
You checked your DWC bucket this morning and your stomach dropped. The roots that were pearly white last week now hang in brown, slimy ropes. The leaves above have started curling downward. Your reservoir smells like a swamp. You're dealing with cannabis root rot in hydroponics—the single most common reason growers abandon hydro altogether.
But here's what the panic posts on Reddit won't tell you: root rot is almost always fixable if you catch it before the plant collapses, and it's entirely preventable once you understand the cause chain. In over 15 years of cannabis cultivation across DWC, RDWC, and NFT systems, we've rescued dozens of plants from what looked like certain death.
This guide is the standalone diagnostic and treatment resource that hydroponic growers have been asking for. We'll walk you through exactly what's happening beneath your net pot—and how to fix it.
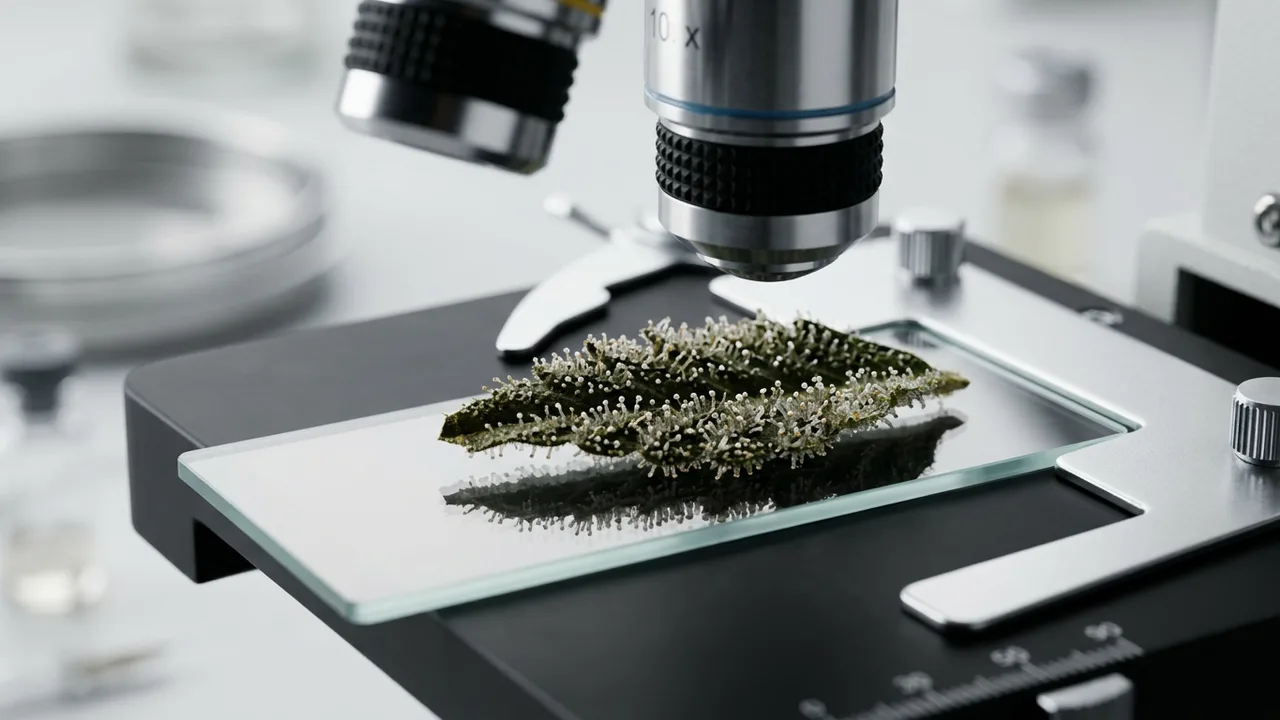
What Healthy Cannabis Roots Actually Look Like
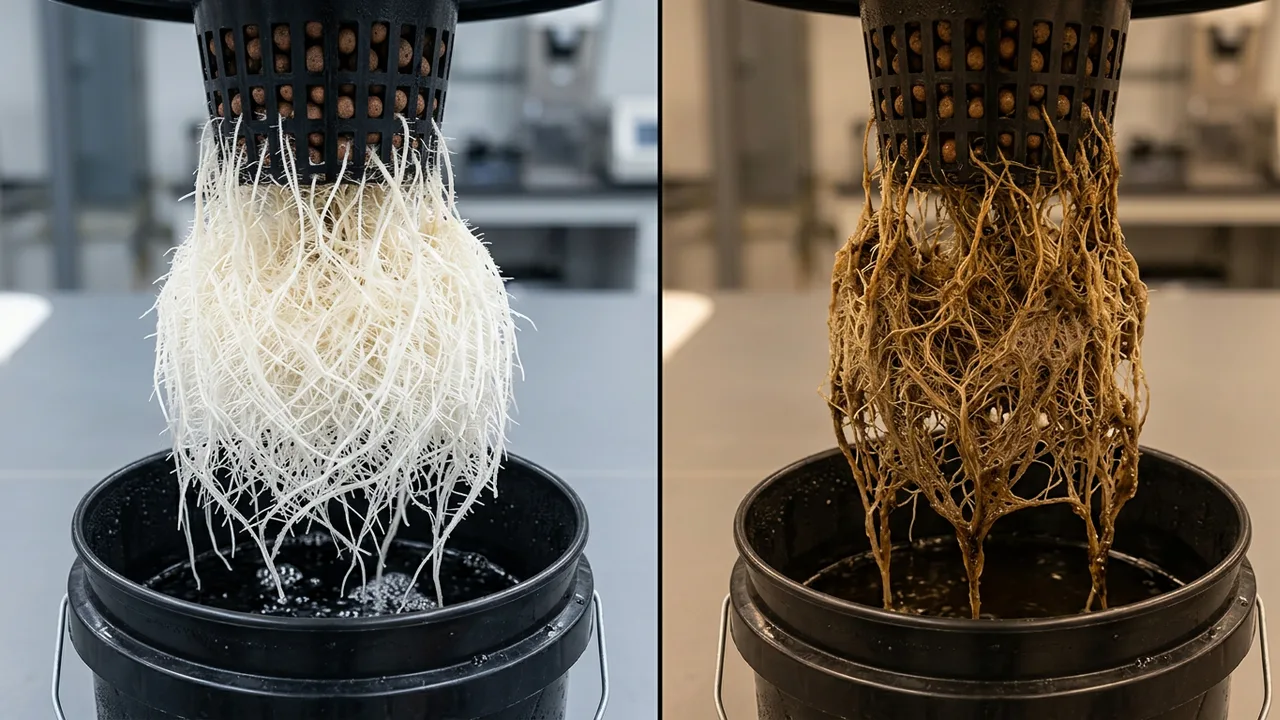
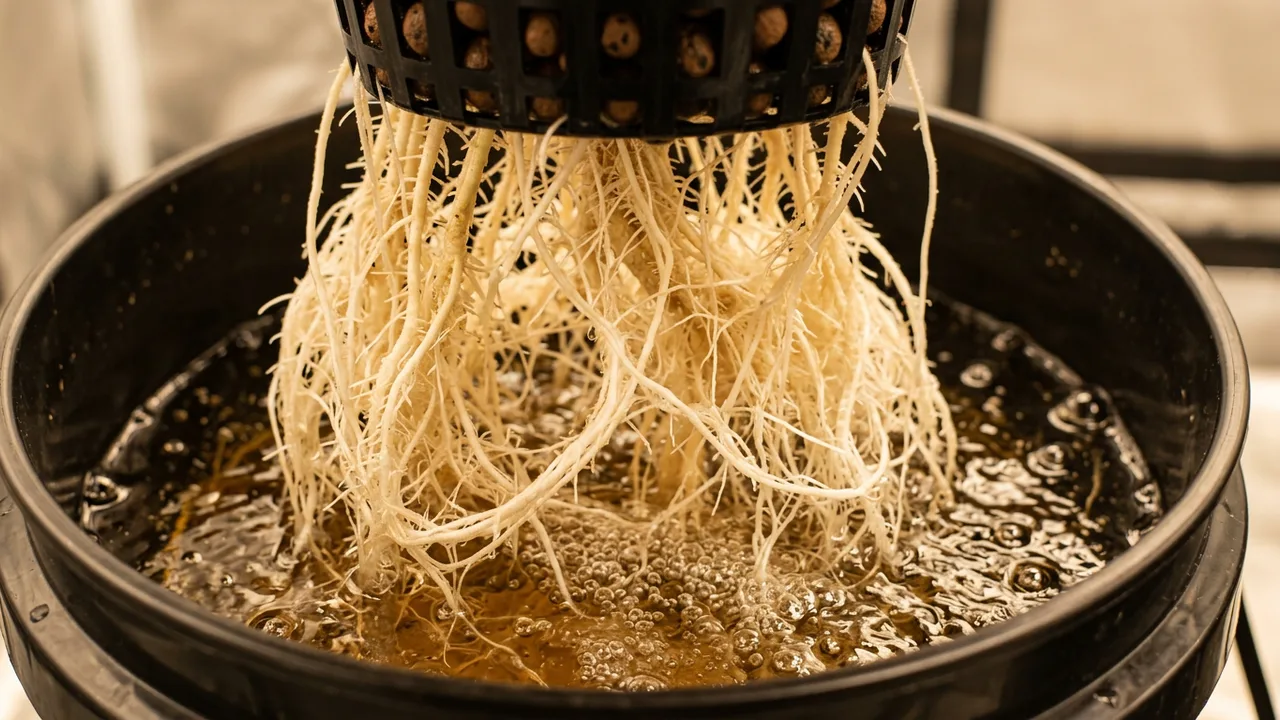
Healthy hydroponic cannabis roots are bright white to cream-colored, firm to the touch, and smell clean—almost earthy. Knowing what "normal" looks like is the first step to catching problems early.
In a thriving DWC system, you'll see three distinct root zones:
- Upper roots (air zone): Dense and slightly fuzzy with fine root hairs, sitting in the humid air gap above the water line
- Splash zone: Where bubbles from your airstone keep roots perpetually misted—these roots are typically the thickest and most vigorous
- Submerged roots: Smooth and white, spreading freely through the nutrient solution
A few things that look alarming but are perfectly normal:
- Light tan or yellowish tint after adding nutrients—some formulas (especially those with fulvic acid or kelp) stain roots without causing harm
- Slight browning at the very tips of older roots during late flower—natural senescence, not infection
- Root-bound clustering near the airstone—roots grow toward oxygen, and this is a sign of good aeration
The smell test never lies. Gently cup a handful of roots and sniff. Healthy roots smell like nothing or faintly earthy. Any sour, swampy, or rotten odor—even if roots still appear white—means anaerobic bacteria are colonizing. Act immediately.
If you're new to hydroponic growing and want a complete system overview, our hydroponics growing guide covers setup fundamentals. This article focuses specifically on the root health challenges that guide introduces but doesn't fully address.
The Cause Chain: How Root Rot Takes Hold in Hydroponics
Cannabis root rot in DWC follows a predictable chain reaction: warm water leads to low oxygen, which invites anaerobic bacteria, which opens the door to Pythium and other pathogens. Break any link and the chain fails.
Understanding this cause chain is what separates growers who panic from growers who prevent. Here's exactly how it unfolds:
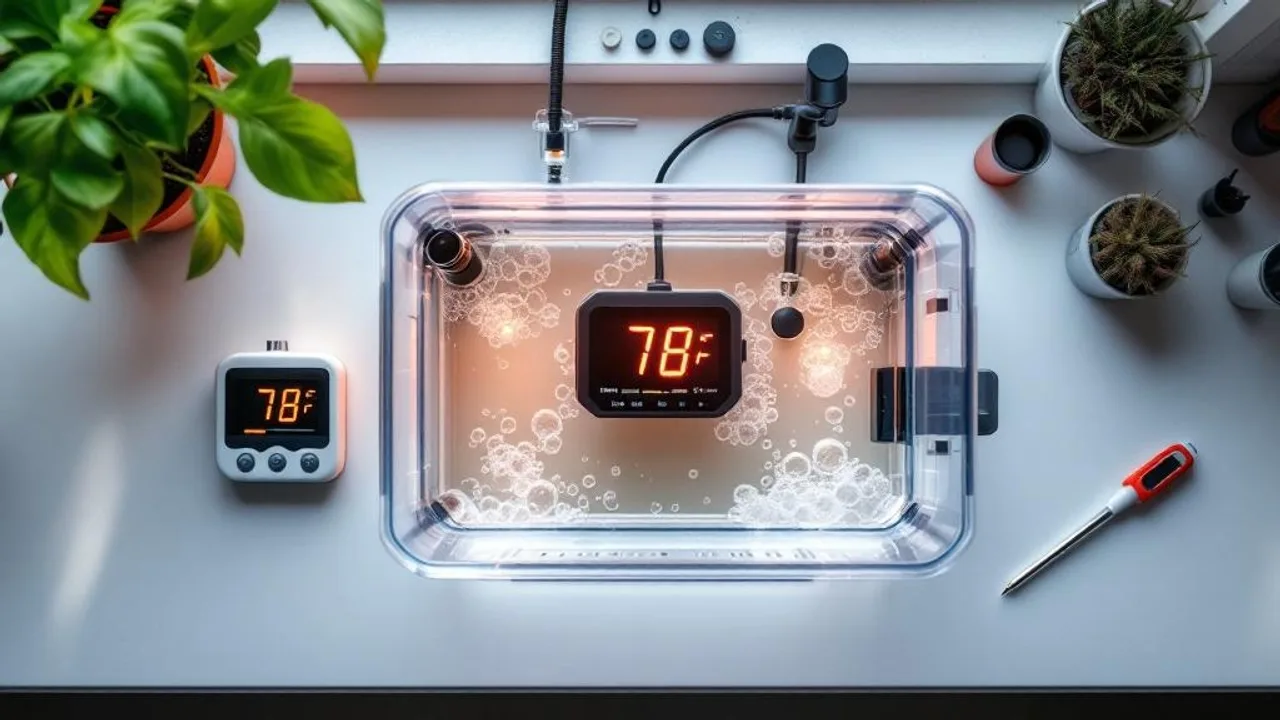
Link 1: Reservoir Temperature Rises Above 68°F
Water's ability to hold dissolved oxygen drops sharply as temperature rises. At 60°F, water can hold approximately 10.1 mg/L of dissolved oxygen. At 72°F, that drops to about 8.4 mg/L. At 80°F—common in grow tents during summer—it plunges to roughly 7.6 mg/L.
As detailed in GrowWeedEasy's comprehensive root rot guide, temperatures in the reservoir ideally stay at or below 72°F (22°C), but the safest range is 60–68°F. Their case study documents how a heat wave pushing grow space temperatures to 85°F triggered a severe root rot outbreak that was ultimately reversed by addressing temperature first.
Link 2: Dissolved Oxygen Crashes
Cannabis roots are oxygen-hungry organs. In hydro, they depend entirely on dissolved oxygen (DO) in the nutrient solution and the air gap above the water line. When DO drops below 5 mg/L, roots become stressed. Below 4 mg/L, aerobic biological processes stall.
Science note: Research suggests that Pythium species—classified as parasitic oomycetes rather than true fungi, with over 100 identified species according to Royal Queen Seeds' research blog—thrive in low-oxygen, warm-water environments. They're opportunistic: healthy, well-oxygenated roots resist colonization. Stressed, oxygen-starved roots cannot.
Link 3: Anaerobic Bacteria Colonize
With oxygen levels low, anaerobic bacteria begin outcompeting beneficial aerobic microbes. These organisms produce the slimy biofilm that coats roots and reservoir walls. This biofilm further reduces oxygen exchange at the root surface, creating a feedback loop.
Link 4: Pythium and Pathogens Move In
The weakened, oxygen-deprived root tissue is now defenseless. Pythium zoospores—which are present in most water sources at low levels—find ideal conditions to germinate and penetrate root cells. Infection spreads rapidly through the root mass and, as noted by Trifecta Natural, spores can travel through the water to infect every plant sharing a reservoir.
Shared reservoirs multiply risk. In RDWC and flood-and-drain systems, one infected plant can spread Pythium to every connected plant within 24–48 hours. If you run a shared system, quarantine and treat at the first sign of browning.
Environmental monitoring is critical here. Use our VPD calculator to dial in grow room conditions that keep both canopy and reservoir temperatures in safe ranges.
Root Health Diagnosis Table: Symptom, Cause, and Fix
Use this diagnostic table to identify your exact root problem and its solution. Not all brown roots mean Pythium—nutrient staining, pH damage, and biofilm each require different responses.
| Symptom | Root Appearance | Smell | Most Likely Cause | Fix |
|---|---|---|---|---|
| Slight tan or amber tint, plant healthy | Firm, flexible, uniform color | None | Nutrient staining (especially from organics, fulvic acid, or kelp) | No action needed; rinse roots at reservoir change to confirm firmness |
| Brown tips on older roots only, plant healthy | Tips soft, main roots firm and white | None | Natural root senescence (late flower) or minor pH shock | Trim dead tips; verify pH stays 5.5–6.5 |
| Slimy coating on roots, slight off-smell | Translucent slime layer, roots still mostly firm underneath | Mild musty odor | Biofilm / bacterial slime (not yet Pythium) | H₂O₂ flush, increase aeration, lower reservoir temp, reintroduce beneficial bacteria |
| Brown, mushy roots; drooping leaves above | Soft, easily breaks apart, twisted masses | Strong rotten or swampy odor | Active Pythium / root rot infection | Full emergency protocol: prune dead roots, H₂O₂ flush, reservoir sterilization, beneficial bacteria reset |
| Dark brown/black root mass, severe wilting, yellowing | Disintegrates when touched | Intense decay smell | Advanced Pythium; plant may be beyond saving | Assess remaining viable roots. If less than 20% white tissue remains, consider starting fresh |
| Green slime on roots and reservoir walls | Roots may still be white beneath green coating | Algae smell (pond-like) | Light leak in reservoir allowing algae growth | Seal all light leaks; clean reservoir; wrap containers in reflective material |
| Rust-colored roots, crispy texture | Stiff and brittle rather than soft | None or slight chemical smell | Severe pH crash (below 4.5) or chemical burn from concentrated nutrients | Flush with pH-balanced water; check and calibrate pH meter; use our nutrient calculator to verify dosing |
The texture test matters more than color. Gently squeeze a root between your fingers. Healthy roots feel firm and springy. Rotting roots feel mushy and collapse. Stained-but-healthy roots feel firm. This single test distinguishes harmless staining from active infection.
Biofilm and Slime vs True Pythium: Know the Difference

Biofilm is a bacterial slime layer that coats roots and reservoir surfaces. It's a precursor to full Pythium infection—not the same disease—and treating it early prevents the worst-case scenario.
Many growers on r/microgrowery post photos of slimy roots and immediately assume Pythium. But biofilm and Pythium are distinct problems with different organisms, timelines, and treatment urgency:
Biofilm (Bacterial Slime)
- What it is: A colony of anaerobic and facultative bacteria that secrete a polysaccharide matrix—the "slime" you see and feel
- Appearance: Translucent to milky white coating on roots; roots underneath may still be firm and viable
- Smell: Mild musty or stale odor, not the intense rot smell of Pythium
- Speed: Develops over days to a week in warm, poorly oxygenated water
- Danger level: Moderate—it reduces oxygen exchange at root surfaces and creates conditions for Pythium to establish
True Pythium Infection
- What it is: Colonization by parasitic oomycetes (Pythium spp.) that actively digest root tissue
- Appearance: Roots turn brown to dark brown, become mushy and soft, twist together in matted clumps
- Smell: Strong rotting or swamp-like odor
- Speed: Can devastate a root system in 48–72 hours once established
- Danger level: Severe—left untreated, it kills the plant and spreads to any connected plants
Catch it at the biofilm stage. If you notice slime but roots still feel firm underneath, you've caught the problem at its most treatable point. Address temperature and aeration immediately, and you may prevent Pythium entirely without needing a hydrogen peroxide flush.
The 5-Step Emergency Treatment Protocol for Active Root Rot
When root rot is confirmed—brown mushy roots with a foul smell—follow this emergency protocol immediately. Speed matters: every hour of delay allows the infection to destroy more root tissue.
Remove, Inspect, and Prune
Lift the plant from the reservoir and gently spread the root mass under running lukewarm water. Using sterilized scissors, cut away all brown, mushy, or slimy root material until you reach firm white tissue. Don't be timid—leaving infected material behind reinfects the system. Sterilize scissors with isopropyl alcohol between cuts.
Sterilize the Reservoir
Drain the reservoir completely. Scrub all interior surfaces with a 3% hydrogen peroxide solution using a clean sponge, as recommended by Royal Queen Seeds' Pythium treatment guide. Rinse thoroughly. Replace airstones—they're cheap and harbor bacteria in their porous surfaces. Clean all tubing and fittings.
Hydrogen Peroxide Root Soak
Prepare a solution of 3% hydrogen peroxide at 3 ml per liter (roughly 2.5 teaspoons per gallon) of water. Submerge the pruned roots in this solution for 3–5 minutes. This kills remaining pathogens on root surfaces. Do not exceed concentration or soak time—H₂O₂ damages healthy tissue at higher doses.
Refill with Fresh, Cool Solution
Fill the sterilized reservoir with fresh, pH-balanced nutrient solution at half the normal concentration. Ensure water temperature is 60–68°F. Lower the water level 2–3 inches below the net pot to create an oxygen-rich air gap, similar to an aeroponic environment. GrowWeedEasy's recovery case study found this air gap technique critical for helping damaged roots access oxygen directly.
Introduce Beneficial Bacteria (After 4–6 Hours)
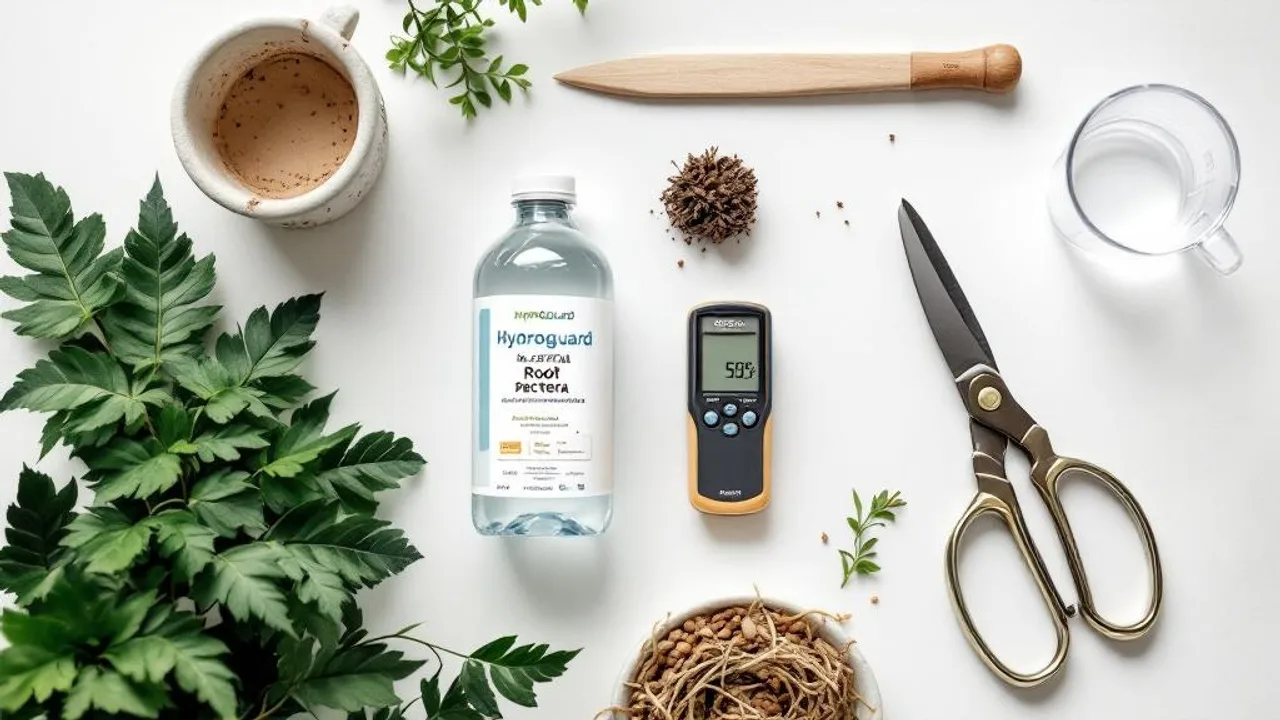
Wait at least 4–6 hours after any hydrogen peroxide treatment before adding beneficial bacteria. The H₂O₂ needs time to fully break down (it decomposes into water and oxygen). Then add a product like Hydroguard, SLF-100, or Mammoth P at the manufacturer's recommended dose. These beneficial microbes colonize root surfaces and outcompete pathogens.
Do not skip the waiting period between H₂O₂ and beneficial bacteria. Hydrogen peroxide is indiscriminate—it kills beneficial organisms just as effectively as harmful ones. Adding Hydroguard into a reservoir still containing active H₂O₂ wastes your inoculant entirely.
Hydrogen Peroxide Treatment: Concentrations, Timing, and Limits
Hydrogen peroxide (H₂O₂) is the most widely used emergency treatment for cannabis root rot in hydroponics. It works by releasing a reactive oxygen atom that destroys cell membranes of bacteria, fungi, and oomycetes on contact.
But H₂O₂ is a blunt instrument. It sterilizes everything—good and bad—and provides zero residual protection once it decomposes. Here's how to use it correctly:
Concentration Guide
| H₂O₂ Strength | Application | Dose per Gallon of Reservoir Water | Notes |
|---|---|---|---|
| 3% (drugstore grade) | Root soak (emergency) | 2.5 teaspoons direct soak for 3–5 min | For dipping pruned roots before returning to clean reservoir |
| 3% (drugstore grade) | Reservoir treatment (mild biofilm) | 3 ml per liter (~2 tsp per gallon) | Add directly to reservoir; replace solution after 4–6 hours |
| 29% (food-grade concentrate) | Reservoir treatment (active rot) | 2–3 ml per gallon (diluted into reservoir) | Wear gloves; causes chemical burns at this concentration. Dilute carefully |
| Any strength | Surface sterilization | Wipe surfaces with 3% solution undiluted | For cleaning empty reservoirs, lids, and equipment |
Never use 29% food-grade hydrogen peroxide undiluted on roots or skin. It causes severe chemical burns. Always dilute to working concentration before any plant contact. Wear nitrile gloves and eye protection when handling concentrated H₂O₂.
Critical Limitations of H₂O₂
- No residual protection: H₂O₂ decomposes into water and oxygen within 4–24 hours depending on temperature and organic load. Once gone, roots are unprotected
- Kills beneficials: Any beneficial bacteria colonies you've built are destroyed. You must reinoculate
- Doesn't fix the cause: If your reservoir temperature is still 78°F after treatment, rot will return within days
- Repeated use stresses plants: Using H₂O₂ more than twice in a single grow cycle can stunt growth and damage healthy root tissue
As GrowWeedEasy's case study author reflected, their first attempt at fighting root rot years earlier failed precisely because they used hydrogen peroxide without addressing the underlying temperature and aeration problems. The H₂O₂ bought time, but the rot kept returning.
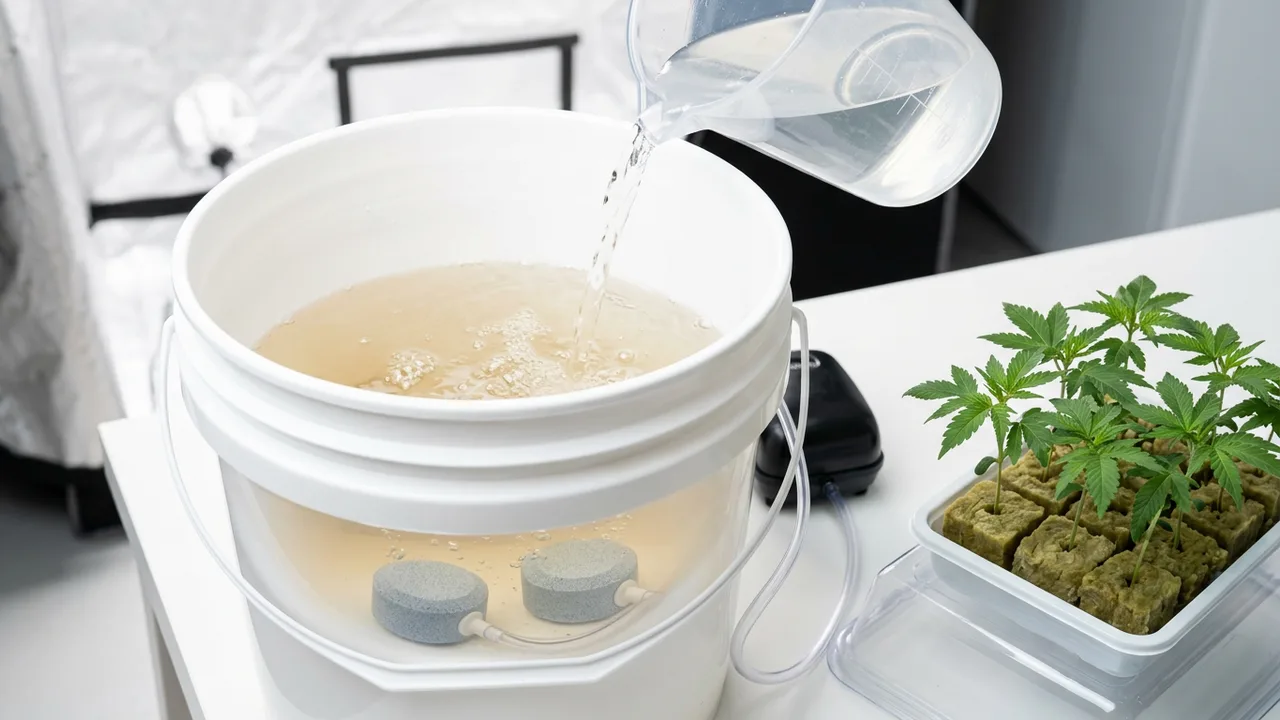
Beneficial Bacteria: Your Long-Term Root Defense System
While hydrogen peroxide is emergency medicine, beneficial bacteria are the immune system. Inoculating your reservoir with the right microbial communities creates a living defense that outcompetes pathogens 24/7.
Here are the most proven products for cannabis root health in hydroponics, based on widespread grower reports and our own testing:
Top Beneficial Bacteria Products for Cannabis Hydroponics
- Hydroguard (Botanicare): Contains Bacillus amyloliquefaciens. The most recommended product on hydro forums for a reason—it's specifically formulated for recirculating systems. Effective even at slightly elevated temperatures (up to 75°F according to grower reports documented by GrowWeedEasy)
- SLF-100: An enzymatic cleaner that breaks down dead root material and organic buildup. Works synergistically with Hydroguard rather than replacing it
- Mammoth P: Primarily a phosphorus-liberating microbial product, but its bacterial consortium also contributes to root zone health. Most beneficial during flower
- Great White (Plant Revolution): Contains mycorrhizal fungi and beneficial bacteria. Best applied at transplant—less effective in pure DWC where roots are submerged
Choose one strategy: sterile or living. You cannot run hydrogen peroxide continuously AND maintain beneficial bacteria colonies. Most experienced hydro growers choose the living (beneficial bacteria) approach for prevention and reserve H₂O₂ strictly for emergency intervention. Pick a lane and commit.
How Beneficial Bacteria Protect Roots
Beneficial microbes defend cannabis roots through three mechanisms:
- Competitive exclusion: They physically occupy root surface sites that pathogens would otherwise colonize
- Antibiotic production: Many Bacillus species produce natural antimicrobial compounds that inhibit Pythium growth. Early research referenced by Royal Queen Seeds suggests both aerated and non-aerated compost teas can inhibit mycelial growth of certain Pythium species through similar mechanisms
- Biofilm competition: Beneficial bacteria form their own thin, healthy biofilm that prevents pathogenic biofilm from establishing
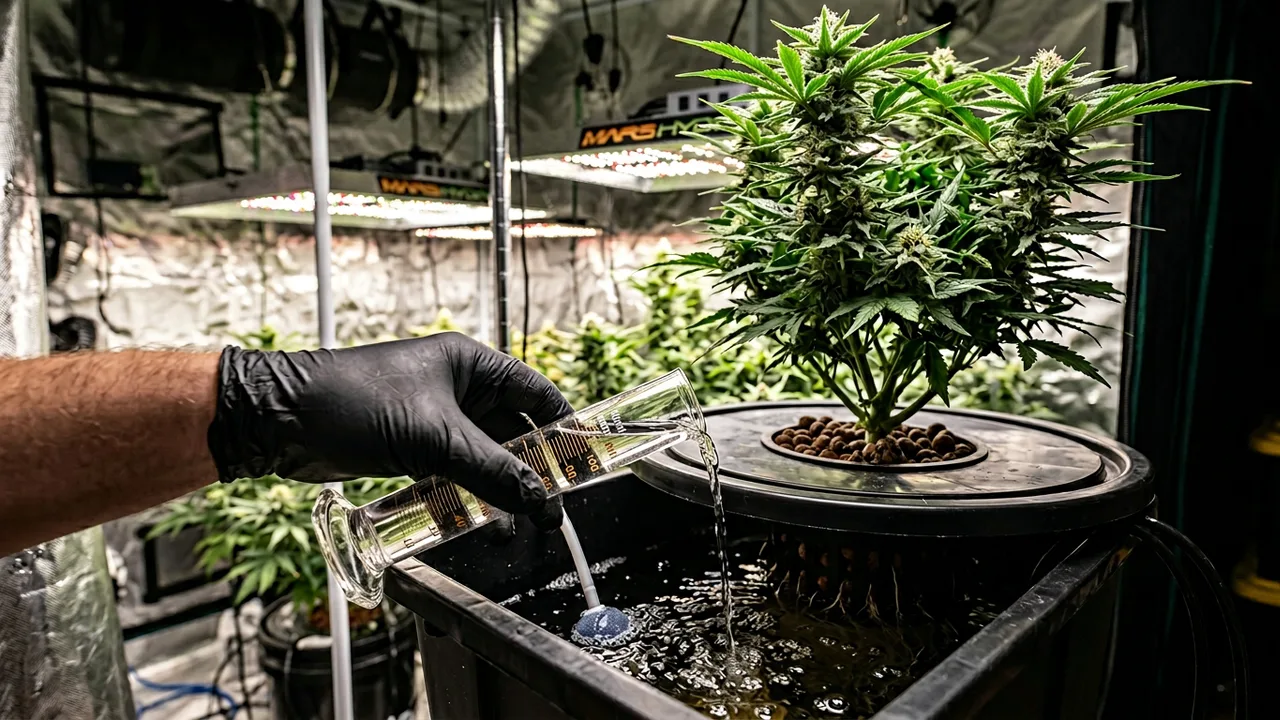
For the best results, add beneficial bacteria at every reservoir change (every 7–10 days, as recommended across multiple cultivation resources) to maintain colony strength.
Prevention Framework: Stop Root Rot Before It Starts
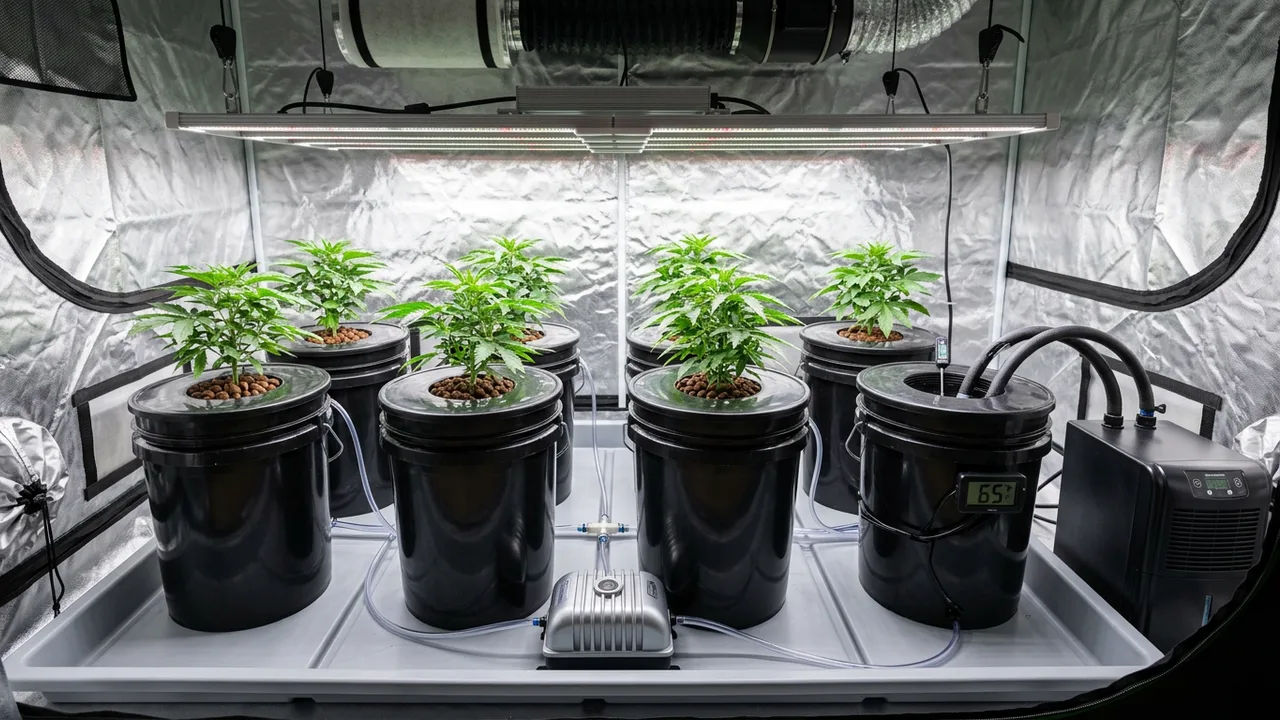
Prevention is dramatically easier than treatment. A properly configured hydroponic system with controlled temperature, adequate aeration, light exclusion, and microbial inoculation will never develop root rot. Here's the complete framework.
Temperature Management (The #1 Factor)
- Keep reservoir water between 60–68°F (15–20°C) at all times
- Use an aquarium chiller for grow rooms that exceed 75°F ambient
- Frozen water bottles work as a budget stopgap—rotate 2-liter bottles in and out of a freezer
- Insulate reservoirs with reflective bubble wrap or neoprene sleeves
- Run lights during cooler nighttime hours if heat is an ongoing issue
- Consider switching from 24/0 to 18/6 during heat waves to reduce thermal load (as documented in GrowWeedEasy's recovery case study)
Dissolved Oxygen Optimization
- Target 5.5+ mg/L dissolved oxygen—8+ mg/L is ideal
- Use an air pump rated for at least twice your reservoir volume
- Run multiple small airstones rather than one large one for better bubble distribution
- Maintain a 1–2 inch air gap between water surface and net pot base
- Replace airstones monthly—mineral buildup reduces output over time
- Consider a dissolved oxygen meter ($40–80) for precise monitoring
Light Exclusion
- Use only opaque, dark-colored reservoirs—never translucent or thin white plastic
- Seal every opening around net pots, airlines, and fill ports
- Wrap any suspect containers in black-and-white poly film (white side out to reflect heat)
- Check for light leaks by placing a flashlight inside the sealed reservoir in a dark room
As noted in the Hey abby treatment guide, water temperatures that drop below 60°F can also stress roots—so don't overcorrect. The 60–68°F window balances dissolved oxygen, root metabolism, and nutrient uptake.
Reservoir Hygiene
- Change reservoir water every 7–10 days—critical during flower when plants are most sensitive to pH and nutrient fluctuations
- Sterilize all equipment between grows with 3% hydrogen peroxide or a 10% bleach solution (rinse thoroughly)
- Never reuse airstones from a previous grow that experienced root issues
- Keep nutrients, pH adjusters, and measuring tools clean and organized
The 68°F rule: If you do nothing else from this entire article, keep your reservoir water at or below 68°F. This single action prevents the majority of root rot cases in DWC cannabis grows. Everything else is secondary to temperature control.
Pair reservoir management with proper environmental control throughout your grow space. Our VPD guide for 2026 explains how to optimize temperature and humidity relationships that affect both canopy health and reservoir temperatures. And for mold and pathogen prevention above the root zone, our cannabis mold prevention guide covers airflow and humidity strategies that complement root health management.
When to Cut Your Losses: Signs a Plant Cannot Be Saved
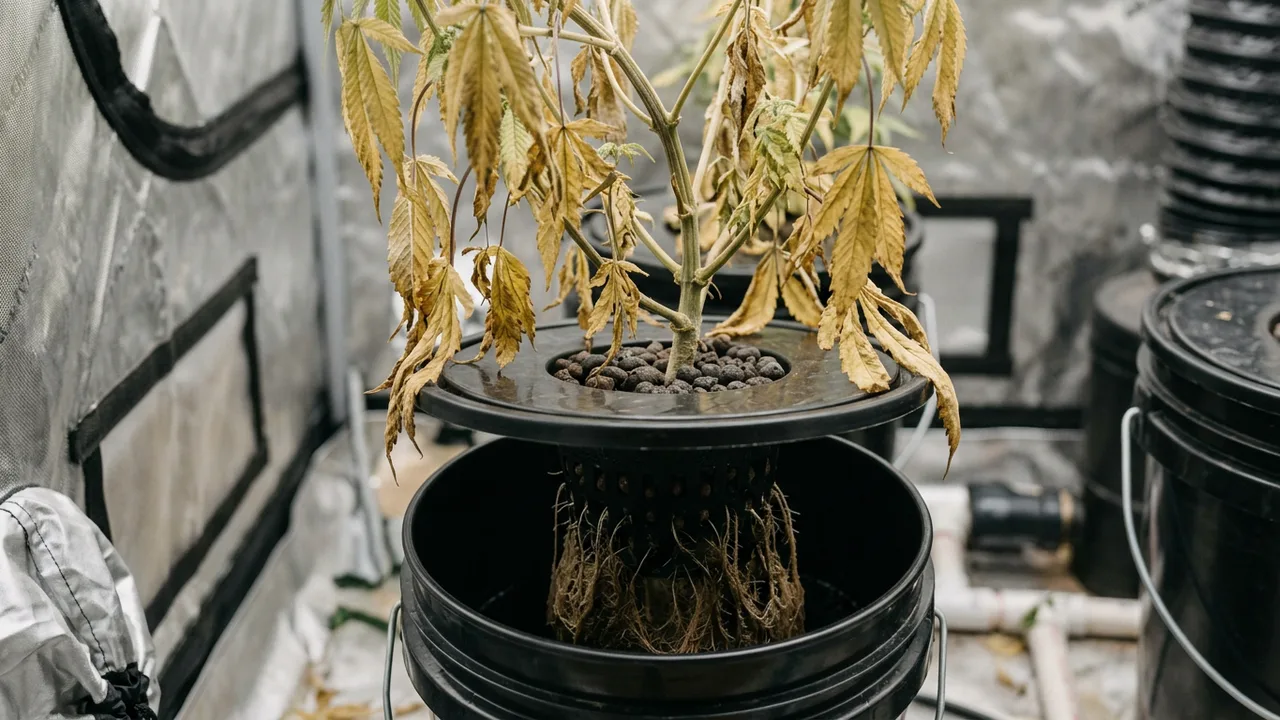
Not every plant can be rescued. Knowing when to stop fighting root rot and start fresh saves weeks of wasted time, nutrients, and electricity—and protects healthy plants in your grow space from ongoing pathogen exposure.
A plant is likely beyond saving when:
- Less than 20% of the root mass is still white and firm—there simply isn't enough functional root tissue to support recovery
- The main stem base (crown) is soft or mushy—infection has moved above the root zone into the stem itself
- The plant has been severely wilted for 48+ hours despite treatment—prolonged wilt indicates vascular damage that won't reverse
- You're in late flower (week 5+)—the plant lacks the vegetative energy to regrow roots while simultaneously finishing buds. Even if it survives, yield and quality will be drastically compromised
- Multiple treatment attempts have failed—if rot returns within days of a full protocol treatment, the reservoir environment likely has a systemic issue (cracked container, persistent light leak, unchillable water temperature) that must be solved before any plant can thrive
Removing a dead or dying plant quickly is as important as treating a sick one. A rotting root mass in a shared reservoir is a pathogen factory. If you're running RDWC, disconnect the affected site immediately.
Starting Fresh After Root Rot: Reset Protocol and Strain Selection
If root rot claims a plant—or you just want a clean start—a proper reset protocol ensures the next round doesn't inherit the last one's problems. Follow these steps before dropping new seeds or clones into any system that experienced root rot.
Full System Sterilization Protocol
- Drain and disassemble the entire system—reservoirs, tubing, air lines, net pots, everything
- Scrub all components with a 3% hydrogen peroxide solution. Royal Queen Seeds recommends wiping every square inch of the reservoir and external grow trays with a soft sponge
- Soak tubing and small fittings in hydrogen peroxide or 10% bleach solution for 30 minutes
- Replace airstones, drip rings, and any porous components that can't be fully sterilized
- Rinse everything thoroughly with clean water before reassembly
- Run the system with sterilizing solution only (no plants) for 24 hours before draining and refilling with fresh nutrient solution
Choosing Resilient Strains for Hydro
While no cannabis strain is immune to Pythium, some genetics handle hydroponic stress better than others. Vigorous, robust rooters with strong vegetative growth recover faster from environmental setbacks and resist root zone problems more effectively.
For growers resetting after a root rot battle, we recommend proven hydro performers with vigorous root systems:
- White Widow—legendary resilience and aggressive root growth make this a forgiving choice for DWC. Our White Widow feminized seeds deliver up to 25% THC with rock-solid hydro performance
- Northern Lights—one of the most forgiving indicas ever bred, with compact growth ideal for controlled environments. Try our Northern Lights x Big Bud feminized seeds for 20% THC yields that reward even imperfect conditions
- Blue Dream—a hydro favorite for its explosive vegetative growth and resilient root system. Widely available from multiple breeders
- OG Kush—thrives in DWC when conditions are dialed in, producing dense, potent flowers up to 26% THC. Available as OG Kush feminized seeds
- Gorilla Glue (GG4)—known for vigorous, almost aggressive growth that quickly fills reservoirs with thick root mass
- Super Skunk—bred for resilience and consistency, making it an excellent reset strain. Our Super Skunk feminized seeds produce reliable 20% THC harvests
Starting fresh with quality genetics gives you the best possible foundation. We stand behind every seed we ship with our germination guarantee, so you're not risking money on a reset grow. For help selecting strains matched to your specific setup, our grow planner tool can help you map out your next run.
Before you start your fresh grow, make sure your seedling care is dialed in—check our seedling care guide for the critical first two weeks. And if you're considering adjusting your growing medium alongside your reset, our coco coir growing guide offers an alternative that some growers find more forgiving than pure DWC for root health management.
2026 Root Health Checklist: Your Weekly Maintenance Routine
Consistent weekly monitoring catches root problems days before they become emergencies. Print this checklist or save it to your phone—run through it at every reservoir change.
- Reservoir water temperature between 60–68°F
- pH between 5.5–6.5 (calibrate meter monthly)
- Root visual inspection: white/cream, firm, no slime
- Root smell check: neutral or faintly earthy
- Airstone output: vigorous, visible bubble action
- No light penetrating reservoir (check seal points)
- Beneficial bacteria added at recommended dose
- Water level maintaining 1–2 inch air gap below net pot
- Nutrient concentration appropriate for growth stage (use our nutrient calculator)
- All reservoir surfaces free of slime, algae, or buildup
If you catch a problem during your weekly check, use our plant diagnosis tool to cross-reference above-ground symptoms with potential root zone issues. Early detection is the difference between a 10-minute fix and a week-long battle.
Track your data. Keep a simple log of reservoir temperature, pH, and root condition at each water change. Patterns reveal problems before symptoms appear—if you notice your reservoir temperature creeping up by 2°F per week as summer approaches, you can add cooling before roots ever suffer.
Frequently Asked Questions
Why are my cannabis roots brown in DWC but the plant looks fine?
Early-stage browning often comes from nutrient staining rather than root rot. If roots feel firm (not mushy), have no foul smell, and the plant shows no drooping or leaf symptoms, the discoloration is likely harmless tannin or nutrient stain—especially common with organic-based nutrient lines containing fulvic acid or kelp extracts. Monitor water temperature (keep it 60–68°F) and smell the roots at each reservoir change. If they stay firm and odorless, you're fine.
Can I use hydrogen peroxide and beneficial bacteria at the same time?
No—this is one of the most common mistakes in DWC cannabis growing. Hydrogen peroxide is a broad-spectrum sterilizer that destroys all microorganisms, including the beneficial bacteria you're trying to establish. Use them sequentially: flush with hydrogen peroxide first, allow 4–6 hours for it to decompose fully, then drain and replace the reservoir with fresh solution before introducing beneficial bacteria like Hydroguard. Running both simultaneously wastes the bacterial product entirely.
How long does it take for cannabis to recover from root rot in DWC?
With proper treatment—root pruning, hydrogen peroxide flush, temperature correction, and beneficial bacteria reintroduction—most plants show visible improvement within 3–5 days. New white root tips typically appear within 7–10 days. Full recovery to vigorous growth usually takes 2–3 weeks depending on severity. Plants in early vegetative growth recover significantly faster than those already in flower.
What water temperature prevents root rot in hydroponic cannabis?
Maintain reservoir water between 60–68°F (15–20°C) for optimal dissolved oxygen levels and minimal pathogen risk. Temperatures above 72°F dramatically increase susceptibility to Pythium and anaerobic bacteria. Use an aquarium chiller, frozen water bottles, or insulated reservoirs to maintain this range. Avoid overcooling below 58°F, which can shock roots and slow nutrient uptake.
Is Hydroguard or hydrogen peroxide better for preventing cannabis root rot?
For ongoing prevention, beneficial bacteria products like Hydroguard are clearly superior. They provide continuous, living protection by colonizing root surfaces and actively outcompeting pathogens around the clock. Hydrogen peroxide provides temporary sterilization with zero residual protection—within hours of decomposing, roots are completely undefended again. Most experienced hydro growers use Hydroguard continuously for prevention and reserve hydrogen peroxide exclusively for emergency intervention during active root rot outbreaks.
Sources & References
This article was researched and fact-checked using 3 verified sources including 3 industry sources.
- Cannabis Root Rot - How to Identify & Get Rid of It Quickly! — growweedeasy.com [Industry]
- Case Study: Root Rot Recovery | Grow Weed Easy — growweedeasy.com [Industry]
- How to Spot, Treat and Prevent Cannabis Root Rot (Pythium) – Hey abby — heyabby.com [Industry]


