
Every week on growing forums, someone asks the same question: "Is CO2 supplementation cannabis growers swear by actually worth the money, or is it just hype?" The answer isn't a simple yes or no. It depends entirely on what you've already dialed in — and most guides skip that uncomfortable truth.
In over 15 years of cannabis cultivation, we've seen growers waste hundreds of dollars pumping CO2 into rooms that couldn't use it, and we've seen others add 30% to their harvest weight for under $100 a cycle. The difference? Understanding the science, the prerequisites, and the math. This guide gives you all three — no upselling, no magic claims.
We'll walk through the photosynthesis mechanics, the critical light-intensity threshold most budget guides ignore, every delivery method compared with real costs, a complete setup walkthrough, safety protocols, and an honest ROI analysis by grow size. Let's find out if CO2 belongs in your grow room — or if your money is better spent elsewhere.
The Photosynthesis Engine: How Cannabis Actually Uses CO2
Cannabis plants use CO2 during the Calvin cycle of photosynthesis, combining it with light energy and water to produce glucose (plant fuel) and oxygen. At ambient atmospheric levels — roughly 420 PPM in 2026 — photosynthesis proceeds at a baseline rate limited by this CO2 concentration.
The Calvin Cycle in 60 Seconds
Here's the simplified chain of events inside every cannabis leaf:
- CO2 enters through stomata — microscopic pores on the leaf underside
- The enzyme RuBisCO grabs CO2 molecules and fixes them into a 3-carbon compound
- Light energy (captured by chlorophyll) powers the conversion of that compound into G3P — the building block for glucose, cellulose, and ultimately every gram of bud you harvest
- Oxygen exits as a byproduct through the same stomata
Research suggests that RuBisCO, the key enzyme in carbon fixation, operates at only about 25% efficiency at ambient CO2 levels. Elevating CO2 concentration essentially gives RuBisCO more substrate to work with, pushing the reaction rate closer to its maximum — as detailed in GrowWeedEasy's comprehensive CO2 guide and supported by decades of commercial greenhouse research.
Why 420 PPM Is the Bottleneck
Cannabis photosynthesis follows the principle of limiting factors. Growth is constrained by whichever resource is in shortest supply. At ambient CO2 (roughly 420 PPM), a well-lit, well-fed plant is almost always CO2-limited — meaning the leaves have more light energy available than they can use with the CO2 present.
Research on C3 plants (which includes cannabis) shows that photosynthetic rates increase nearly linearly from 200 PPM up to about 1,000 PPM, then curve sharply, plateauing around 1,200–1,500 PPM. Beyond 1,500 PPM, returns diminish rapidly. At 2,000+ PPM, you're spending money with negligible additional benefit — and creating safety hazards.
The cannabis CO2 PPM levels sweet spot is 1,200–1,500 PPM — roughly 3× ambient levels. Below 1,000 PPM, you're leaving gains on the table. Above 1,500 PPM, you're burning cash for near-zero return and increasing toxicity risk.
The Hard Ceiling: Diminishing Returns Above 1,500 PPM
At extreme concentrations (1,500+ PPM), RuBisCO approaches saturation. Additional CO2 molecules simply cannot be processed faster. Meanwhile, plant stomata begin closing in response to excessive CO2, which paradoxically reduces gas exchange and can slow transpiration. Some growers running 2,000+ PPM report leaf curling and nutrient uptake issues — the plant is essentially choking on an oversupply.
The Oxygen Service Company's cannabis CO2 guide notes that "excessive CO2 levels can create a suffocating environment and hinder plant growth," reinforcing the importance of staying within the productive range.
The Rule Most Growers Break: Why Light Intensity Comes First

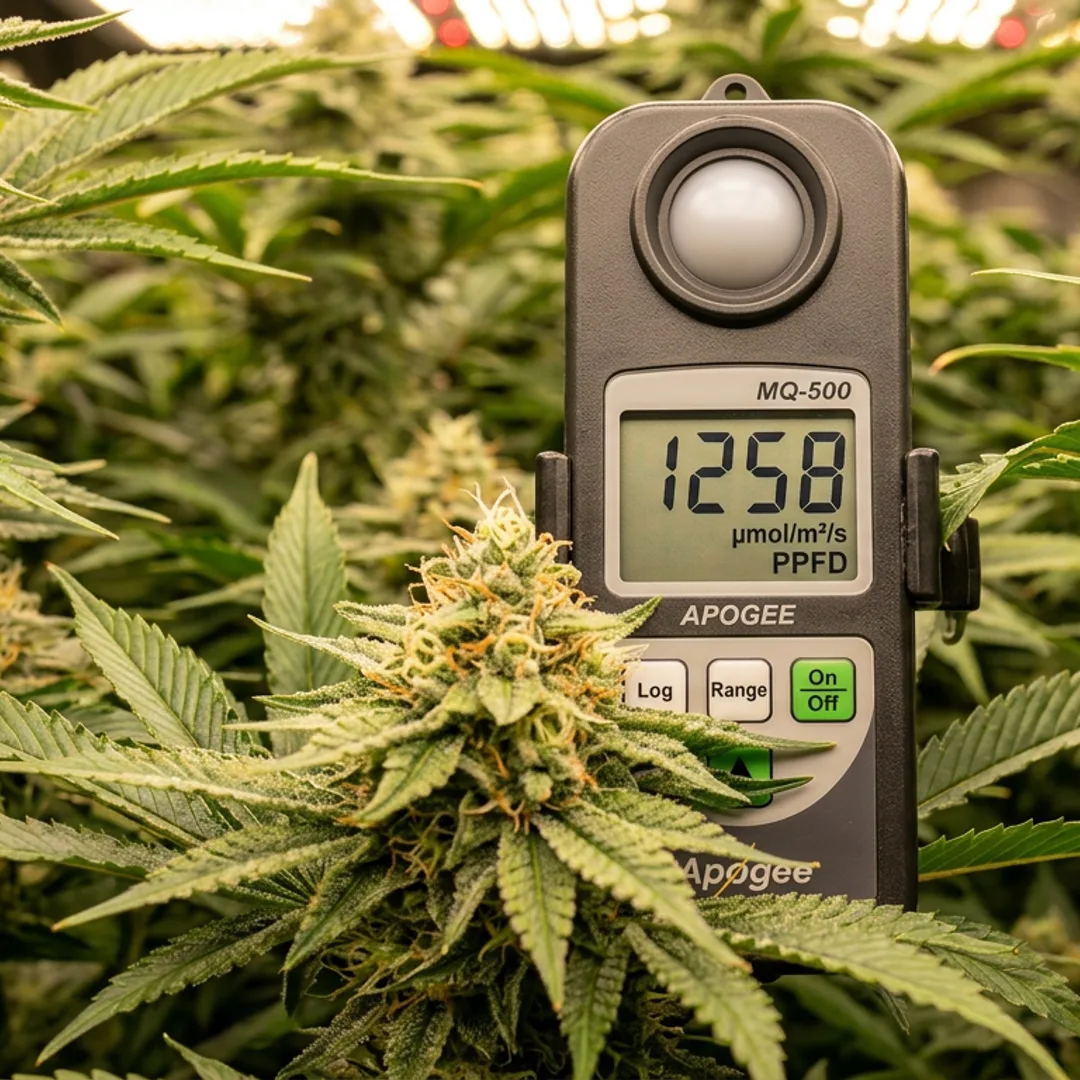
CO2 supplementation only produces meaningful yield gains when light intensity is already high enough for the plant to use extra carbon. If your cannabis plants are receiving less than 600 PPFD at the canopy, adding CO2 is like putting premium fuel in a lawnmower — technically compatible, practically pointless.
The PPFD–CO2 Relationship
This is the single most important concept in CO2 enrichment that budget guides consistently fail to explain. Photosynthesis requires both light energy and CO2. When light is the limiting factor, adding CO2 produces zero additional growth because the plant can't power the Calvin cycle any faster.
Here's the practical threshold breakdown:
- Below 400 PPFD: CO2 enrichment produces negligible results. Your money is far better spent upgrading your light
- 400–600 PPFD: Marginal CO2 benefit possible (5–8%), but upgrading light or dialing in VPD will yield a higher return
- 600–800 PPFD: CO2 begins to show measurable gains at 800–1,000 PPM. Light is now strong enough that CO2 becomes the limiting factor
- 800–1,200 PPFD: The ideal range for CO2 supplementation. Plants can fully capitalize on 1,200–1,500 PPM CO2. This is where 15–30% yield increases become realistic
- 1,200+ PPFD: Maximum photosynthetic throughput with CO2 at 1,500 PPM. Some strains show light stress at this intensity even with elevated CO2
The $300 mistake: We've seen growers spend $300+ on CO2 tanks and controllers while running a 150W blurple LED at 300 PPFD. That money should have gone toward a better light first. Use our light calculator to check your canopy PPFD before investing in CO2.
Temperature: The Third Piece of the Puzzle
CO2 enrichment is significantly more effective at elevated temperatures. As noted in Leafly's growing guide, "when using CO2 your plants can handle a higher average temperature — around 85–90°F." At standard temperatures (72–78°F), the additional metabolic capacity from CO2 isn't fully utilized.
GrowWeedEasy's guide is more specific: "CO2 supplementation is much more effective when the temperature is above 85°F (27°C). Plants need heat in order to perform extra photosynthesis. Adding CO2 to a cold grow room won't have dramatic results."
This creates a synergistic setup checklist — all three must be present:
- Light: 800+ PPFD at canopy
- CO2: 1,200–1,500 PPM
- Temperature: 82–88°F (28–31°C)
- Humidity: Below 60% RH (essential in sealed rooms)
- Nutrition: Increased feeding to match faster metabolism
For help managing the interplay between temperature and humidity, see our VPD guide and use our VPD calculator to find target ranges at higher temperatures.
CO2 Delivery Methods Compared: Bags, Tanks, Burners and DIY

There are five main ways to add CO2 to a cannabis grow room, ranging from $15 fermentation bags to $500+ burner setups. Each has a specific use case — and most are wrong for small home growers. Here's how they compare on the metrics that actually matter: cost, control, output, and practicality.
| Method | PPM Boost | Setup Cost | Monthly Cost | Control Level | Best For |
|---|---|---|---|---|---|
| CO2 Bags (fermentation) | 50–200 PPM | $0 | $20–40 | None | Micro grows, supplementing sealed spaces under 3×3 |
| Vinegar + Baking Soda DIY | 20–100 PPM | $10–30 | $10–20 | Minimal | Experimentation only — not recommended for serious grows |
| Compressed CO2 Tank + Regulator | Up to 1,500 PPM | $150–300 | $20–50 (refills) | Precise (with controller) | 4×4 to 4×8 tents — the gold standard for home grows |
| Propane/Natural Gas Burner | Up to 1,500+ PPM | $250–500 | $30–80 (fuel) | Good (with controller) | Large rooms (10×10+), commercial operations |
| CO2 Controller + Sensor | N/A (monitors) | $100–400 | $0 | Essential add-on | Required for tank or burner setups; useless without emitter |
CO2 Bags: Cheap but Nearly Useless
Fermentation-based CO2 bags use mycelium or yeast cultures to slowly emit CO2. They're affordable ($20–40 per bag, lasting 4–8 weeks) but produce a trickle of gas — typically raising ambient levels by only 50–200 PPM in an extremely well-sealed, small space.
In a standard 4×4 tent with any ventilation running, CO2 bags produce no measurable PPM increase. As Zamnesia's DIY CO2 guide notes, fermentation methods work only "if other factors are also met" — and in practice, those factors (sealed space, no ventilation, high light) are rarely present in beginner setups where bags are most popular.
Honest take: CO2 bags are the most purchased and least effective CO2 product in cannabis growing. If you're spending $30/month on bags, save that money for 3–4 months and buy a compressed tank with regulator instead. The bags belong in a closet-sized grow at best.
Vinegar + Baking Soda DIY: Fun Science, Bad Growing
The classic acid-base reaction (acetic acid + sodium bicarbonate → CO2 + water + sodium acetate) produces a brief burst of CO2. It's impossible to control output, concentration, or timing. The reaction exhausts in minutes, meaning you'd need to drip vinegar continuously — creating a mess and inconsistent PPM levels.
We don't recommend this for any grower expecting measurable results. It's a fun chemistry demo, not a cultivation tool.
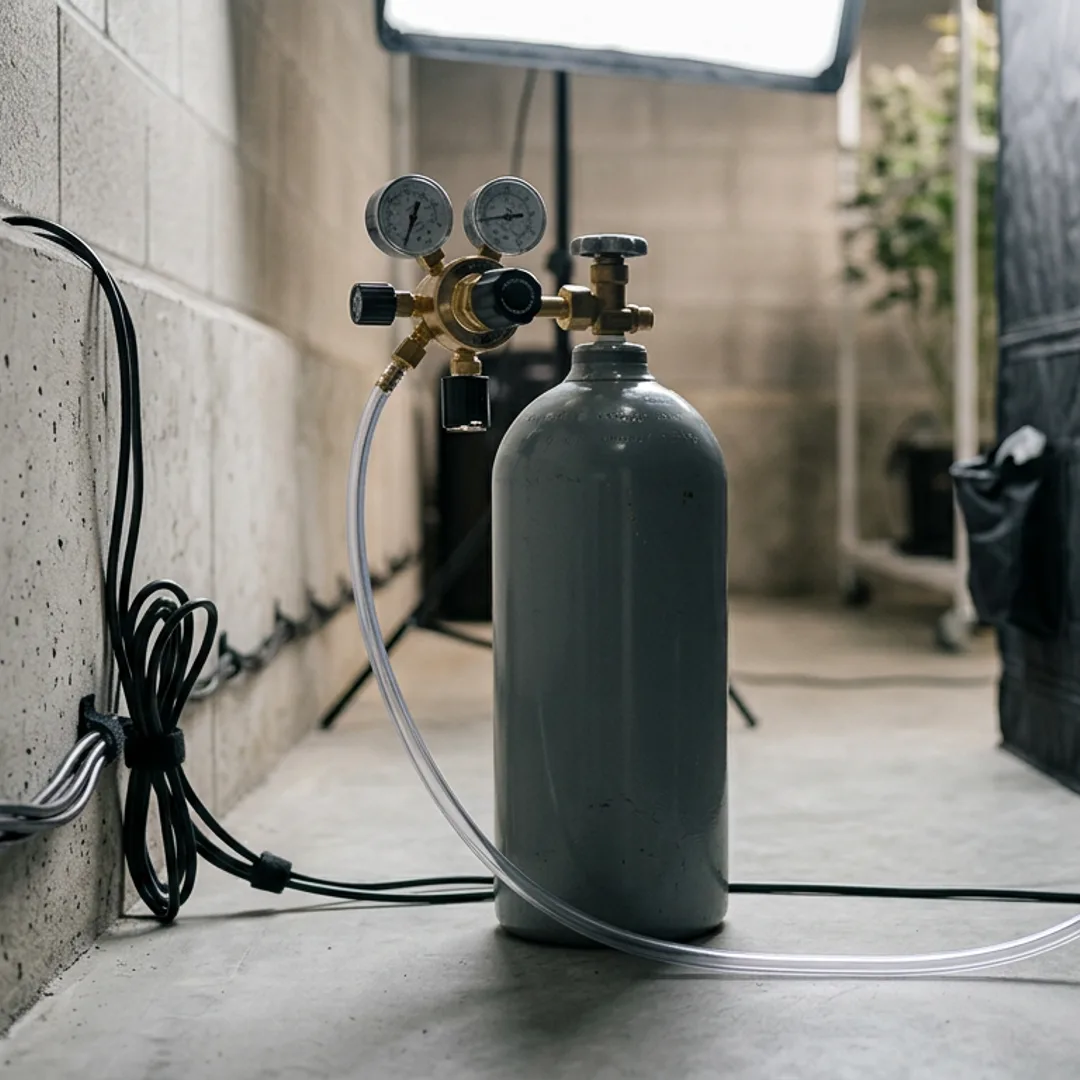
Compressed CO2 Tanks: The Home Grower's Best Option
A 20-lb or 50-lb compressed CO2 tank paired with a solenoid regulator and a CO2 controller gives you precise, repeatable PPM control with no heat, no combustion byproducts, and no open flames. This is the method we recommend for the vast majority of home growers running 4×4 to 4×8 tents.
- 20-lb tank: Lasts 2–4 weeks in a sealed 4×4 tent at 1,200 PPM. Refills cost $15–30 at welding supply shops or homebrew stores
- 50-lb tank: Lasts 4–8 weeks. Refills cost $25–50. Better value for 4×8 or larger spaces
- Regulator: $40–80 for a basic solenoid model. Look for adjustable flow rate (0.5–15 CFH)
- CO2 controller: $100–400. Measures ambient PPM via NDIR sensor and opens/closes the solenoid to maintain target. Non-negotiable for serious supplementation
CO2 Generator vs Tank Cannabis: When Burners Make Sense
Propane or natural gas CO2 burners combust fuel to produce CO2. They generate massive output — enough for rooms 10×10 and larger. However, they also produce heat, water vapor, and trace carbon monoxide.
As GrowWeedEasy warns, "even the more advanced CO2 generators that have been specifically built for gardening applications produce dangerous and potentially deadly carbon monoxide." Burners also add significant heat — problematic in spaces already running high-wattage lights — and increase humidity from combustion moisture.
For home growers under 4×8, burners are overkill. They shine in commercial facilities with dedicated HVAC, fire suppression, and CO monitoring systems. If you're debating CO2 generator vs CO2 tank for cannabis grow room use, the tank wins for any tent or small room setup.
Cost Per Grow Cycle: The Numbers Nobody Shows You

A full CO2 supplementation setup costs $250–$700 upfront depending on method, plus $40–$150 per grow cycle in consumables. Here's a transparent breakdown for a standard 4×4 tent running a 10-week flower cycle with a compressed tank system.
First-Cycle Cost Breakdown (4×4 Tent, Tank Method)
Equipment (One-Time)
20-lb CO2 tank: $80–130. Solenoid regulator: $50–80. CO2 controller with sensor: $150–300. Tubing and fittings: $15–25. Total one-time: $295–535.
Per-Cycle Consumables (10 Weeks)
Tank refills (2–3 per cycle): $30–90. Electricity for controller: negligible. Total per cycle: $30–90.
First Cycle All-In
$325–625 total. Subsequent cycles drop to $30–90 in refill costs only — the equipment lasts for years.
Compare this to CO2 bags at $30/month for 10 weeks ($75/cycle) with minimal results, and the tank's value proposition becomes clear by the second grow cycle. Use our grow cost calculator to model your specific setup.
Step-by-Step: How to Set Up CO2 in a 4×4 Cannabis Tent
Here's exactly how to add CO2 to a cannabis tent setup using a compressed tank, which is the best method for most home growers. This walkthrough assumes you have strong lighting (800+ PPFD), healthy plants, and a sealed or near-sealed environment.
Seal Your Tent
Close all passive intake vents. Seal duct openings with tape or duct covers. CO2 only works in near-sealed environments — if your exhaust fan is running constantly, all your CO2 exits the tent within minutes. Turn off exhaust fans during CO2 injection periods (use a controller to cycle them for temperature management).
Position the Tank
Place the CO2 tank outside the tent if possible (safer, easier to access). Run the regulator line through a port or small hole. If it must go inside, secure it upright to prevent tipping.
Run Tubing Above the Canopy
CO2 is heavier than air (molecular weight 44 vs. 29 for air). Distribute it from above and let it rain down over the canopy. Run perforated tubing or a drip ring 6–12 inches above your tallest plant tops. Poke small holes every 6–8 inches along the tubing for even distribution.
Mount the Controller Sensor
Place the CO2 sensor at canopy height — not at the floor, not at the ceiling. This is where your plants are actually breathing. Most controllers come with a hanging bracket. Set your target PPM (start at 1,000 PPM, increase to 1,200–1,500 as plants respond).
Program On/Off Timing
CO2 injection should only run during lights-on hours. Photosynthesis requires light — stomata close in the dark, and CO2 injected during lights-off is entirely wasted. Most controllers have a photocell input or timer function. Set CO2 to start 30 minutes after lights on and stop 30 minutes before lights off.
Dial In Flow Rate
Start with a low flow rate (2–5 CFH) and let the controller manage cycling. Watch the controller's PPM readout — it should reach your target within 15–30 minutes and maintain it with periodic solenoid pulses. If PPM drops too fast between pulses, increase flow rate or improve your tent seal.
Oscillating fans are critical. CO2 sinking through the canopy means the air below can become CO2-rich while the tops get depleted. Keep at least one oscillating fan running gently to create air movement within the sealed tent. This ensures even CO2 distribution across all leaves.
Target PPM by Growth Stage: A Precision Schedule
Cannabis CO2 requirements shift throughout the plant's lifecycle. Seedlings and clones need minimal supplementation, vegetative plants benefit from moderate enrichment, and flowering plants in full bloom can use the highest concentrations. Here's the schedule we use in our own grows.
Seedling and Clone Stage (Week 1–2)
No CO2 supplementation needed. Ambient levels (400–420 PPM) are sufficient. Seedlings have minimal leaf surface area and low metabolic rates. Focus on humidity, temperature, and gentle light instead — our seedling care guide covers this stage in detail.
Vegetative Stage (Week 3–8)
- Target PPM: 800–1,000
- Temperature: 80–85°F (27–29°C)
- PPFD: 600–800 at canopy
- Duration: Lights-on hours only
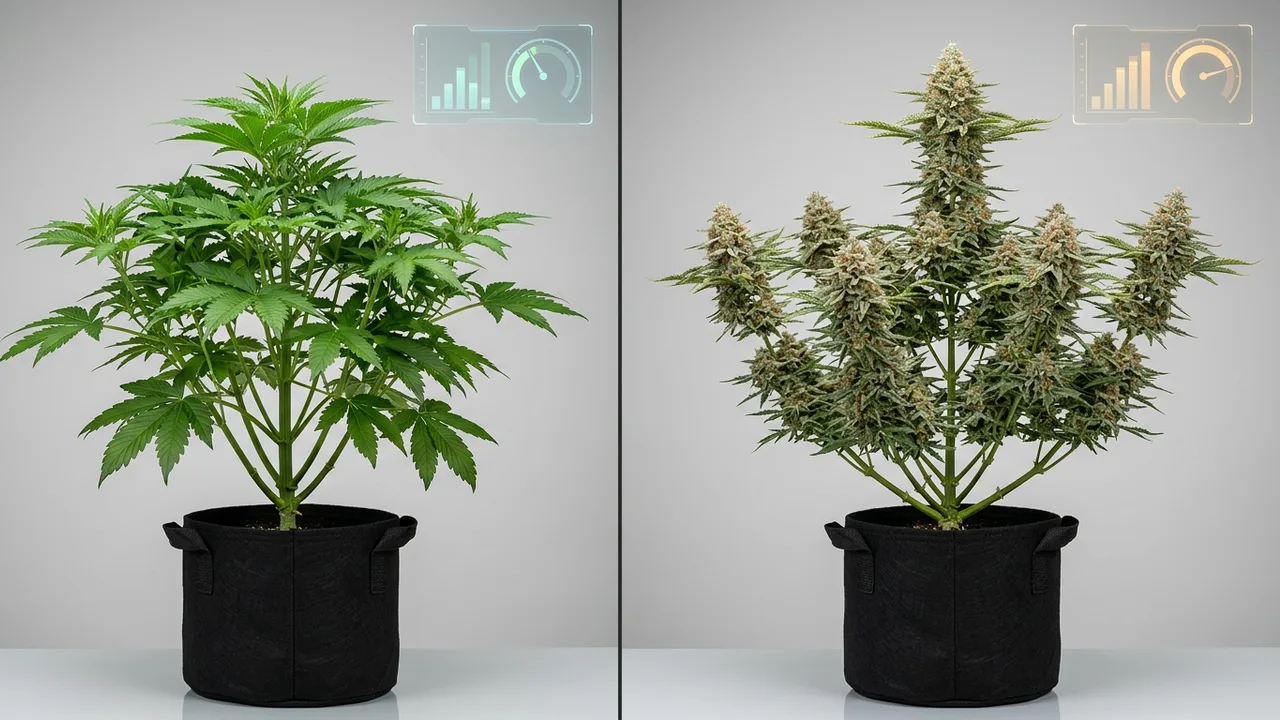
CO2 is extremely effective at accelerating vegetative growth. Plants build more leaf mass, thicker stems, and more branching sites when supplemented during veg. This creates a larger "solar panel" to capture light during flower — compounding the eventual yield benefit.
Pair CO2-enhanced veg growth with topping or ScrOG training to maximize canopy spread. More branching sites under strong light with elevated CO2 means significantly more bud sites at flip.
Flowering Stage (Week 1–8 of Flower)
- Target PPM: 1,200–1,500
- Temperature: 82–88°F (28–31°C)
- PPFD: 800–1,200 at canopy
- Duration: Lights-on hours only (12 hours)
The most dramatic CO2 benefits occur during the first 4 weeks of flower, when bud sites are forming and calyx production is ramping up. As GrowWeedEasy notes, "you also get increased growth and bud production by running CO2, with the most dramatic results during the first month of flowering."
Many experienced growers reduce or stop CO2 supplementation during the final 2 weeks before harvest. The plant's metabolic focus shifts from growth to ripening, and research suggests diminishing returns during this late window. This also saves on tank refills — a practical benefit that adds up over multiple cycles.
Increased Nutrient Demand Under CO2
Faster photosynthesis means faster nutrient consumption. Plants running at 1,200–1,500 PPM CO2 typically need 15–25% more nutrients than their ambient-CO2 counterparts. Monitor runoff EC/PPM closely and increase feeding gradually. Our nutrient calculator can help you adjust schedules for CO2-enhanced grows.
Calcium and magnesium demand often increases first, followed by nitrogen in veg and phosphorus/potassium in flower. If you're growing in coco coir or hydroponic systems, this adjustment is straightforward. Soil growers may need supplemental liquid feeds.
Safety First: CO2 Toxicity, Monitors, and Sealed Room Risks
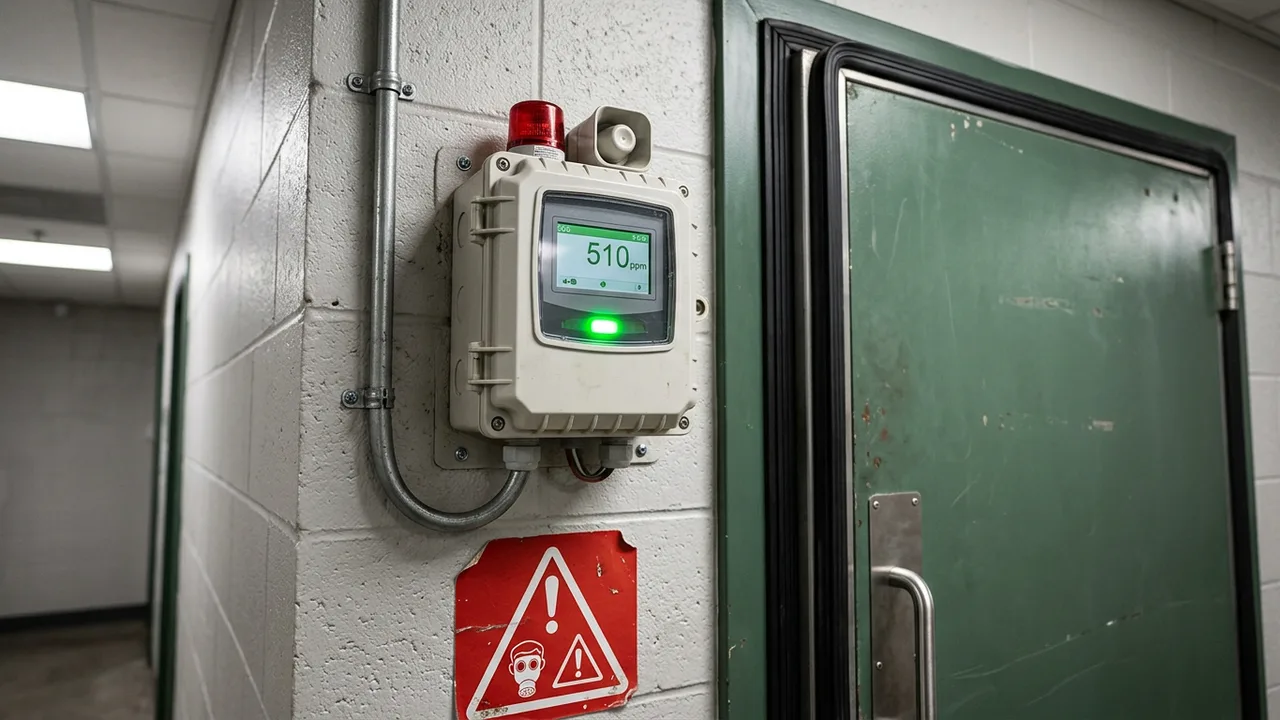
CO2 is an invisible, odorless gas that becomes dangerous to humans at concentrations above 5,000 PPM and potentially lethal at 40,000 PPM (4%). While cannabis grows target 1,200–1,500 PPM — well below danger levels — sealed rooms can accumulate CO2 from equipment malfunctions, and enclosed spaces amplify risk.
Human Health Thresholds
- 400–1,000 PPM: Normal indoor air. No risk
- 1,000–2,000 PPM: Target range for cannabis grows. Mild stuffiness if you spend extended time in the room. GrowWeedEasy cautions to "avoid breathing in the air in your sealed grow space for any length of time"
- 2,000–5,000 PPM: Headaches, drowsiness, poor concentration with extended exposure
- 5,000+ PPM: OSHA workplace exposure limit. Nausea, elevated heart rate
- 40,000+ PPM (4%): Immediately dangerous to life and health (IDLH)
Never sleep in a room adjacent to an unsealed CO2-enriched grow space. A regulator failure at night could flood living areas with dangerous CO2 levels while you sleep. Always mount a CO2 safety alarm rated for 5,000 PPM in any room connected to your grow space — they cost $30–50 and could save your life.
Essential Safety Equipment
- CO2 controller with built-in high-PPM shutoff (set at 1,600–1,800 PPM)
- Standalone CO2 alarm in grow space (audible at 5,000 PPM)
- Standalone CO2 alarm in adjacent living space
- Solenoid regulator (fails closed — stops gas flow when power is lost)
- Tank secured to wall or stand to prevent tipping
- Ventilation override accessible from outside the grow space
Sealed vs. Vented Rooms: The Critical Distinction
CO2 enrichment only works in sealed or near-sealed environments. If your exhaust fan runs continuously, fresh air replaces enriched air within minutes. But sealing a room creates its own challenges:
- Temperature: Without exhaust ventilation, heat from lights builds rapidly. You'll likely need a mini-split AC or portable air conditioner
- Humidity: Cannabis transpires significant moisture. A sealed room can hit 80%+ RH without a dehumidifier, inviting mold — see our mold prevention guide for critical protocols
- Air stagnation: Internal oscillating fans become essential for leaf-level gas exchange and preventing microclimates
Zamnesia's grow guide offers practical advice for smaller operations: "If you've only got a small grow, an airtight seal is not likely to be of great benefit... it is more difficult to keep a sealed grow room cool while at a low-enough humidity. Therefore, for a small operation, sealing it is likely to be more of a nuisance than a benefit."
This is why CO2 for grows under 4×4 often doesn't pencil out — the ancillary costs of sealing (AC, dehumidifier) can exceed the CO2 equipment itself.
The Honest ROI Verdict: Is CO2 Worth It for Your Grow?
A realistic CO2 cannabis ROI analysis depends on your grow size, existing equipment, electricity costs, and the value you place on your harvest. Here are the numbers, broken down honestly.
Realistic Yield Increase Expectations
Multiple industry sources — including GrowWeedEasy, Leafly, and Zamnesia — converge on the same range:
- 10–20% yield increase in well-dialed grows with adequate light, temperature, and nutrition
- Up to 30% in optimized environments where every variable (light, temp, humidity, nutrients, genetics) is near perfect
- 0–5% in grows with insufficient light, poor environment control, or leaky spaces — effectively zero meaningful gain
It's important to note that no peer-reviewed cannabis-specific CO2 study is widely available for home-scale grows. The 10–30% figures come from commercial greenhouse research on C3 plants and extensive anecdotal data from the cannabis community. We consider 15–20% a reasonable expectation for a well-managed home grow running 1,000+ PPFD and 1,200–1,500 PPM CO2.
ROI by Grow Size
| Grow Size | Baseline Yield | 15% CO2 Boost | Est. Annual CO2 Cost | Worth It? |
|---|---|---|---|---|
| 2×2 tent | 2–4 oz/cycle | +0.3–0.6 oz | $150–250 (bags) or $400+ (tank + seal costs) | ❌ Rarely — ancillary costs outweigh gains |
| 4×4 tent | 8–16 oz/cycle | +1.2–2.4 oz | $120–360 (tank refills) | ✅ Yes — break-even by 2nd cycle if light is sufficient |
| 4×8 room | 16–32 oz/cycle | +2.4–4.8 oz | $200–500 (tank refills) | ✅ Strong ROI — clear financial gain |
| 10×10+ room | 32–64+ oz/cycle | +4.8–9.6+ oz | $300–800 (burner fuel) | ✅✅ Excellent ROI — standard practice commercially |
The Break-Even Calculation
For a 4×4 tent grower averaging 12 oz per cycle:
- 15% yield boost: +1.8 oz per cycle
- First-cycle all-in cost: ~$450 (tank, regulator, controller, refills)
- Subsequent cycle cost: ~$60 (refills only)
- Break-even: If your cannabis has a personal value of $150+/oz, you recoup your entire investment in the first cycle ($270 in extra yield value vs. $450 cost, with the remaining $180 recouped in the second cycle). By grow three, you're in pure profit territory
Our verdict: CO2 supplementation is not worth it for grows under 4×4, unless your light, temperature, humidity, and nutrition are already perfect and you have a near-sealed space. For 4×4 and larger grows with 800+ PPFD lighting, CO2 is one of the highest-ROI upgrades available — paying for itself within 1–2 cycles. Use our yield estimator to model your specific scenario.
Where Your Money Goes First: The Priority Stack
Before spending a dollar on CO2, make sure you've optimized these (in order):
- Genetics — High-yield strains with proven performance matter more than any environmental variable
- Lighting — Upgrade to 800+ PPFD before considering CO2. Use our light calculator
- Training — Topping, LST, and ScrOG are free and can add 20–40% to yields
- VPD and environment — Proper VPD management is free with a hygrometer and exhaust fan
- Nutrition — Dialing in feeds eliminates deficiencies that cap yield potential
- CO2 — The cherry on top, once everything else is dialed
Best Genetics for CO2-Enriched Growing

Not all strains respond equally to CO2 supplementation. Vigorous, fast-metabolizing genetics with high photosynthetic capacity benefit most — typically sativa-dominant hybrids and strains known for heavy yields and long flower stretches. Compact, low-vigor indicas may show less dramatic gains simply because their growth ceiling is lower.
Here are strains that thrive under elevated CO2 — a mix of industry favorites and proven performers from our catalog:
Industry Favorites for CO2 Grows
- Gorilla Glue #4 — Heavy-yielding hybrid, 25–28% THC potential. Explosive stretch in early flower responds beautifully to CO2. Known for dense, resinous colas under high light
- Wedding Cake — Vigorous hybrid pushing 25%+ THC. Stacks calyxes aggressively with elevated CO2 and strong lighting
- Blue Dream — Sativa-dominant classic, 21–24% THC. Long flowering period and voracious appetite for light and CO2 make it ideal for enriched environments
- Gelato — Dense, high-producing hybrid. Responds to high PPFD + CO2 with significantly fatter buds and shorter internodes
Catalog Picks Bred for High Performance
- OG Kush Feminized — 26% THC. Vigorous feeder that responds extremely well to elevated CO2 during its 8–9 week flower. A proven producer under optimized conditions
- New York Power Diesel Feminized — 24% THC. Sativa-leaning energy plant that stretches hard in early flower, capitalizing on every PPM of extra CO2
- Northern Lights × Big Bud Feminized — 20% THC. Specifically bred for massive yields — this cross was made to push weight, and CO2 only amplifies that genetic potential
- Sour Diesel Feminized — 24% THC. Lanky sativa growth pattern means more internodal bud sites that fill out dramatically with CO2 supplementation
- Quantum Kush Feminized — 30% THC. Our most potent offering, and a vigorous grower that rewards high-light, high-CO2 environments with exceptional resin production
- Super Lemon Haze Feminized — 23% THC. Award-winning sativa hybrid with extended flowering that particularly benefits from sustained CO2 enrichment
All seeds in our catalog come with a germination guarantee — ensuring your investment in genetics, lighting, and CO2 starts on solid ground.
Autoflower consideration: Auto strains like our Skywalker OG Autoflower (23% THC) can benefit from CO2 during their short lifecycle, but the compressed timeline (seed to harvest in 9–11 weeks) means less time to recoup the investment. We recommend CO2 primarily for photoperiod feminized strains where you control the veg/flower schedule.
Frequently Asked Questions About CO2 and Cannabis
Does CO2 increase cannabis yields at home?
Yes, but only under specific conditions. Research and extensive grower reports suggest CO2 enrichment to 1,200–1,500 PPM can increase yields by 10–30% — but only when light intensity exceeds 800 PPFD, temperature is 82–88°F, the space is near-sealed, and nutrition is sufficient. Without these prerequisites met, CO2 supplementation provides little to no measurable benefit and is not a worthwhile investment.
What PPM CO2 for cannabis growing is ideal?
The optimal range is 1,200–1,500 PPM during flowering and 800–1,000 PPM during vegetative growth. Ambient air sits at approximately 420 PPM in 2026. Going above 1,500 PPM provides negligible additional yield benefit while increasing costs and safety risks. Cannabis plants cannot effectively use CO2 above this range due to enzyme saturation in the Calvin cycle.
Is CO2 supplementation worth it for a small cannabis grow?
For grows under 4×4, CO2 is rarely worth the investment. The cost of proper equipment (tank, regulator, controller) plus the ancillary requirements (sealed space, dehumidifier, possible AC unit) often exceeds $500 — and the yield increase on a small grow may only amount to 1–2 extra ounces. Your money is better spent on better lighting, training techniques, or superior genetics. At 4×4 and above with adequate light, CO2 becomes a strong ROI proposition.
CO2 bags vs burners vs tanks — which is best for cannabis?
Compressed CO2 tanks with a solenoid regulator and controller are the best option for home grows (4×4 to 4×8). They offer precise PPM control, produce no heat or combustion byproducts, and cost $30–90 per cycle in refills. CO2 bags are too weak for meaningful enrichment. Burners produce excessive heat and carbon monoxide — they're designed for commercial rooms of 10×10 or larger with dedicated HVAC systems.
Can I run CO2 in my cannabis tent without sealing it?
Technically yes, but it's extremely wasteful. Any active exhaust ventilation will pull enriched air out of the tent faster than your system can replace it. You'll burn through CO2 refills rapidly while never reaching target PPM levels. At minimum, close passive intakes and run exhaust on a timer or controller that cycles off during CO2 injection periods. A fully sealed tent with internal air conditioning is the ideal setup for effective CO2 supplementation.
Sources & References
This article was researched and fact-checked using 8 verified sources including 1 authoritative reference, 2 industry sources, 5 community resources.
- How to Use CO2 to Increase Yields in Your Marijuana Grow | Leafly — leafly.com [Reference]
- How to Use CO2 to Increase Cannabis Yields! | Grow Weed Easy — growweedeasy.com [Industry]
- How To Make A DIY CO₂ Generator For Your Cannabis Grow Room — zamnesia.com [Industry]
- CO2 for Cannabis Growth | Oxygen Service Company — oxygenservicecompany.com [Community]
- How to Implement CO2 to your Grow – CO2 Meter — co2meter.com [Community]
- How CO₂ Enhances Cannabis Cultivation — fluence-led.com [Community]
- Using CO2 In Your Grow Rooms: A Quick Guide Greenlight Distribution — growwithgreenlight.com [Community]
- Increasing Cannabis Growth With CO2 | Photone — growlightmeter.com [Community]


