1. What Is ScrOG (Screen of Green)?
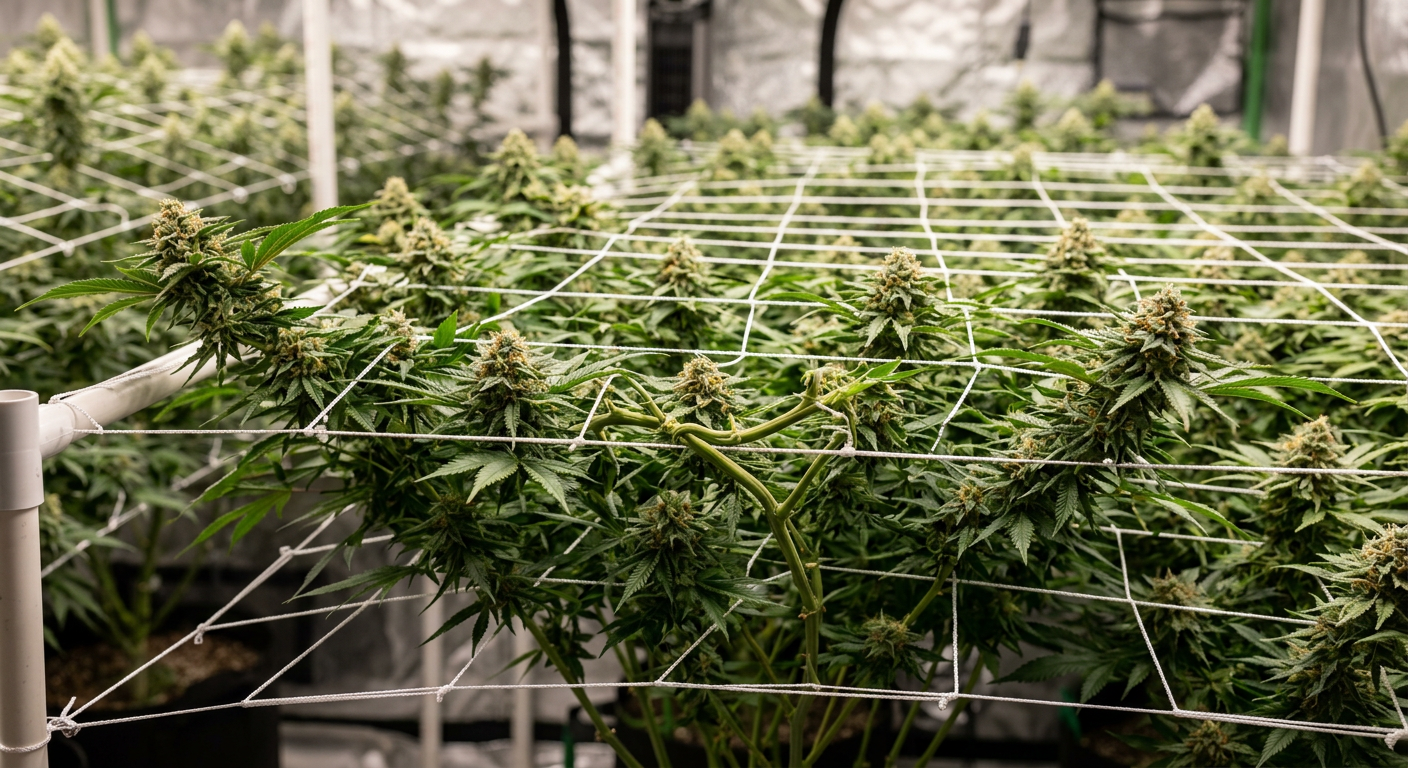
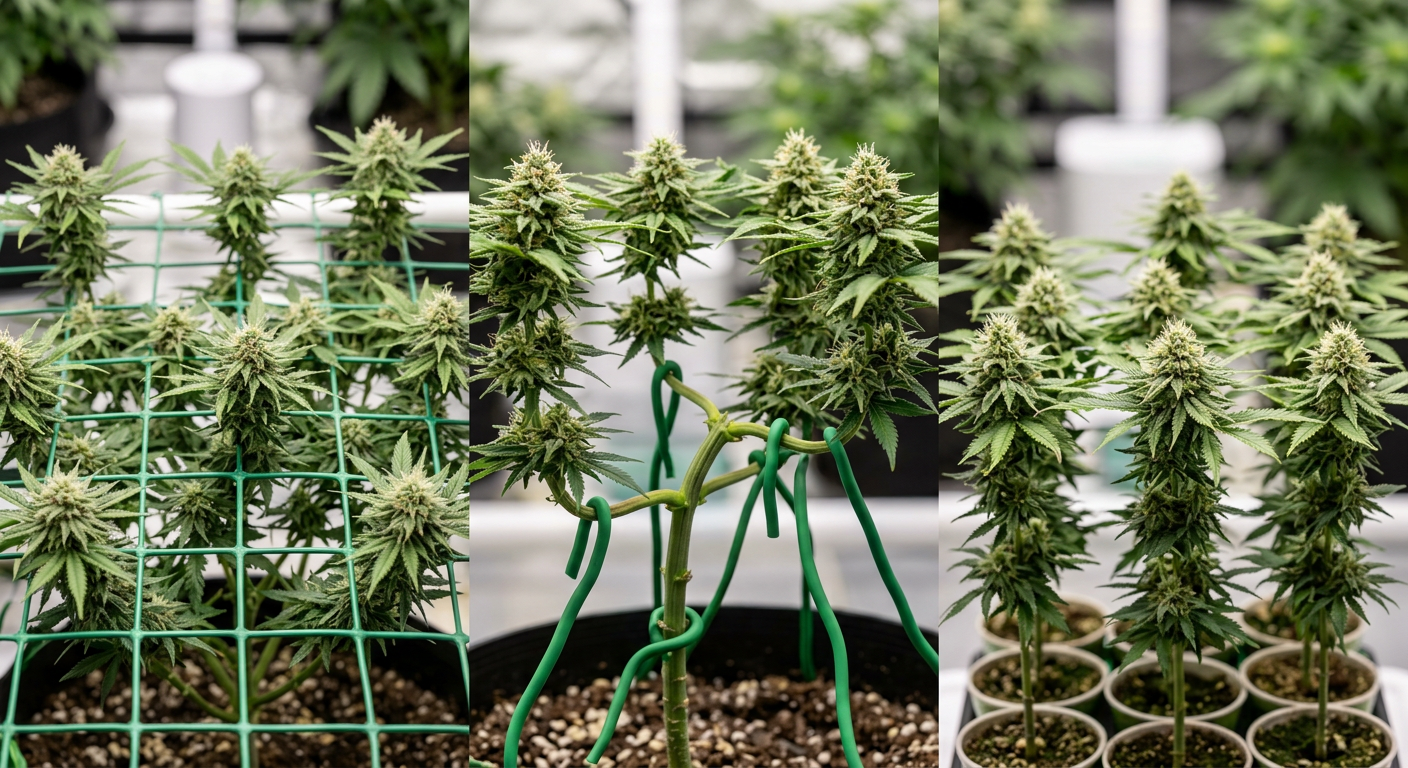
ScrOG — short for Screen of Green — is a cannabis training method where a horizontal mesh screen is placed above your plants. Growers weave branches through the screen to spread the canopy flat, exposing every bud site to direct light.
The result is a dense, even "table" of colas instead of one tall central spike. This technique consistently produces some of the highest yields per square foot of any training method available to home growers.
How ScrOG Works
Cannabis naturally grows in an "apical dominance" pattern — the main cola races upward and shades lower branches. ScrOG disrupts this by bending and pinning shoots horizontally under the screen.
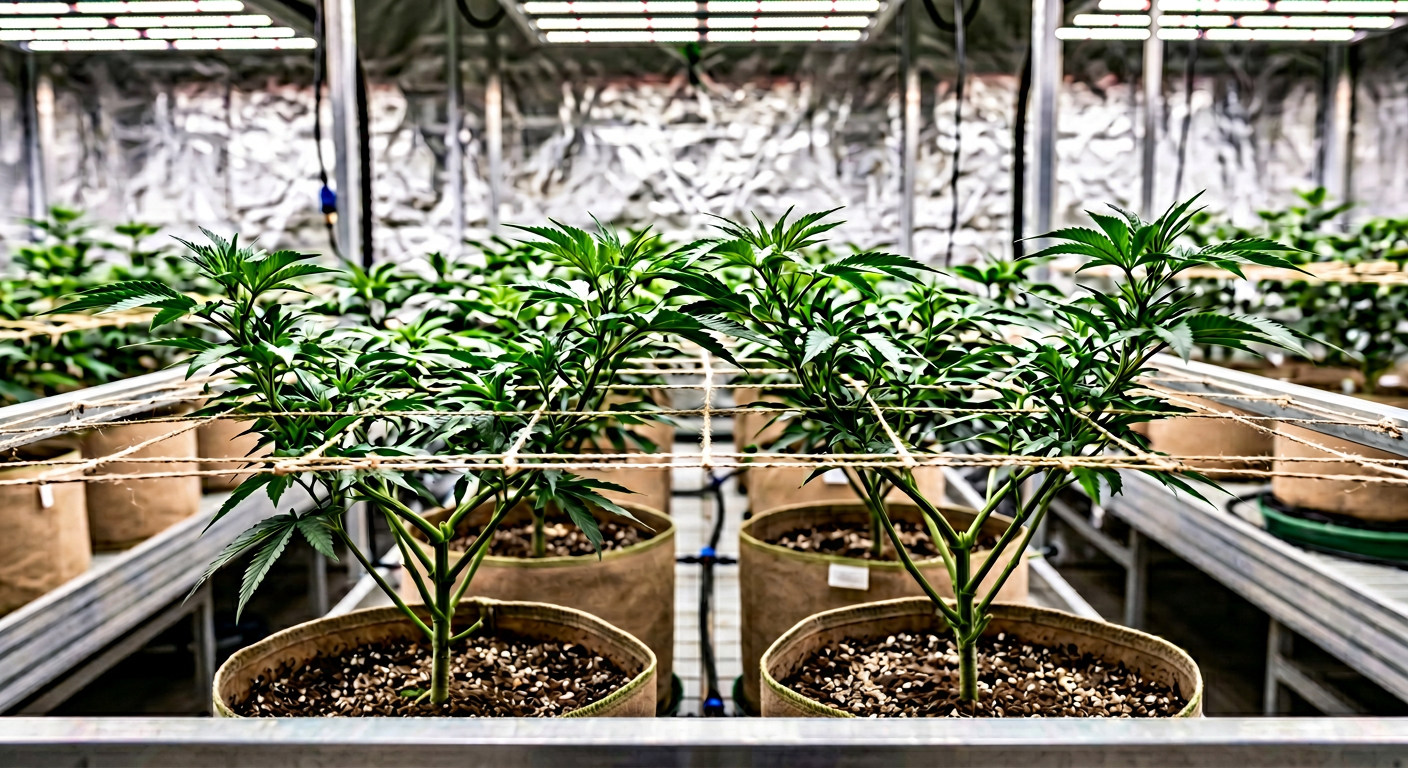
Once a shoot is woven under the mesh, it redirects energy outward rather than upward. Every pinned tip eventually turns upward, forming its own dominant cola. A single plant can fill an entire 1.2 × 1.2 m grow tent this way.
ScrOG works by tricking each branch tip into behaving like its own main cola — so instead of one dominant flower, you get dozens of equal-sized, light-saturated tops all at the same height.
2. Equipment You Need for ScrOG
Setting up a ScrOG correctly starts with choosing the right materials. Using cheap or flimsy equipment wastes weeks of training effort and can damage your plants mid-flower.
Here is everything you need before you begin:
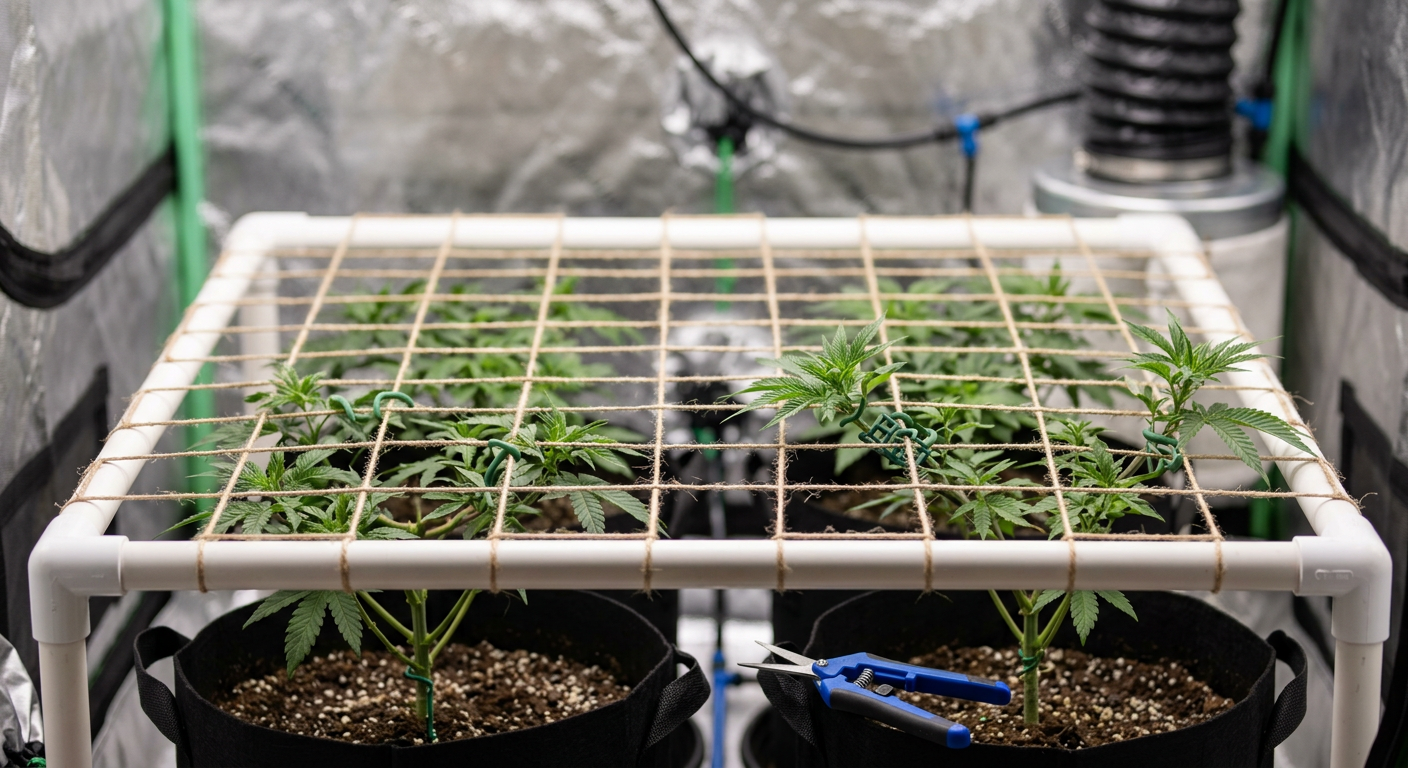
- The screen itself: Nylon garden netting, wire mesh, or purpose-built PVC screens with 5×5 cm grid squares. Nylon is gentler on stems; wire holds shape better.
- Frame: PVC pipe (20–25 mm diameter), bamboo stakes, or metal conduit. The frame must be rigid enough not to sag under the weight of flowering branches.
- Soft plant ties or twist ties: For securing early shoots before they grip the screen naturally.
- Pruning scissors: For lollipopping (removing lower growth) once the screen fills.
- Measuring tape: To set screen height accurately at 20–40 cm above the pot rim during veg.
Screen Materials: Pros and Cons
Nylon netting is the most popular choice for home growers. It is cheap, flexible, and easy to cut to size — but it can stretch over time under the weight of heavy colas.
Wire mesh (such as 16-gauge galvanised garden wire) holds its shape under load and is reusable across many grows. The downside is that sharp wire edges can nick stems during late-flower repositioning.
Build your ScrOG frame from 25 mm PVC pipe with corner joints. It costs under $15, assembles in minutes, and can be adjusted or dismantled without cutting into your canopy.
3. When to Install the Screen
Timing the screen installation correctly is one of the most important ScrOG decisions you will make. Install too early and you have nothing to weave. Install too late and branches become woody and hard to bend without snapping.
The general rule: install your screen when the plant's main shoot is 5–10 cm below the screen height. For most strains grown indoors, this happens 2–3 weeks into vegetative growth after transplanting to the final container.
Veg Time Guidelines
- Indica-dominant strains: 3–5 weeks of veg before screen fills
- Sativa-dominant strains: 5–8 weeks of veg — they stretch more and fill screens faster
- Autoflowering strains: Install the screen at week 2 of growth — autos have no time to waste
- Photoperiod strains: Keep vegging until 60–70% of the screen is filled, then flip to 12/12
Do NOT flip to 12/12 lighting with less than 50% of the screen filled. Plants will stretch during early flower (the "pre-flower stretch"), but you will not have enough canopy coverage for maximum yield. Wait until the screen is at least 60% full before switching.
The Pre-Flip Rule
Experienced ScrOG growers follow the "60/70 rule": flip to flower when 60–70% of the screen is filled with vegetation. The remaining 30–40% fills naturally during the 2–3 week stretch phase of early flowering.
This approach maximises usable canopy without letting the screen become overcrowded before buds set.
4. The ScrOG Weaving Technique Step by Step
Weaving is the core skill of ScrOG. Done correctly, it is gentle, methodical, and surprisingly fast once you have done it a few times. Here is the full process.
Top or FIM the Plant First
Before you begin weaving, top your plant once or twice during early veg to create multiple main shoots. Topping at the 4th or 5th node gives you 4–8 primary branches to train — far more efficient than weaving a single main stem.
Install the Screen at the Right Height
Position the screen 20–40 cm above the soil surface. Too low and you run out of room for lollipopping. Too high and shoots become long and leggy before they reach the mesh.
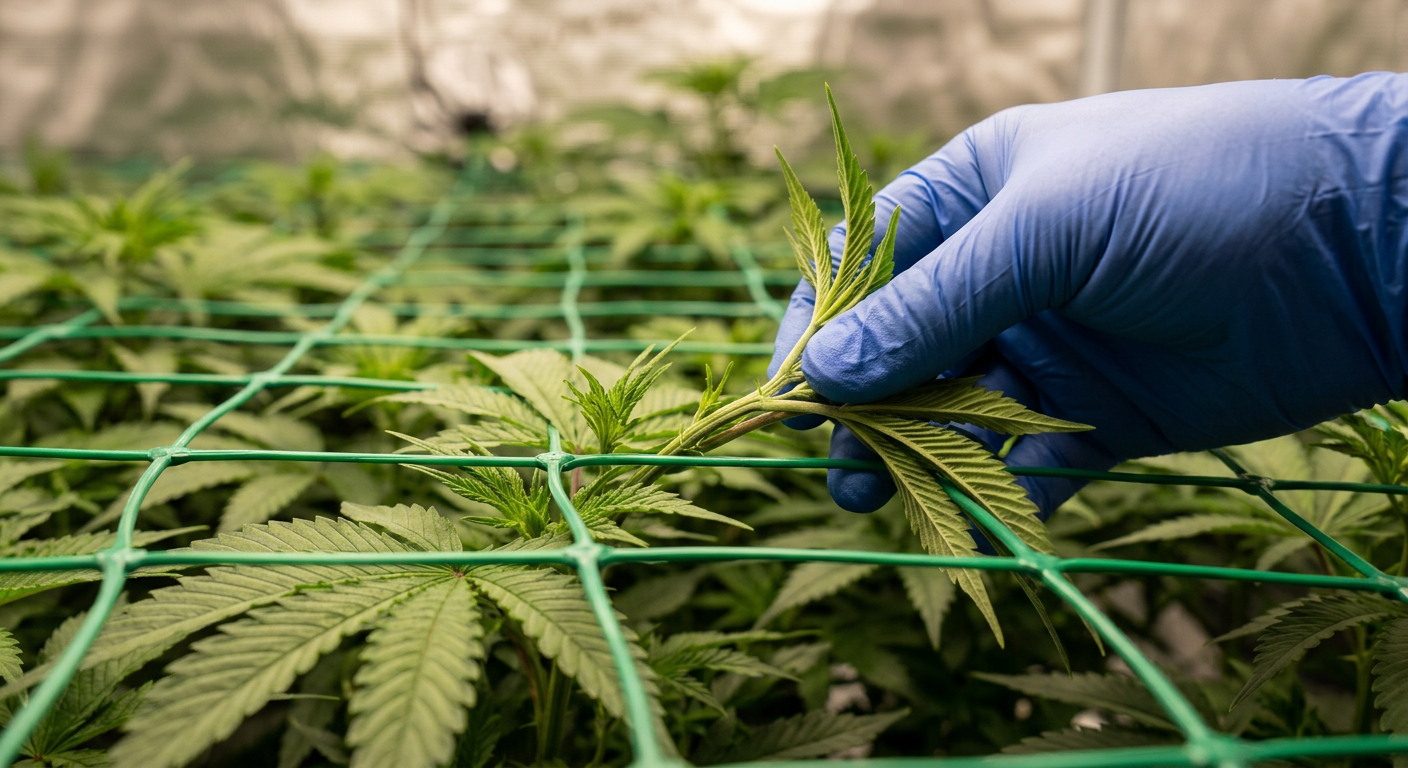
Weave Shoots Outward, Not Upward
As each shoot grows through a square in the screen, gently bend it horizontally and guide it under the next grid square away from the centre of the plant. Use soft ties to hold it in place if needed.
Repeat Every 2–3 Days
Cannabis grows fast. Check your screen every 2–3 days during veg and tuck any new growth back under the mesh. Consistency here determines how even your final canopy is.
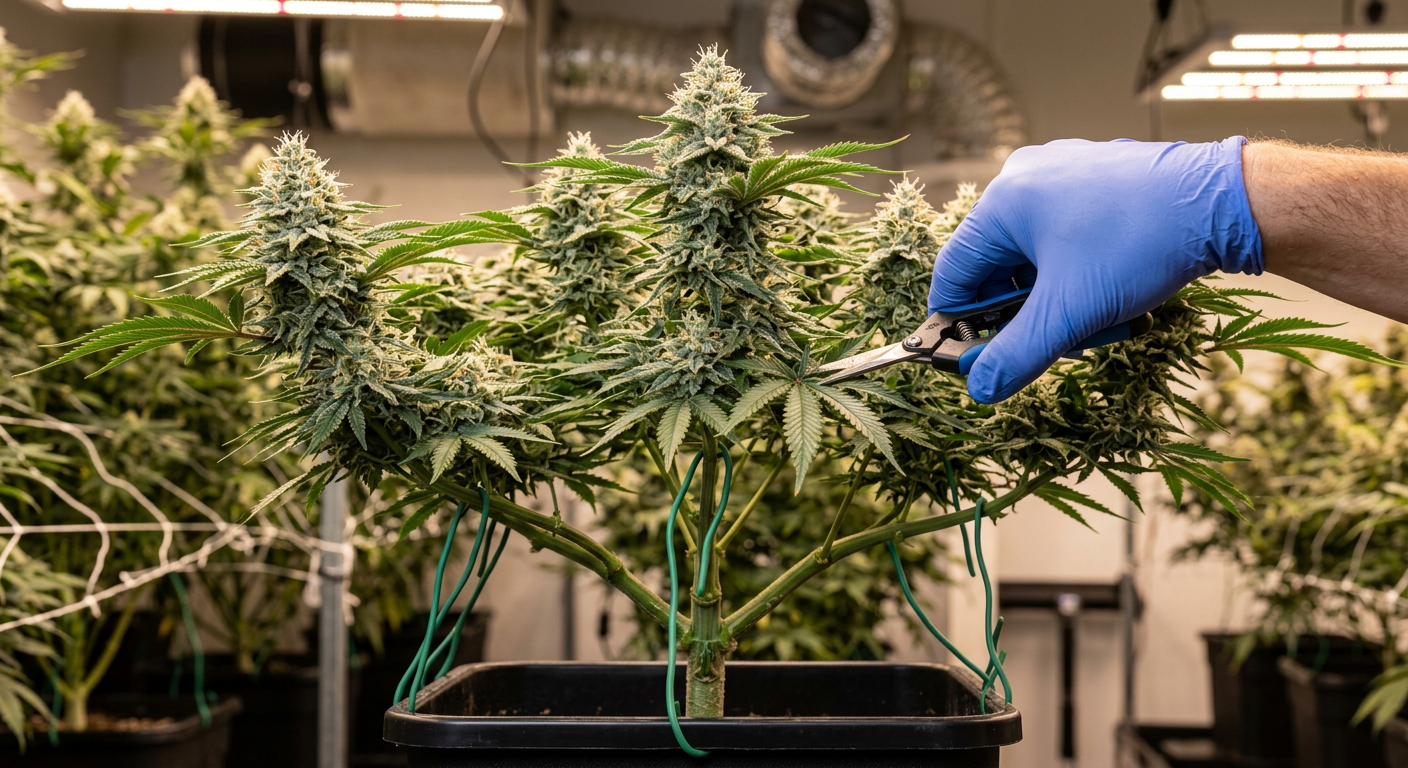
Lollipop at the Flip
When you switch to 12/12, remove all foliage and bud sites below the screen. This redirects all energy to the canopy above and improves airflow, dramatically reducing the risk of mould.
During weaving, always guide shoots toward empty squares in the screen rather than crowded areas. Think of it like filling a puzzle — you want an even distribution of green across the entire mesh before flowering begins.
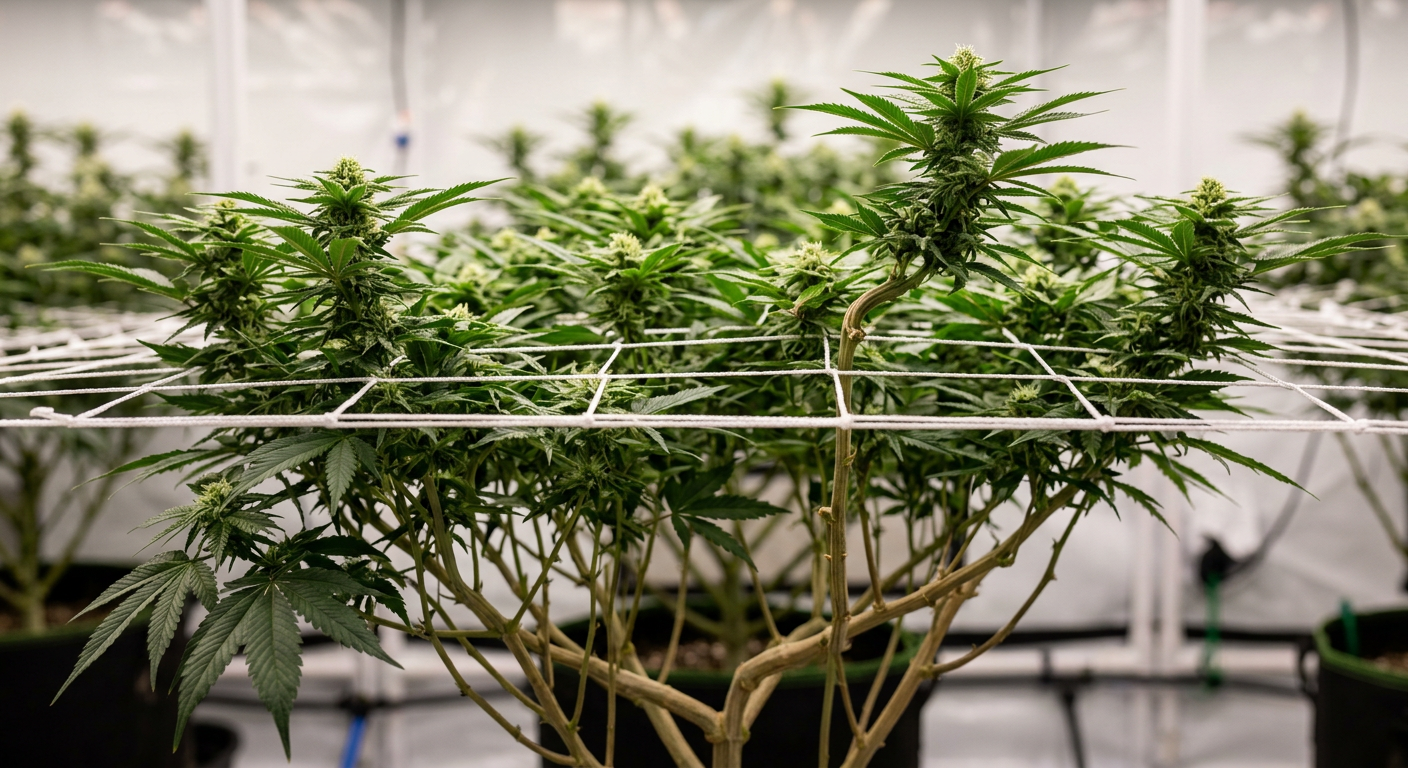
5. Managing the Canopy During Flowering
Once you flip to 12/12, ScrOG management shifts from training to maintenance. The goal is to protect the canopy structure you have built and maximise light penetration to every bud site.
The First Two Weeks of Flower
During the pre-flower stretch, plants can grow 2–5 cm per day. Continue tucking new growth under the screen for the first 10–14 days of flowering. After that, stems begin to harden and become difficult to bend safely.
- Tuck daily if possible during weeks 1–2 of flower
- Stop tucking by day 14–21 to avoid snapping hardening stems
- Remove any large fan leaves blocking light to bud sites below the screen
- Maintain a 25–30 cm gap between the screen and your grow lights (adjust for your specific light type)
Airflow and Humidity Control
A dense ScrOG canopy traps moisture and reduces airflow — two factors that encourage botrytis (bud rot) and powdery mildew. Use at least one oscillating fan directed across the canopy.
Target 40–50% relative humidity during late flowering. If you are growing a dense, compact indica like Papaya Feminized, this is especially critical — tight bud structure can hold moisture deep inside colas.
Research into light penetration shows that photons reaching a leaf at less than 50 µmol/m²/s contribute minimally to photosynthesis. By flattening your canopy with ScrOG, you ensure every bud site receives at least 400–600 µmol/m²/s — the sweet spot for bud development without light burn.
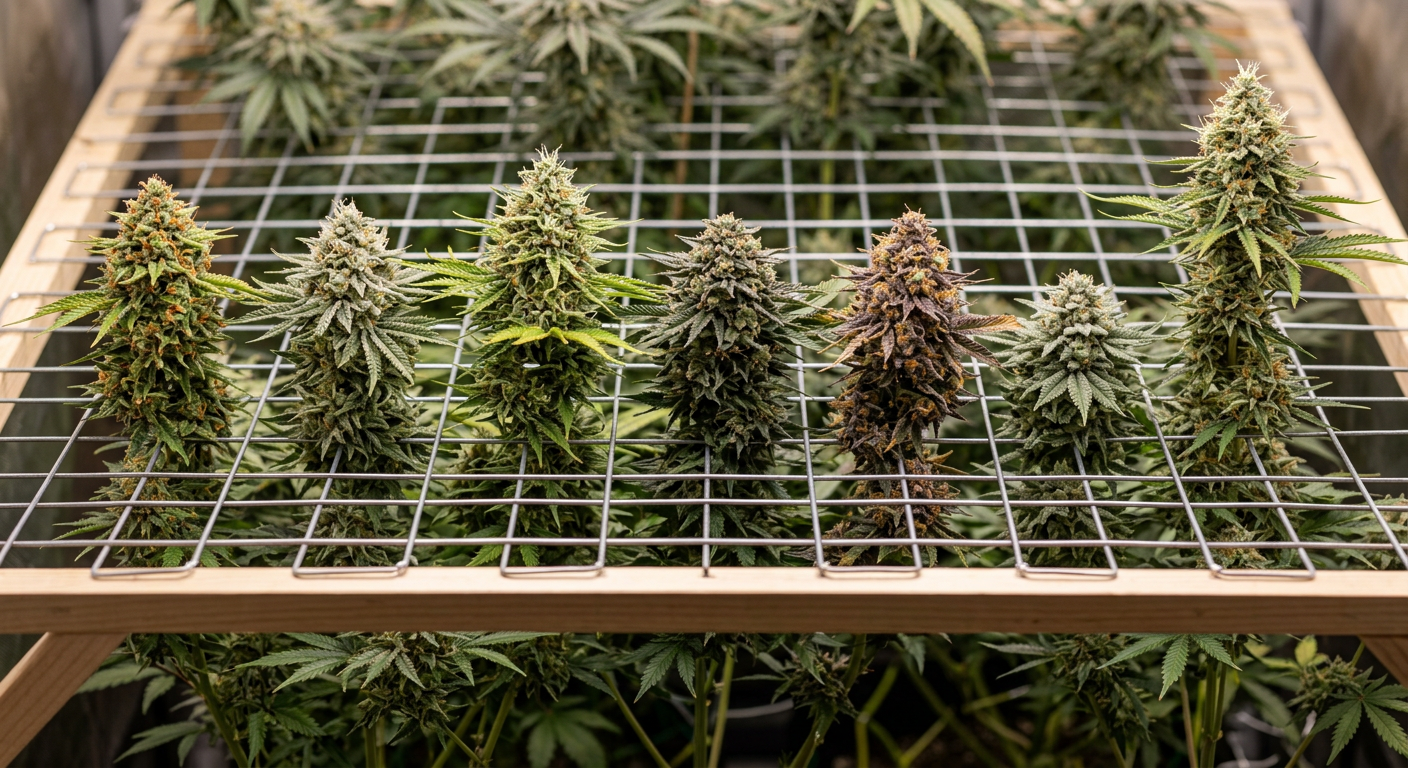
Defoliation During Flower
Light defoliation at day 21 and again at day 42 of flower helps maintain penetration through the canopy. Remove only large fan leaves that are directly shading bud sites — never strip more than 20–30% of foliage in a single session.
After day 14 of flowering, stop weaving and switch focus to airflow, humidity, and light penetration. Your job at this stage is to protect the canopy, not reshape it.
6. ScrOG vs SOG vs LST: Which Is Best?
ScrOG is not the only training method available. Understanding how it compares to SOG (Sea of Green) and LST (Low Stress Training) helps you choose the right approach for your setup and goals.
ScrOG vs SOG
- SOG: Uses many small plants (1 per 30×30 cm) flipped to flower early. Faster turnaround, simpler setup, but requires more clones or seeds.
- ScrOG: Uses fewer plants trained extensively. Better for growers limited by plant count laws. Produces larger individual yields per plant.
- Winner for small legal plant counts: ScrOG — one plant can fill a full 1.2 m² tent
- Winner for speed: SOG — harvests can come 2–4 weeks faster
ScrOG vs LST
LST (Low Stress Training) involves bending and tying branches down without a screen. It is gentler, requires less equipment, and works well for beginners.
ScrOG is more structured and produces a more even canopy than LST alone. The screen acts as a guide and support structure that LST lacks — especially useful once heavy buds develop in flower.
- LST: Better for beginners, cheaper, works with any container
- ScrOG: Higher ceiling for yields, more control, better light distribution
- Combined approach: Many experienced growers use LST during early veg then transition to ScrOG — getting the best of both methods
"ScrOG is not just a training technique — it is a systems approach to grow room design. When you plan your screen, you are planning your harvest weeks in advance."
7. Best Strains for ScrOG Growing
Not every cannabis strain responds equally well to ScrOG. The best ScrOG strains share a few key traits: vigorous branching, moderate internodal spacing, and strong lateral growth potential.
Explore the full DSS Genetics strain catalog to find ScrOG-ready genetics for your setup.
Top Traits to Look For
- High branching: Plants that develop many lateral shoots fill the screen faster
- Flexible stems: Young stems that bend without snapping are easier to weave
- Moderate height: Extreme sativa height can overwhelm a fixed screen; look for medium-height genetics
- Dense bud structure: More bud sites per branch means more reward for each square of screen filled
Papaya — A ScrOG Standout
Papaya Feminized from DSS Genetics is an outstanding ScrOG candidate. This indica-dominant cultivar develops wide, bushy lateral branching that responds aggressively to topping and weaving.
Papaya produces dense, resinous colas with a tropical terpene profile dominated by myrcene and caryophyllene. Under a well-managed ScrOG, experienced growers report yields of 500–600 g/m² under 600W HPS or equivalent LED.
- Genetics: Indica-dominant hybrid
- Flowering time: 56–63 days (8–9 weeks)
- Yield potential: Up to 600 g/m² under ScrOG
- Height: Medium — ideal for standard 1.2 m tent setups
- Terpene profile: Tropical fruit, mango, earthy undertones
When growing Papaya Feminized under ScrOG, top at the 4th node and allow 4 weeks of veg before flipping. Her indica structure fills a 60×60 cm screen efficiently with just one plant.
Other Excellent ScrOG Strains from DSS Genetics
The DSS Genetics lineup includes several other cultivars that thrive under a screen. Each brings something different to the ScrOG setup.
- Blue Dream Feminized — sativa-dominant, vigorous lateral growth, excellent for large screens
- Gorilla Glue #4 Feminized — legendary resin production, strong branching, responds well to topping
- Wedding Cake Feminized — compact indica structure, perfect for tight ScrOG grids
- Amnesia Haze Feminized — sativa stretch fills large screens; plan for 6–8 weeks of veg
- Zkittlez Feminized — medium height, compact and dense, beginner-friendly ScrOG strain
The best ScrOG strains are vigorous, branch freely, and have flexible young stems. Indica-dominant hybrids like Papaya fill screens efficiently; sativa-leaning strains fill more screen but need longer veg time.
8. Common ScrOG Mistakes and How to Avoid Them
Even experienced growers make errors when transitioning to ScrOG. Knowing the most common pitfalls saves you from losing weeks of training effort.
Mistake 1: Flipping Too Early
Flipping to 12/12 with less than 50% screen coverage is the single most common ScrOG error. Plants stretch during early flower, but not enough to compensate for an empty screen.
Mistake 2: Skipping Lollipopping
Leaving lower growth in place after flipping forces the plant to waste energy on bud sites that receive almost no light. Always remove everything below the screen at the flip.
Mistake 3: Using Too Many Plants
ScrOG works best with fewer, larger plants. Cramming too many into a screen creates uneven canopy density, airflow problems, and makes lollipopping nearly impossible.
- Recommended density: 1 plant per 0.5 m² of screen space
- A 1.2 × 1.2 m tent needs only 2–3 plants maximum under ScrOG
- Overcrowding also increases disease pressure significantly
Never try to move or reposition a ScrOG screen after week 3 of flowering. Stems become brittle and intertwined with the mesh. Planning your frame to be adjustable in height before flowering begins is a much safer approach.
Mistake 4: Ignoring Humidity After Lollipopping
After removing lower foliage, you may feel humidity is less of a concern. In reality, the dense upper canopy still traps air. Keep monitoring VPD (Vapour Pressure Deficit) or at minimum relative humidity throughout flower.
Browse the complete DSS Genetics catalog to find strains with documented mould resistance — an important factor when choosing ScrOG genetics.
Frequently Asked Questions
How many plants do I need for ScrOG?
For ScrOG, use 1 plant per 0.5 m² of screen space. A standard 1.2 × 1.2 m grow tent works well with just 2–3 plants. Fewer plants trained longer always outperforms cramming many plants into the same screen area.
Using fewer plants also simplifies lollipopping, improves airflow across the canopy, and reduces disease pressure during the critical late-flower period. In many jurisdictions, a lower plant count also has legal advantages for home growers.
What size screen squares work best for ScrOG?
The ideal grid square size for ScrOG is 5×5 cm. This size is large enough to weave stems through easily but small enough to provide consistent support across the canopy as buds develop weight during flowering.
Some growers prefer 10×10 cm squares for larger-branching sativa strains. Smaller squares (2.5×2.5 cm) are harder to work with and tend to trap foliage rather than guide it. Start with 5×5 cm until you are comfortable with the technique.
Can you use ScrOG with autoflowering strains?
Yes, ScrOG works with autoflowering strains, but the approach must be adapted. Install the screen at week 2 of growth and use gentle weaving only — autos have a fixed life cycle and cannot recover from stress as easily as photoperiod plants.
Choose autoflowering strains with known vigour and branching ability. Avoid heavy topping with autos under ScrOG — a single FIM or light topping at week 2 is usually sufficient before the screen is installed and weaving begins.
How high should the ScrOG screen be above the pot?
Place your ScrOG screen 20–40 cm above the soil surface (or pot rim). This leaves enough space below the screen for lollipopping and airflow while keeping the canopy close enough to the light for maximum photon absorption.
For smaller indica-dominant strains like Papaya Feminized, the lower end of this range (20–25 cm) works well. Taller sativa-leaning genetics benefit from the full 35–40 cm of clearance below the mesh to accommodate more branching structure.
When should I stop tucking during ScrOG?
Stop tucking branches under the screen between day 14 and day 21 of flowering. After this point, stems begin to lignify (harden) and become brittle. Forcing them into new positions risks snapping branches and stressing the plant during critical bud development.
During the first two weeks of flower, tuck daily if possible to capture the maximum pre-flower stretch. After day 21, shift your focus entirely to airflow management, defoliation of light-blocking fan leaves, and maintaining optimal temperature and humidity in the grow space.
6. Frequently Asked Questions
How many plants do I need for ScrOG?
Use 1 plant per 0.5 m² of screen space. A 1.2 × 1.2 m grow tent works well with just 2–3 plants. Fewer plants trained longer always outperforms overcrowding the screen, and also improves airflow and reduces disease pressure during flowering.
What size screen squares work best for ScrOG?
The ideal grid square size is 5×5 cm. This is large enough to weave stems through easily but small enough to support heavy buds as they develop. Some growers use 10×10 cm for large sativa branches, but 5×5 cm is the best all-around starting point for most strains.
Can you use ScrOG with autoflowering cannabis strains?
Yes, but adapt your approach. Install the screen at week 2 of growth and use only gentle weaving. Avoid heavy topping — one light FIM is usually sufficient. Autos have a fixed life cycle and less recovery time than photoperiod plants, so low-stress technique is essential.
How high should the ScrOG screen be above the pot?
Position your screen 20–40 cm above the soil or pot rim. This allows space for lollipopping below the screen and keeps the canopy close enough to the light. Indica strains work well at 20–25 cm; taller sativa-leaning plants benefit from the full 35–40 cm of clearance.
When should I stop tucking branches during ScrOG flowering?
Stop tucking between day 14 and day 21 of flowering. After this point, stems harden and become brittle — forcing them risks snapping. Tuck daily during weeks 1–2 of flower to capture the stretch, then shift focus to airflow, defoliation, and environmental control for the rest of the cycle.


