You just harvested the best-looking buds of your life. The trichomes are milky-amber, the smell is intoxicating, and months of careful growing are finally paying off. Now comes the part most growers underestimate — and where most harvests are quietly ruined.
Cannabis drying and curing isn't a passive waiting game. It's an active, science-backed process that can make or break every hour you invested from seed to harvest. Done right, a slow dry and a proper cure transforms good bud into exceptional bud — smoother, more potent, more flavorful, and shelf-stable for over a year.
This guide covers the complete process from harvest day through an 8-week cure, with exact numbers, step-by-step protocols, and the science behind every decision.
Why Drying and Curing Cannabis Actually Matters
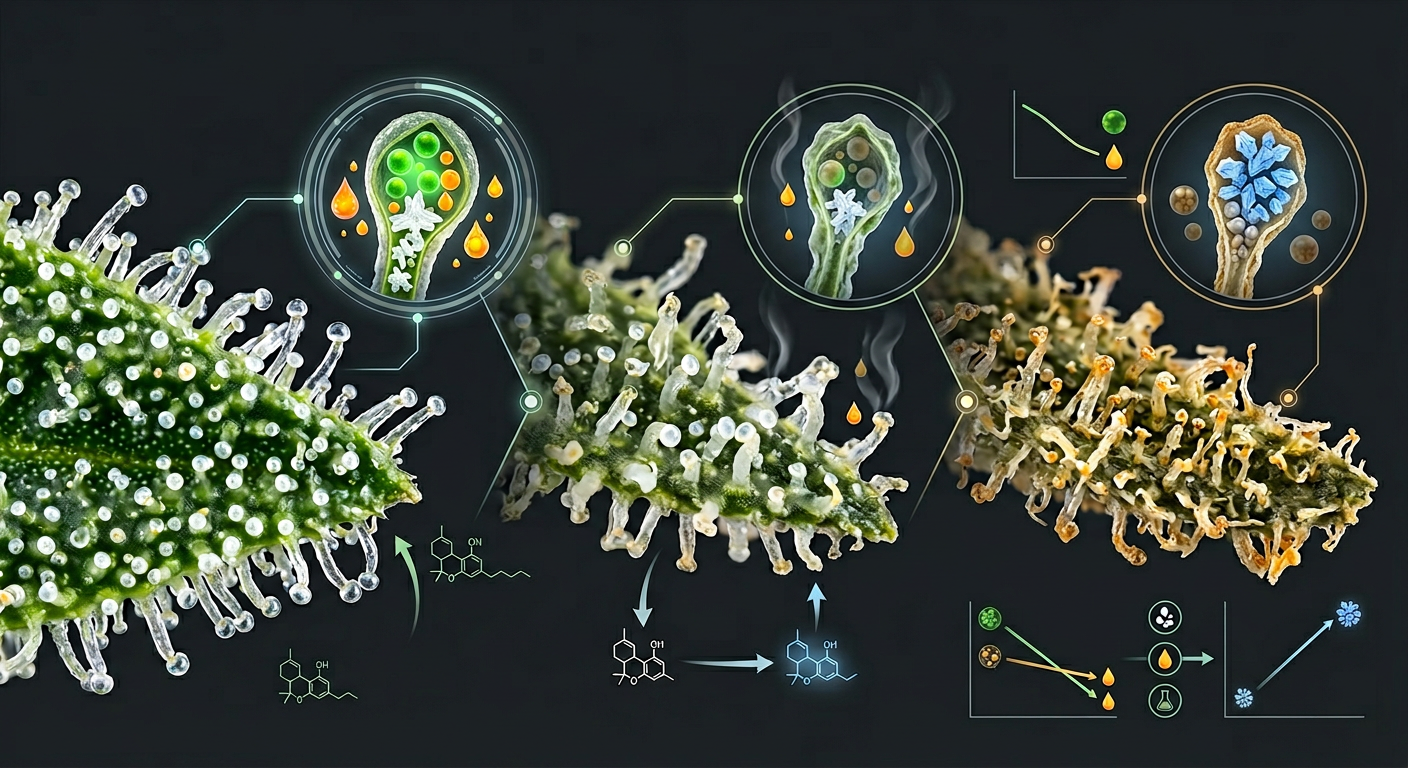
Proper cannabis drying and curing preserves terpenes, converts cannabinoid acids into active forms, and eliminates chlorophyll that makes buds taste harsh and green. Skipping or rushing this stage permanently degrades quality that no technique can restore.
At harvest, cannabis buds are roughly 75–80% water by weight. Your goal isn't just to remove that moisture — it's to remove it slowly and evenly so cellular breakdown happens in a controlled way.
Here's what actually happens during a proper dry and cure:
- Chlorophyll breaks down — that harsh, green, "freshly mowed lawn" taste disappears
- THCA converts to THC — decarboxylation begins slowly at room temperature
- Terpenes are preserved — many monoterpenes evaporate above 70°F, so temperature control is critical
- Sugars and starches convert — reducing harshness on the throat
- Moisture equilibrates — the interior of the bud and exterior reach the same humidity level
A fast, hot dry kills terpenes and locks in chlorophyll. A 10–14 day slow dry at 60–65°F with 55–65% RH preserves the full terpene profile and sets the stage for a transformative cure. Speed is the enemy of quality here.
Strains with dense, resinous buds like OG Kush (26% THC) or Purple Kush (27% THC) are especially sensitive to drying conditions — their thick calyxes trap moisture and create mold pockets if humidity isn't managed precisely.
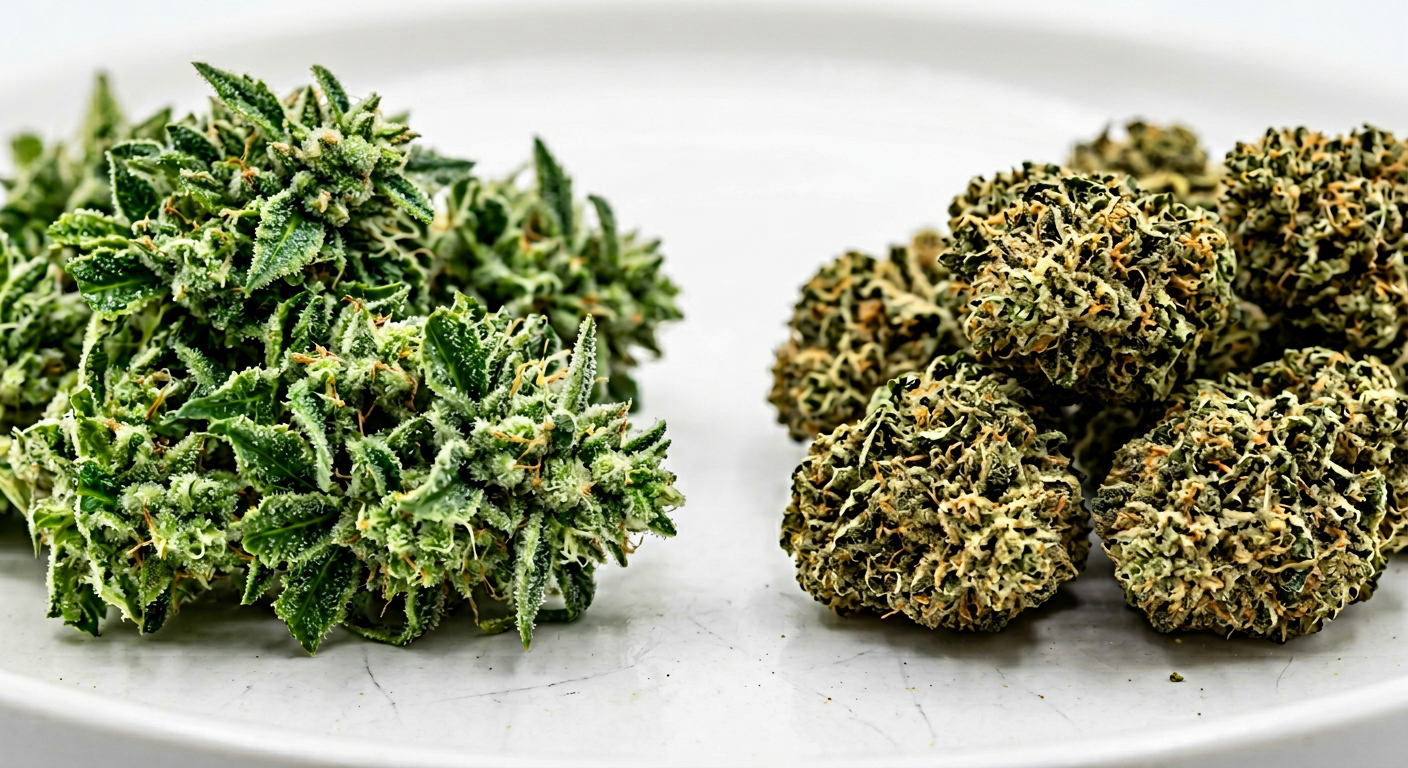
Wet Trim vs Dry Trim Cannabis: Which Method Wins?
The wet trim vs dry trim debate shapes your entire drying setup. Wet trimming removes fan and sugar leaves immediately after harvest, while dry trimming leaves them on during the drying period and trims after the dry is complete.
Each method changes how quickly moisture escapes and how much terpene protection your buds have during the critical early drying phase.
| Factor | Wet Trim | Dry Trim |
|---|---|---|
| Drying speed | Faster (5–7 days) | Slower (10–14 days) |
| Terpene retention | Lower | Higher |
| Mold risk (humid climates) | Lower | Higher |
| Trim difficulty | Easier (leaves pliable) | Harder (leaves brittle) |
| Final bud quality | Good | Superior |
| Best for | High humidity environments | Controlled dry rooms |
In most controlled indoor setups, dry trimming wins for quality. The leaf matter acts as a natural humidity buffer, slowing moisture loss and protecting terpene-rich trichomes from physical damage and evaporation during the dry phase.
If you're growing in a region with high ambient humidity (above 60% RH outdoors), wet trimming reduces surface area and speeds drying to lower your mold risk. If you have full environmental control, always choose dry trim for better flavor and aroma preservation.
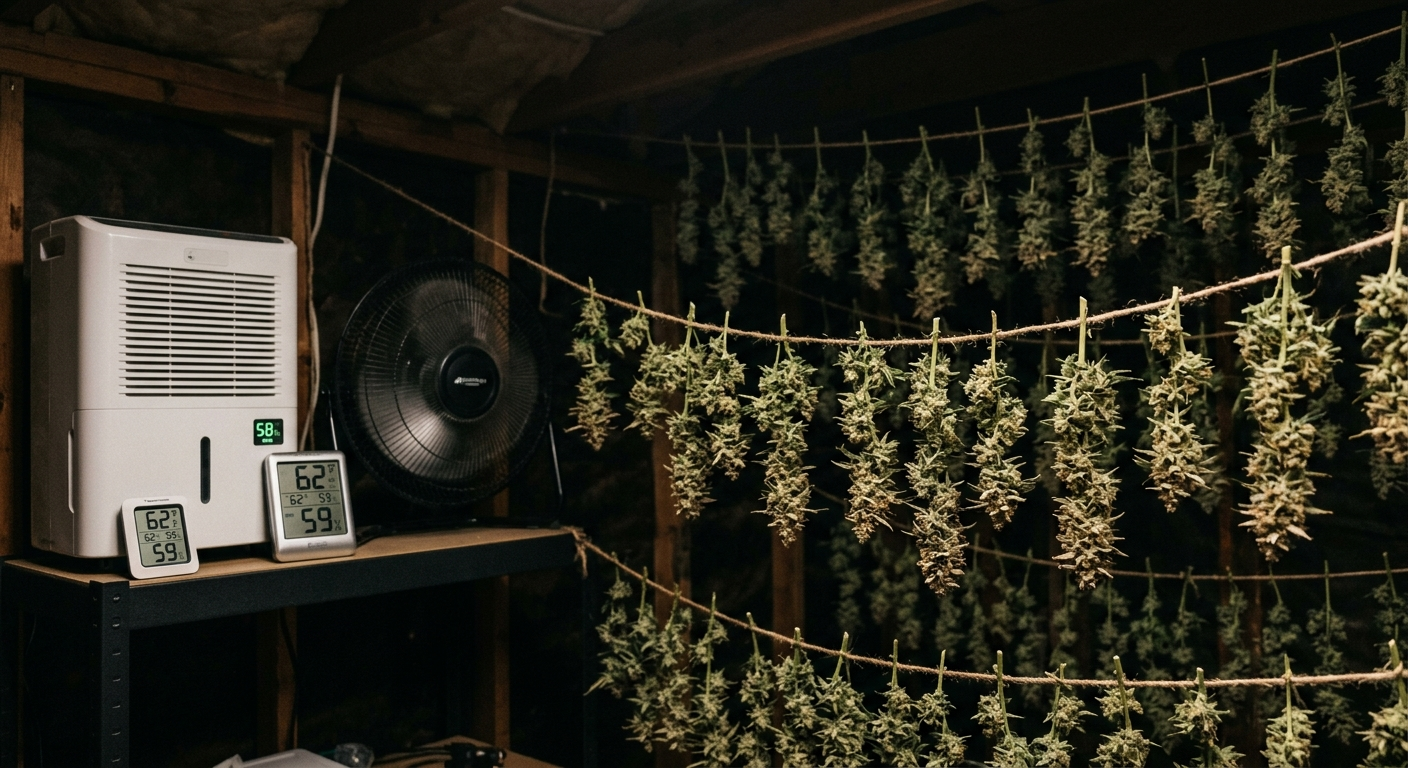
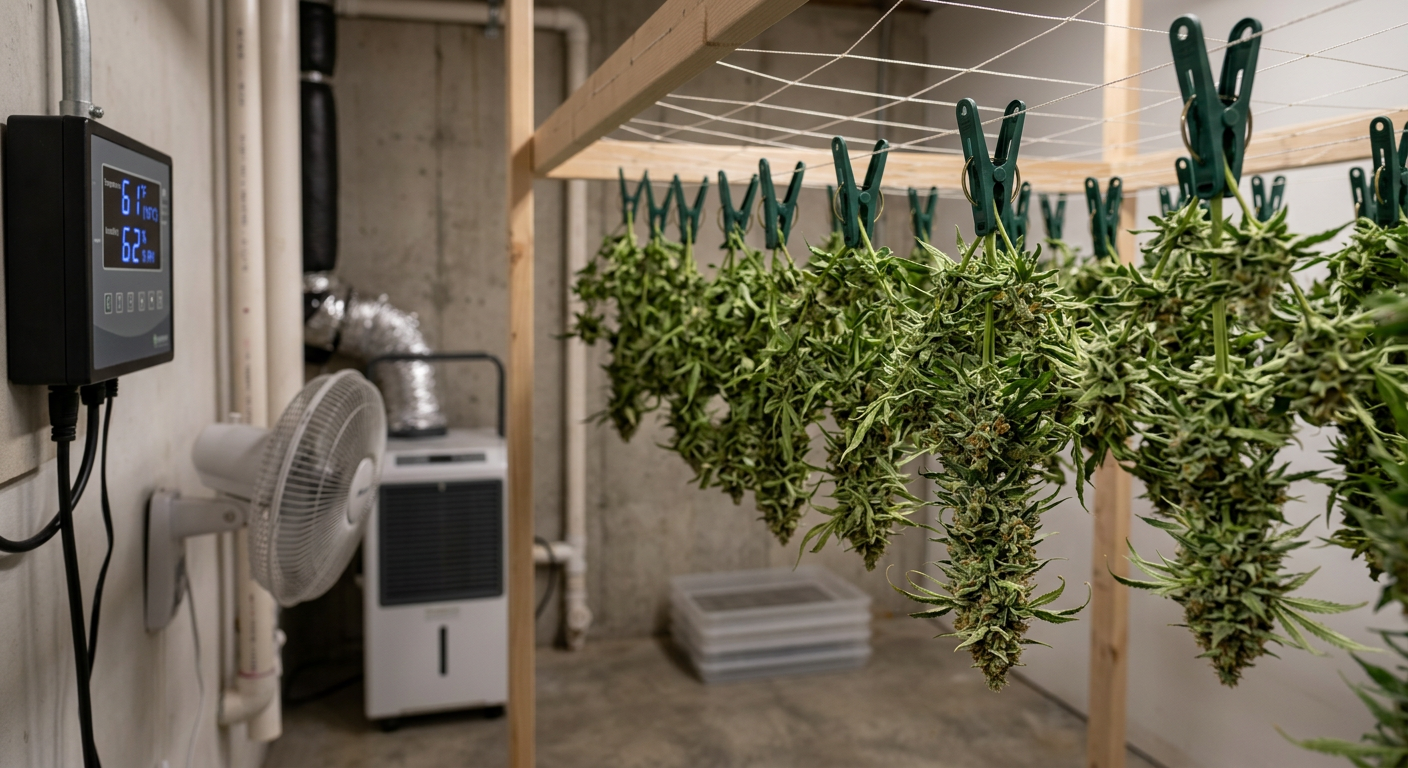
Setting Up Your Cannabis Drying Environment
Your drying room setup is the single most important variable in the entire post-harvest process. Cannabis drying humidity and temperature must stay within tight ranges for the full 10–14 day window to achieve professional results.
Here are the precise environmental targets to hit:
- Temperature: 60–65°F (15–18°C) — never exceed 70°F
- Relative Humidity: 55–65% RH — 60% is the sweet spot
- Airflow: Gentle indirect circulation, never direct fan on buds
- Light: Complete darkness — UV light degrades THC and terpenes
- Odor control: Carbon filter or sealed space with exhaust
Never point a fan directly at drying buds. Direct airflow causes the outside of the bud to dry faster than the inside, trapping moisture in the core. This creates the perfect mold environment — dry on the outside, wet on the inside. Use oscillating fans aimed at walls instead.
Your best drying locations include a dedicated grow tent with exhaust, a dark closet with a small USB fan and hygrometer, a basement (naturally cooler and stable), or a converted cabinet. The key is darkness, temperature stability, and the ability to measure and adjust humidity in real time.
Equipment you'll need to set up a proper drying space:
- Digital hygrometer/thermometer (at least 2 — one at bud level, one at exhaust)
- Oscillating or clip fan for air circulation
- AC unit or portable cooler if ambient temps exceed 68°F
- Humidifier or dehumidifier depending on your baseline RH
- Carbon filter + inline fan for odor management
- Drying rack or hanging lines
Monoterpenes like myrcene, limonene, and pinene begin evaporating significantly above 68°F. At 75°F, you can lose 20–30% of your terpene content within the first 48 hours of drying. This is why temperature control isn't optional — it's the difference between aromatic, complex bud and flat, harsh flower. Read more in our complete guide to pinene in cannabis.
Hanging vs Rack Drying: Setup and Best Practices
Hanging whole branches and using flat drying racks are the two primary methods for physically drying cannabis. Hanging preserves bud shape, promotes even drying, and is the preferred method for whole-plant or large-branch harvests.
Rack drying works best for individual buds, manicured nugs after wet trimming, or when you have limited vertical space.
Hanging Whole Branches
Cut branches 12–18 inches long and hang them upside down on a wire, rope, or dedicated drying rod. Space branches at least 3–4 inches apart for airflow. This is the best method for dry-trimmed buds and preserves natural bud structure as moisture draws down through the stem.
Flat Rack Drying
Spread individual buds on mesh drying racks (stackable tiered racks work well). Flip buds once every 24 hours to prevent flat spots and ensure even drying. Ideal for wet-trimmed buds or when you're working with limited hanging space.
Hybrid Method
Hang large colas whole and use racks for smaller buds and popcorn nugs. This maximizes your drying space and lets you pull smaller, faster-drying pieces into jars first while larger colas continue their slow dry.
For high-yield strains like Northern Lights x Big Bud (20% THC), proper spacing during hang-drying is critical — those dense, heavy colas need full air circulation to prevent interior moisture pockets that become mold hotspots within 72 hours.
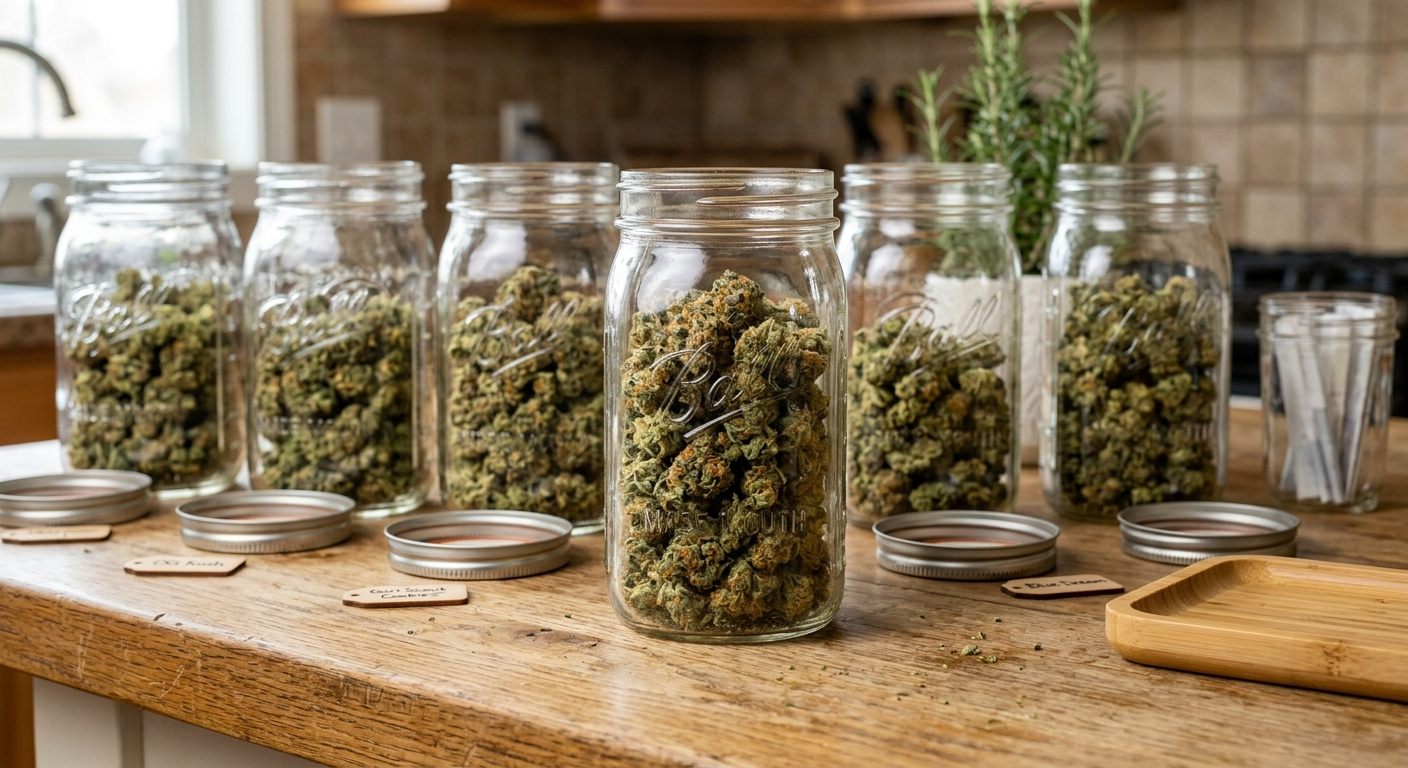
Write the harvest date and strain name on a piece of tape attached to each hanging branch or rack level. When you're drying multiple strains simultaneously, it's easy to lose track — and different strains dry at different rates depending on bud density and moisture content.
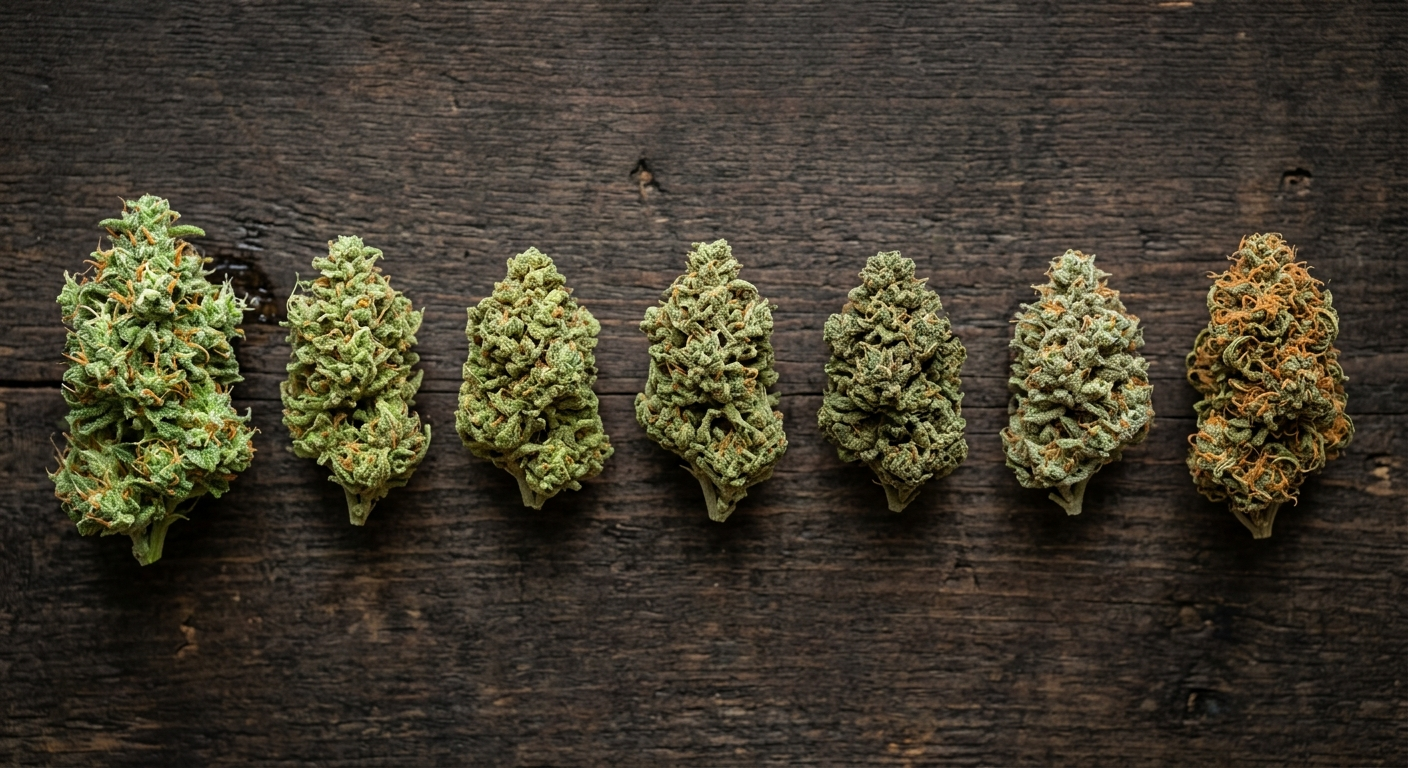
The Cannabis Drying Timeline: Day-by-Day Progress

How long to dry cannabis buds depends on bud density, starting moisture content, and your environmental conditions — but a properly controlled slow dry takes 10–14 days, not 3–5. Here's what to expect each phase of the drying process.
Active Evaporation Phase
Buds lose moisture rapidly. The outer surface dries while the interior remains wet. Your room humidity may spike — run your dehumidifier more actively during this window. Buds will feel damp to the touch and smell very strongly (nearly overwhelming). Do not disturb or handle buds more than necessary.
Surface Drying Phase
The outer layer of the bud dries noticeably. Stems still bend rather than snap. The intense, fresh-cut smell mellows slightly into a more complex aroma. If you dried too fast (temps above 70°F), you'll notice a "hay-like" smell developing — this is chlorophyll not breaking down properly.
Interior Drying Phase
Moisture migrates from the core of the bud outward. Smaller buds may be ready to jar. Test small buds by bending the stem — it should crack but not fully snap. The bud feels dry on the outside but still has slight give when gently squeezed. The aroma becomes noticeably more defined and strain-specific.
Final Dry Assessment
Perform the stem snap test on main colas. A clean, audible snap (not just a bend or creak) indicates readiness for jarring. Buds should feel dry but not brittle or papery — slightly springy is ideal. If buds crumble or feel papery, you over-dried (add a small humidity pack to your jars immediately).
The stem snap test is your most reliable readiness indicator. A stem that bends = needs more time. A stem that snaps cleanly but the bud isn't papery = perfect drying point. Buds dried to 10–12% internal moisture are ideal for jarring and beginning the cure.
The cannabis drying smell is one of your best early indicators of process quality. Proper slow drying produces an evolving, complex aroma — starting sharp and grassy, transitioning through an earthy phase, and finishing with clear strain-specific terpene notes. A persistent hay or barnyard smell after day 7 means your temp was too high or your humidity too low.
Step-by-Step Cannabis Curing in Jars: The Complete Protocol
Cannabis curing in jars is the standard method for small to medium harvests, providing a controlled, airtight environment where moisture equalizes, enzymes continue breaking down chlorophyll, and terpenes develop complexity. Use wide-mouth Mason jars in quart (32oz) or half-gallon sizes.
Jar Preparation
Wash and completely dry your Mason jars. Any residual moisture will immediately contaminate your cure. Fill jars to 75–80% capacity — overpacking restricts airflow during burping and creates pressure points that damage trichomes. Label each jar with strain name, harvest date, and dry completion date.
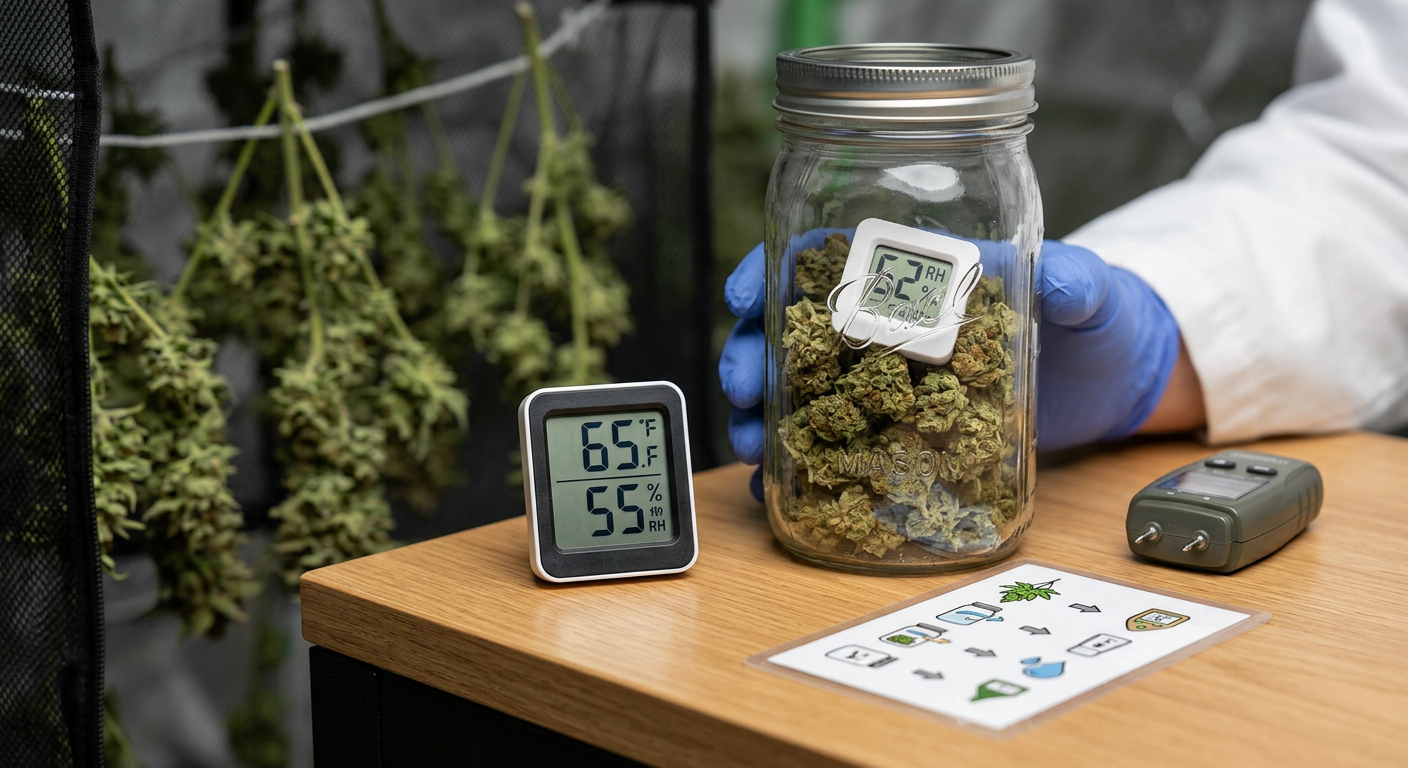
Initial Humidity Check
Within the first 12 hours of jarring, open the jar and check for moisture condensation on the glass. Condensation means your buds were jarred too wet — immediately remove them and return to drying for 24–48 more hours. Place a digital hygrometer reader (Inkbird or Govee mini sensors work perfectly) in your jar to track RH continuously.
The Burping Schedule
Burping replaces CO2 and ethylene gas that builds up inside the jar while replenishing oxygen for enzymatic activity. Follow this exact schedule for best results:
- Week 1 (Days 1–7): Open jars 2–3 times daily for 15–20 minutes each session
- Week 2 (Days 8–14): Reduce to once daily for 10–15 minutes
- Weeks 3–4: Burp every 2–3 days for 5–10 minutes
- Weeks 5–8: Burp once weekly, checking RH each time
- Beyond 8 weeks: Burp monthly or move to long-term storage containers
Target RH During Cure
Your cure RH target is 58–65% inside the jar. Below 55%, your buds are too dry and terpene development stalls. Above 65%, mold risk spikes significantly. The ideal cure window of 58–62% allows enzymatic processes to continue while keeping moisture at safe levels.
Storage During Cure
Store curing jars in a cool, dark location — a cabinet, drawer, or dark shelf away from heat sources and windows. Temperature during the cure should stay 60–70°F. Higher temperatures accelerate terpene evaporation even inside sealed jars. Never store jars in direct light — UV exposure degrades THC into CBN rapidly.
During the cure, enzymatic processes convert remaining chlorophyll, remove residual starches and sugars, and continue the slow breakdown of non-cannabinoid plant material. This is why cured cannabis smells dramatically different — and better — than freshly dried bud. The science is similar to aging fine wine: controlled oxidation and enzymatic activity over time builds complexity. This connects directly to terpene preservation strategies covered in our humulene terpene guide.
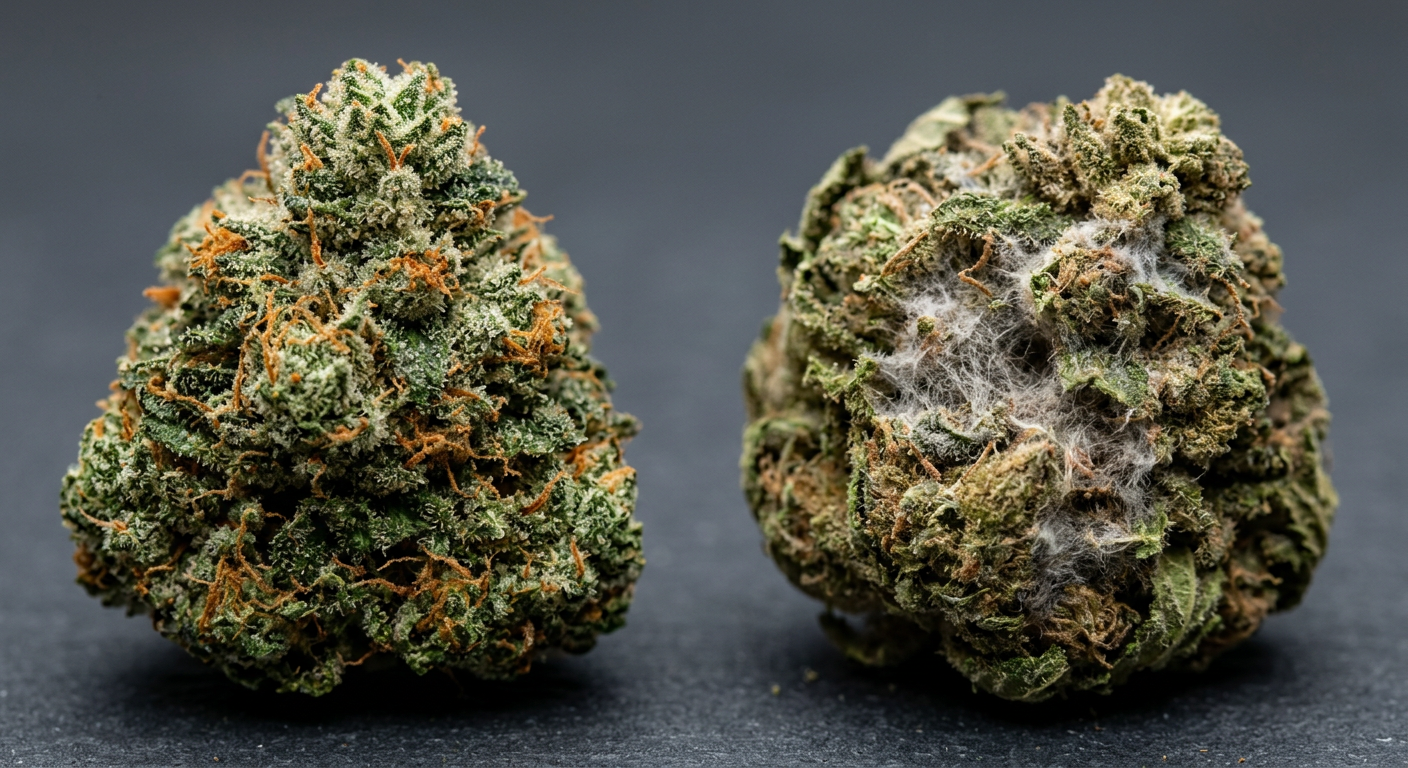
Preventing Mold During Drying and Curing
Preventing mold during drying cannabis is non-negotiable — once Botrytis (bud rot) or white powdery mildew takes hold in a jar or drying room, it spreads fast and can destroy an entire harvest within 48–72 hours. The key is controlling humidity, airflow, and temperature simultaneously.
The conditions mold needs to thrive:
- RH above 65% for extended periods
- Poor airflow with stagnant air pockets
- Temperatures above 75°F
- Physical bud damage exposing inner moisture
- Pre-existing mold spores from the grow room
If you detect white fuzzy growth inside a curing jar, do not attempt to salvage those buds for consumption. Mycotoxins from Botrytis and other cannabis molds are harmful to inhale. Remove and discard contaminated material immediately, sanitize the jar with isopropyl alcohol, and inspect neighboring jars closely for early signs of spread.
Proactive mold prevention strategies during drying:
- Maintain RH at 55–65% — use a dehumidifier if your space runs higher
- Space all hanging branches at least 3–4 inches apart
- Use indirect oscillating airflow throughout the drying space
- Inspect every bud for signs of pre-harvest Botrytis before hanging
- Remove any bud that shows grey or white fuzz immediately
- Clean your drying space with diluted hydrogen peroxide before use
Proactive mold prevention strategies during curing:
- Never jar buds above 65% RH (measure with a jar hygrometer)
- Follow the burping schedule strictly, especially in week 1
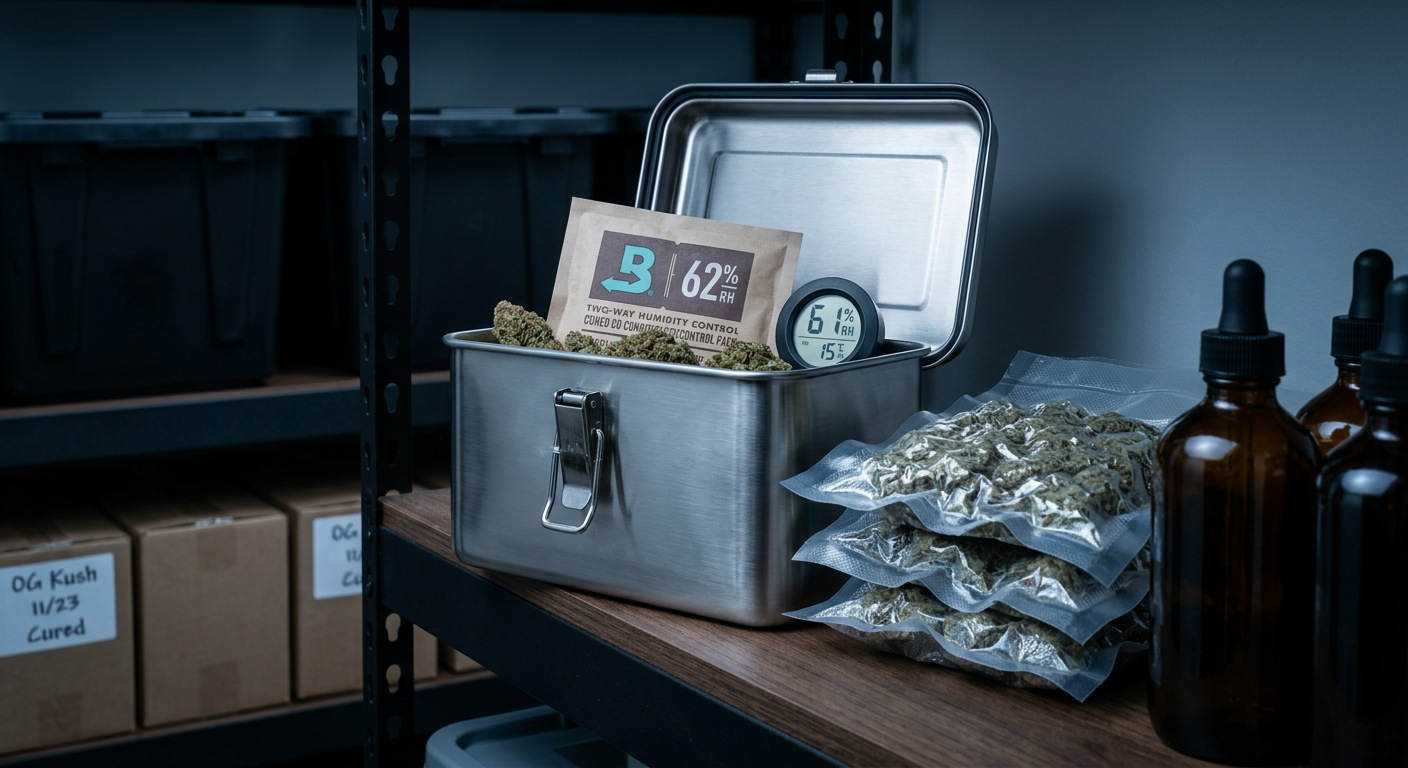
- Use Boveda or Integra Boost 62% humidity packs as a buffer
- Store jars at consistent temperature without fluctuation
- Inspect every bud visually during each burping session
The single biggest mold risk moment is jarring too early. Buds that look dry on the outside but still have 70%+ internal moisture will bring their humidity into the jar — spiking RH to dangerous levels overnight. Always complete a full 10–14 day slow dry before jarring, and verify with a jar hygrometer within the first 12 hours.
Using Humidity Packs: Boveda, Integra, and When to Use Them
Humidity packs like Boveda and Integra Boost are two-way humidity control packets that both add and absorb moisture to maintain a target RH inside sealed jars. They're an excellent safety net during curing but should not replace proper drying technique.
When to use humidity packs:
- When your cured bud drops below 55% RH in the jar
- When you're entering the extended cure phase (weeks 4–8+) and need passive maintenance
- For long-term storage to prevent desiccation
- To rescue slightly over-dried buds
When NOT to rely on humidity packs:
- As a substitute for a proper 10–14 day dry (they can't absorb enough moisture from wet bud)
- If your jar reads above 68% RH — packs maintain target levels, they don't dramatically reduce high moisture
- As a replacement for regular burping during weeks 1–2
| Product | Target RH | Best Use Case | Lifespan |
|---|---|---|---|
| Boveda 62% | 62% RH | Active cure weeks 2–8 | 2–4 months |
| Boveda 58% | 58% RH | Long-term storage | 2–4 months |
| Integra Boost 62% | 62% RH | Active cure, terpene focus | 2–3 months |
| Integra Boost 55% | 55% RH | Drier climates, storage | 2–3 months |
One Boveda 8-gram pack is sufficient for a quart jar. Use one 67-gram pack per half-gallon jar. Replace packs when they become fully rigid and hard — that means they've reached capacity and are no longer active.
For terpene-forward strains like Sour Diesel (24% THC) or Super Lemon Haze (23% THC), use Integra Boost 62% rather than Boveda during the active cure phase. Some growers report Integra packs introduce less moisture vapor contact with the bud surface, better preserving delicate citrus and fuel terpenes.
Extended Curing: The 4-Week to 8-Week Difference
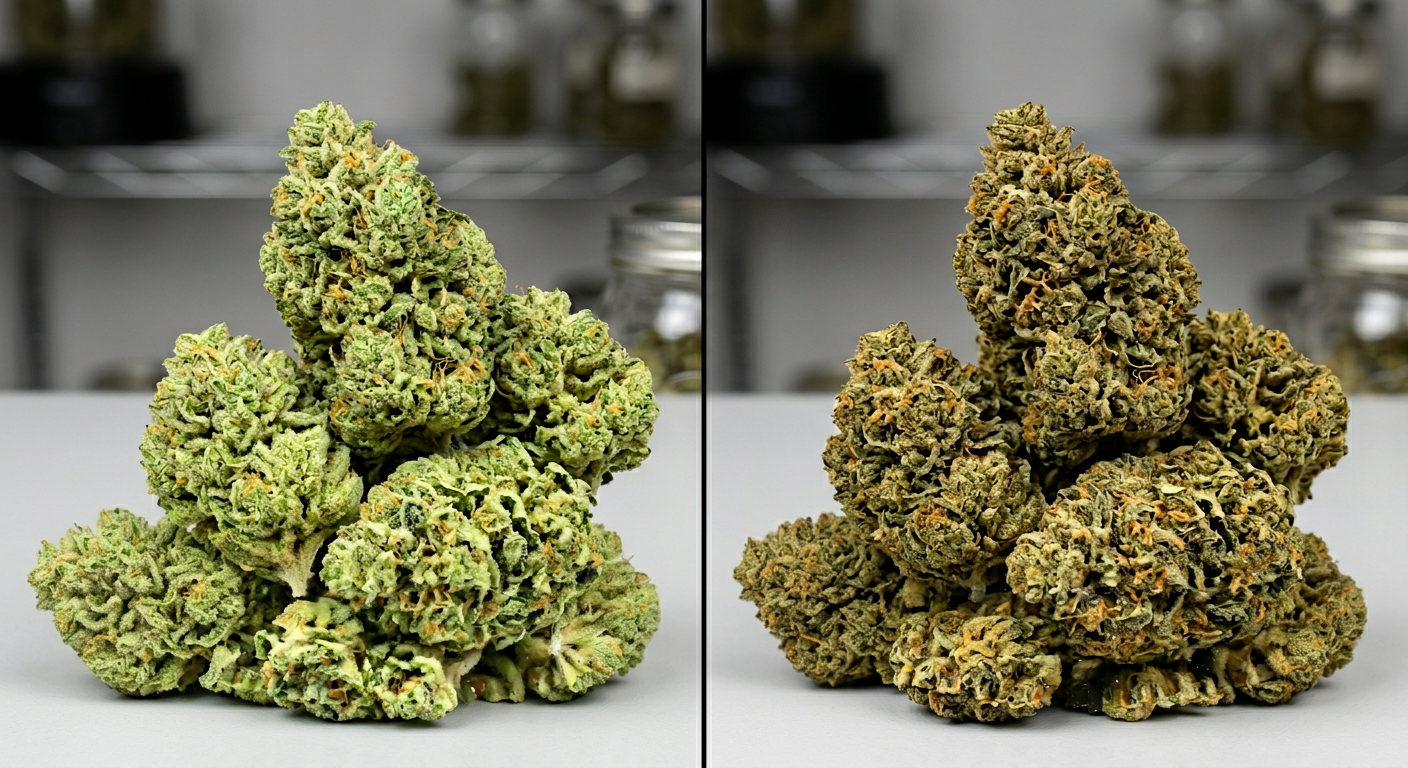
Extended cannabis curing time produces measurably better bud in terms of smoothness, flavor complexity, and aroma intensity. The benefits of curing beyond 4 weeks are real, documented by growers and increasingly by lab testing — and understanding them changes how you approach the entire post-harvest process.
Here's what changes across the full cure timeline:
| Cure Stage | Duration | What's Happening | Quality Level |
|---|---|---|---|
| Early cure | Week 1–2 | Active moisture equalization, CO2 release, chlorophyll breakdown begins | Smokeable but rough |
| Mid cure | Week 2–4 | Chlorophyll mostly degraded, sugar conversion, terpene development begins | Good quality |
| Full cure | Week 4–6 | Enzymatic activity nearly complete, full terpene expression, smooth combustion | Excellent quality |
| Premium cure | Week 6–8 | Full complexity, maximum smoothness, terpene profile fully developed | Premium quality |
| Extended cure | 3–6 months | Continued slow development, reduced harshness, altered cannabinoid ratios | Connoisseur quality |
High-resin, high-THC strains benefit most from extended curing. A jar of Quantum Kush (30% THC) or Black Widow (26% THC) cured for 8 weeks will be noticeably smoother and more complex than the same harvest sampled at 2 weeks.
The biggest quality jump happens between week 2 and week 4. If you can only commit to one extended milestone, get your cure to 4 weeks minimum before consuming or selling. The difference in smoothness and flavor between 2-week and 4-week cured bud is dramatic enough to notice in a blind comparison.
For strains with exceptional terpene profiles — like Tangerine Haze (18% THC) or White Berry (18% THC) — an extended cure truly unlocks the aromatic potential that the genetics built. These aren't just nice smelling strains — they're strains that reward patient, precise post-harvest handling.
Slow Dry Cannabis: The Complete Low-and-Slow Philosophy
Slow dry cannabis methodology is the philosophy of extending drying time to 10–14 days rather than 5–7 by prioritizing environmental control over speed. Commercial growers increasingly adopt this approach because the quality difference justifies the additional time and infrastructure.
The slow dry approach requires:
- Lowering temperature to 60–65°F (below most room temps — usually requires AC)
- Holding RH at 55–65% precisely (dehumidifier + humidifier working together)
- Reducing airflow to gentle indirect circulation only
- Maintaining complete darkness throughout the drying period
- Using dry trim method to keep leaf matter as a moisture buffer
The science behind slow drying connects directly to the VPD (Vapor Pressure Deficit) principles used during the grow itself. Lower temperature combined with moderate humidity creates a low VPD environment that slows transpiration from the bud surface — mimicking the plant's own moisture management system. For a deeper look at VPD during growing, see our complete VPD guide for cannabis.
If you grow in a basement or cool garage naturally sitting at 62–65°F, you already have the ideal slow-dry temperature for free. Use a basic dehumidifier to hold RH at 60% and let the space do the work. Some of the best home-grown cures happen in spaces where growers stopped trying to control every variable and let natural cool, stable conditions do the heavy lifting.
When you combine slow dry cannabis technique with an extended 6–8 week cure, you're working with the same timeline and principles used in craft cannabis production — where a harvest from October might not reach customers until December, because the producer understands that the wait is the product.
Long-Term Storage After Curing
Once your cure is complete — after 6–8 weeks of properly managed jar curing — your cannabis is ready for long-term storage. At this point, the enzymatic activity has largely completed, and your goal shifts from active development to passive preservation.
Long-term storage requirements:
- Temperature: 55–65°F — consistent, without fluctuation
- RH: 58–62% — maintained with humidity packs
- Light: Complete darkness — UV-blocking containers or dark storage
- Oxygen: Minimize — consider vacuum sealing for very long storage (6+ months)
- Container: Glass mason jars remain best — avoid plastic (off-gassing, static)
Properly cured and stored cannabis retains potency and flavor for 12–18 months. After 18 months, THC gradually converts to CBN, which produces more sedative, less psychoactive effects — some users specifically age cannabis for this reason.
Never refrigerate cannabis for storage. The repeated temperature fluctuations as you open and close the fridge create condensation cycles inside your jars, dramatically increasing mold risk. A cool, dark cabinet or cellar is always preferable to refrigeration for cannabis storage.
For growers who produce large quantities — especially high-yield strains like those descended from Northern Lights x Amnesia Haze (24% THC) or New York Power Diesel (24% THC) — vacuum sealing in glass Mason jars with a FoodSaver jar attachment is the best long-term solution. Vacuum sealing removes the oxygen that drives oxidative degradation, preserving both potency and terpene content for 18–24+ months.
Drying and Curing Quick-Reference Checklist
Use this complete checklist as your harvest-to-storage roadmap for every grow cycle. Print it, bookmark it, or screenshot it for reference during your next harvest window.
🌿 Pre-Harvest Preparation
- ☐ Confirm harvest readiness using trichome inspection (see our harvest timing guide)
- ☐ Set up drying space: 60–65°F, 55–65% RH, complete darkness
- ☐ Install oscillating fan aimed at walls (not buds)
- ☐ Hang drying lines or set up mesh racks
- ☐ Have clean, dry Mason jars ready for jarring
- ☐ Have digital hygrometer/thermometer at bud level
✂️ Harvest and Trim Day
- ☐ Choose wet or dry trim based on your humidity environment
- ☐ Inspect all buds for mold or pests before hanging
- ☐ Space branches 3–4 inches apart minimum
- ☐ Record harvest date and strain on each branch/rack
- ☐ Set environmental controls and check within 6 hours
📅 Drying Phase (Days 1–14)
- ☐ Check temp and RH twice daily
- ☐ Inspect for mold signs every 2–3 days
- ☐ Perform stem snap test from day 10 onward
- ☐ Do not touch or handle buds unnecessarily
- ☐ Jar when stems snap cleanly, buds feel slightly springy
🫙 Curing Phase (Weeks 1–8)
- ☐ Fill jars to 75–80% capacity
- ☐ Check for condensation within 12 hours of jarring
- ☐ Burp 2–3x daily for first week
- ☐ Maintain jar RH at 58–65%
- ☐ Add humidity pack if RH drops below 55%
- ☐ Gradually reduce burping frequency from week 2 onward
- ☐ Complete minimum 4-week cure before consuming
- ☐ Complete 6–8 week cure for premium quality
For more on what to expect during the grow leading up to harvest, our cannabis flowering stage guide covers the full late-stage development timeline that feeds directly into your harvest and drying decisions.
Frequently Asked Questions
How long does it take to dry cannabis buds properly?
A proper slow dry takes 10–14 days at 60–65°F and 55–65% RH. Faster drying in 5–7 days is possible but sacrifices terpene retention and chlorophyll breakdown. Use the stem snap test — a clean, audible crack means your buds are ready to jar. Never rush this phase.
What is the ideal humidity for drying and curing cannabis?
For drying, target 55–65% RH at 60–65°F. For curing in jars, maintain 58–65% RH inside the sealed jar. Below 55%, terpene development stalls and buds become brittle. Above 65%, mold risk increases dramatically. A Boveda or Integra 62% pack helps maintain the ideal cure range passively.
Why does my dried cannabis smell like hay?
A hay or barnyard smell after drying means chlorophyll didn't break down properly — usually caused by drying too fast at high temperatures (above 70°F). Continue curing in jars for 4–6 weeks: the enzymatic breakdown process will often resolve the hay smell as chlorophyll degrades. In the future, slow your dry with lower temps and 60% RH.
How often should I burp my cannabis curing jars?
Burp jars 2–3 times daily for 15–20 minutes during the first week. Reduce to once daily in week 2, then every 2–3 days in weeks 3–4, then weekly through weeks 5–8. After 8 weeks with a humidity pack installed, monthly burping is sufficient for long-term storage maintenance.
Can I cure cannabis for too long?
No — properly cured and stored cannabis can continue improving for 3–6 months and remain stable for 12–18 months. Beyond 18 months, THC gradually converts to CBN. The risk isn't over-curing; it's improper storage during a long cure — specifically mold from humidity fluctuations or THC degradation from light or heat exposure.


