What Actually Happens Inside Your Plant During Flowering
You flipped to 12/12 three days ago. Nothing looks different. Is it working? Here's the truth: your plant is already changing on a hormonal level — you just can't see it yet. The cannabis flowering stage is a precise biological sequence, and knowing exactly what happens each week separates growers who harvest fire from growers who harvest regret.
This guide breaks down every week of the flowering stage with specific numbers, actionable steps, and the warning signs most growers miss until it's too late. Whether you're running an indica-dominant cultivar like Purple Kush with an 8-week flower time or a sativa-leaning strain like Super Lemon Haze that stretches to 11 weeks, this framework applies.
Flowering is where all your vegetative-stage work pays off — or where preventable mistakes compound into lost yield. Let's walk through every phase, day by day, week by week.
The 12/12 Light Schedule: How Flowering Gets Triggered
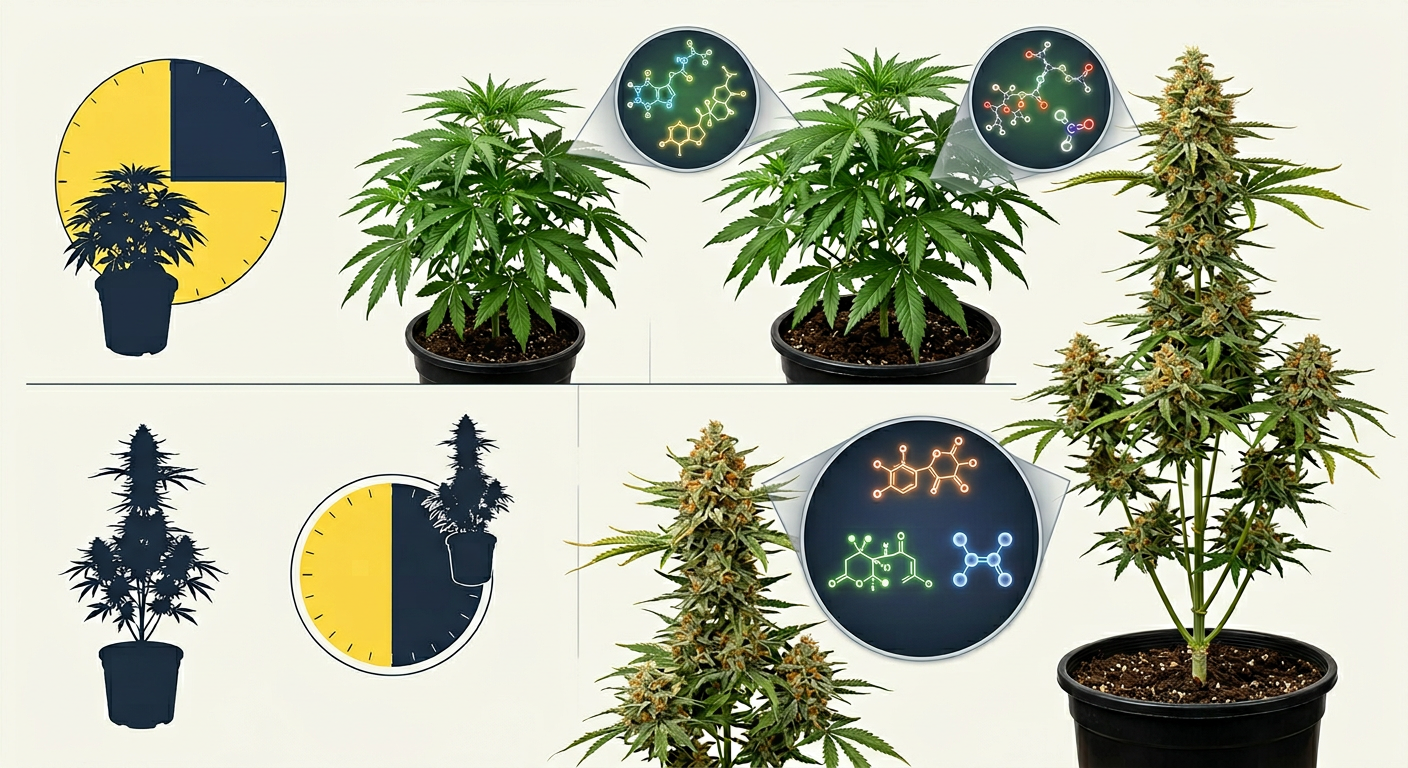
The cannabis flowering stage begins when your plant detects an uninterrupted dark period of roughly 12 hours. This triggers a hormonal shift — specifically a drop in phytochrome far-red (Pfr) and a surge in florigen-like signals — that tells the plant to stop vegetating and start reproducing.
For photoperiod strains, you control this entirely. Autoflowering varieties like Skywalker OG Autoflower bypass the light trigger entirely, flowering based on age (typically 3–4 weeks from sprout). But for feminized photoperiod seeds, the 12/12 schedule is your on switch.
- Indoor growers: Switch your timer from 18/6 (or 20/4) to 12 hours light / 12 hours dark
- Outdoor growers: Natural daylength dropping below ~14 hours (typically late July to mid-August in the Northern Hemisphere) triggers flowering automatically
- Light deprivation: Outdoor growers can force early flowering by blacking out the canopy to create an artificial 12-hour night
Light leaks kill flowering. Even a single LED indicator light, a crack under a door, or a 30-second light interruption during the dark period can re-vegetate your plant or cause stress hermaphroditism. Inspect your grow space for leaks before you flip.
The cannabis flowering stage light schedule doesn't have to be exactly 12/12 — some growers run 11/13 to accelerate flowering in stubborn sativa-dominant strains. The critical variable is the uninterrupted dark period, not the light period itself.
Flowering is triggered by the length of continuous darkness, not the light period. A 12-hour dark period (or longer) is what initiates bud development in photoperiod cannabis strains. Protect your dark period at all costs.
Cannabis Flowering Stage Timeline: Week-by-Week Breakdown
The cannabis flowering stage timeline runs 7 to 11 weeks for most strains, split into four biological phases: transition, early flower, mid flower (peak bud development), and late flower (ripening). Here's exactly what's happening each week and what you should be doing about it.
Week 1–2: Transition & Pre-Flower (The Stretch Begins)
Days 1–14 after flipping to 12/12 are called the transition or pre-flower phase. White pistils emerge at bud sites. The plant begins its "flowering stretch" — vertical growth can increase 25–100% in this phase alone. Indica-dominant strains stretch 25–50%; sativa-dominant strains can double in height. Keep a close eye on canopy-to-light distance. Continue feeding vegetative-level nutrients but begin reducing nitrogen slightly by Day 10.
Week 3: Early Bud Formation
By Day 18–21, pistils cluster and calyxes stack. You'll see the first true bud structures forming at main colas and every node. The stretch typically slows or stops by the end of Week 3 for indicas, but sativas may keep stretching into Week 4 or 5. This is when you begin transitioning to a bloom nutrient formula — increase phosphorus and potassium, start reducing nitrogen. Target P:K ratios around 1:2 at this point.
Week 4–5: Rapid Bud Development (The Power Phase)
Weeks 4 and 5 represent the most explosive bud growth in the entire cannabis flowering stage. Calyxes stack rapidly, pistils multiply, and resin glands (trichomes) begin forming on bud surfaces and surrounding sugar leaves. Nutrient demand peaks here — plants are hungry for phosphorus, potassium, and calcium. Feed at maximum bloom doses and monitor pH closely (5.8–6.2 for hydro, 6.0–6.8 for soil). Terpene profiles begin to take shape.
Week 6–7: Mid-Flower Consolidation & Swell
Buds stop adding new calyxes and begin swelling — this is where density is determined. White pistils start turning orange/amber (typically 20–30% at this stage). Trichome coverage extends down sugar leaves. The canopy fills with heavy, resinous colas. Reduce nitrogen to near zero; maintain high P and K. Watch humidity carefully — dense bud structure increases botrytis (bud rot) risk significantly above 50% RH.
Week 7–8: Late Flower — Trichome Maturation
For most 8-week strains (many indica-dominant varieties), this is the home stretch. Pistils are 60–80% amber/red. Trichomes are milky white under a 60x loupe — this is peak THC. Fan leaves begin yellowing as the plant pulls nitrogen from them (normal and healthy). Begin flushing or reducing nutrient concentration in preparation for harvest. Do NOT add high-nitrogen products now.
Week 8–11: Extended Ripening (Sativas & Long-Flowering Strains)
Sativa-dominant strains like New York Power Diesel and haze varieties need 10–11 weeks to fully mature. Trichomes continue maturing — milky shifts to amber as THC converts to CBN. More amber trichomes = heavier, more relaxing effect. Most growers harvest when trichomes are 70–90% milky with 10–30% amber depending on desired effect profile. Flush for 7–14 days (soil) or 3–7 days (hydro) before harvest.
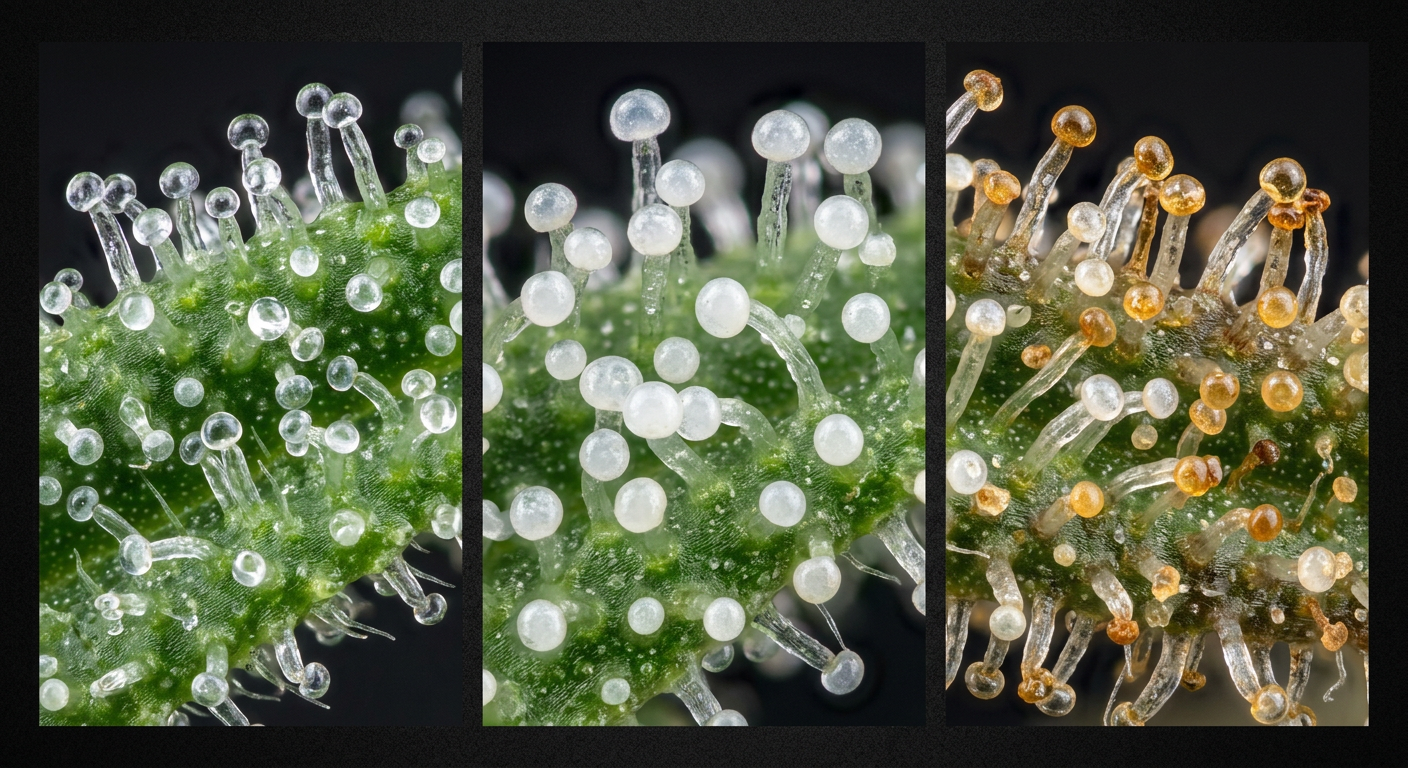
Science insight: Trichome maturation follows a predictable sequence — clear (immature THC-A forming) → cloudy/milky (peak THC-A) → amber (THC-A degrading to CBN). Harvesting at peak milky maximizes THC potency; waiting for more amber produces a more sedative, body-heavy effect due to CBN content.
The Flowering Stretch: Managing Height During Weeks 1–3
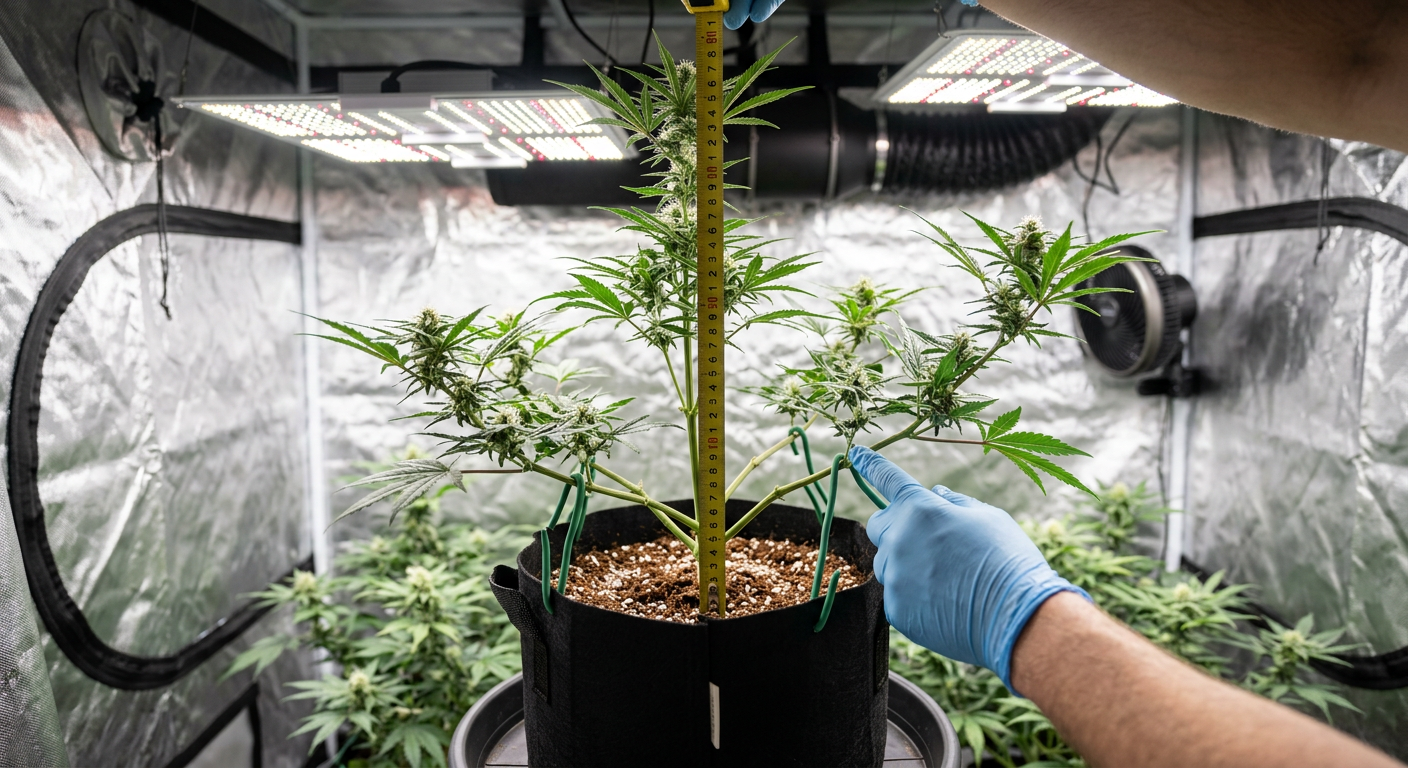
The flowering stretch is one of the most underestimated challenges in indoor growing. Plants can grow 2–4 inches per day during peak stretch — and if you're not ready, your canopy will hit your lights before buds even form properly.
Sativa-dominant strains are the biggest offenders. Sour Diesel, Tangerine Haze, and similar genetics can double in height after the flip. Indica-heavy strains like Northern Lights x Big Bud typically stretch 30–50% and are far more manageable in confined spaces.
Here's how to control stretch without stressing your plants during the critical early flowering window:
- Lower your lights gradually — keep at least 18–24 inches between canopy and HID or LED panels during stretch
- LST (Low Stress Training) — gently bend and tie down tall shoots to keep the canopy even; this is safe through early Week 3
- Reduce nitrogen — high nitrogen levels encourage vegetative (upward) growth; cutting N early slows stretch
- Lower night temperatures — a 10°F drop at lights-off reduces internode elongation by encouraging compact growth
- Avoid supercropping after Week 2 — high-stress techniques that damage stems need recovery time the plant doesn't have in flowering
Pro tip: If your plant is stretching toward your lights at an alarming rate, try bending the main cola to a 45-degree angle and securing it with soft plant ties. This redistributes growth hormones (auxins) to lateral branches and effectively stops vertical stretch without slowing bud development.
Check your vegetative stage guide for training techniques that make stretch management easier — plants trained with ScrOG or LST during veg enter flowering with a far more manageable canopy profile. Our ScrOG growing guide covers this in depth.
Flowering Stage Nutrients: The Complete P/K Feeding Strategy
Flowering stage nutrients for cannabis follow a clear arc: reduce nitrogen, increase phosphorus and potassium, then taper everything off for the final flush. Most feeding mistakes during flowering come from growers either keeping nitrogen too high (produces airy, leafy buds) or pushing P/K too hard too early (causes nutrient burn and lockout).
Here's the week-by-week nutrient strategy that maximizes bud density and resin production:
| Week | Nitrogen (N) | Phosphorus (P) | Potassium (K) | Key Supplements |
|---|---|---|---|---|
| Week 1–2 | Medium | Low-Medium | Medium | CalMag, transition booster |
| Week 3 | Low-Medium | Medium | Medium-High | Bloom base, PK starter |
| Week 4–5 | Low | High | High | PK 13/14 or equivalent, terpene enhancer |
| Week 6–7 | Very Low | Medium-High | High | Ripening formula, carbohydrates |
| Week 8+ | None | Low | Low | Final flush / plain water |
CalMag (calcium-magnesium) supplementation is critical throughout flowering, especially in soft water or coco coir grows. Calcium drives cell wall development in rapidly forming buds; deficiency shows as dark brown spots on leaves and bud tissue.
- Soil pH: Maintain 6.0–6.8 for optimal nutrient uptake during flowering
- Hydro/coco pH: Keep at 5.8–6.2; drifting above 6.5 causes phosphorus lockout
- EC/PPM: Peak feeding around 1,200–1,600 PPM (2.4–3.2 EC) during Weeks 4–6; taper to 800–1,000 PPM in Week 7–8
- Flush threshold: If runoff EC is 30%+ above input EC, flush with plain water until normalized
The biggest flowering nutrient mistake is keeping nitrogen too high past Week 3. Excess nitrogen competes with phosphorus uptake, produces leafy (rather than dense) buds, and leaves a harsh nitrogen taste in the final product. Taper N aggressively after the stretch ends.
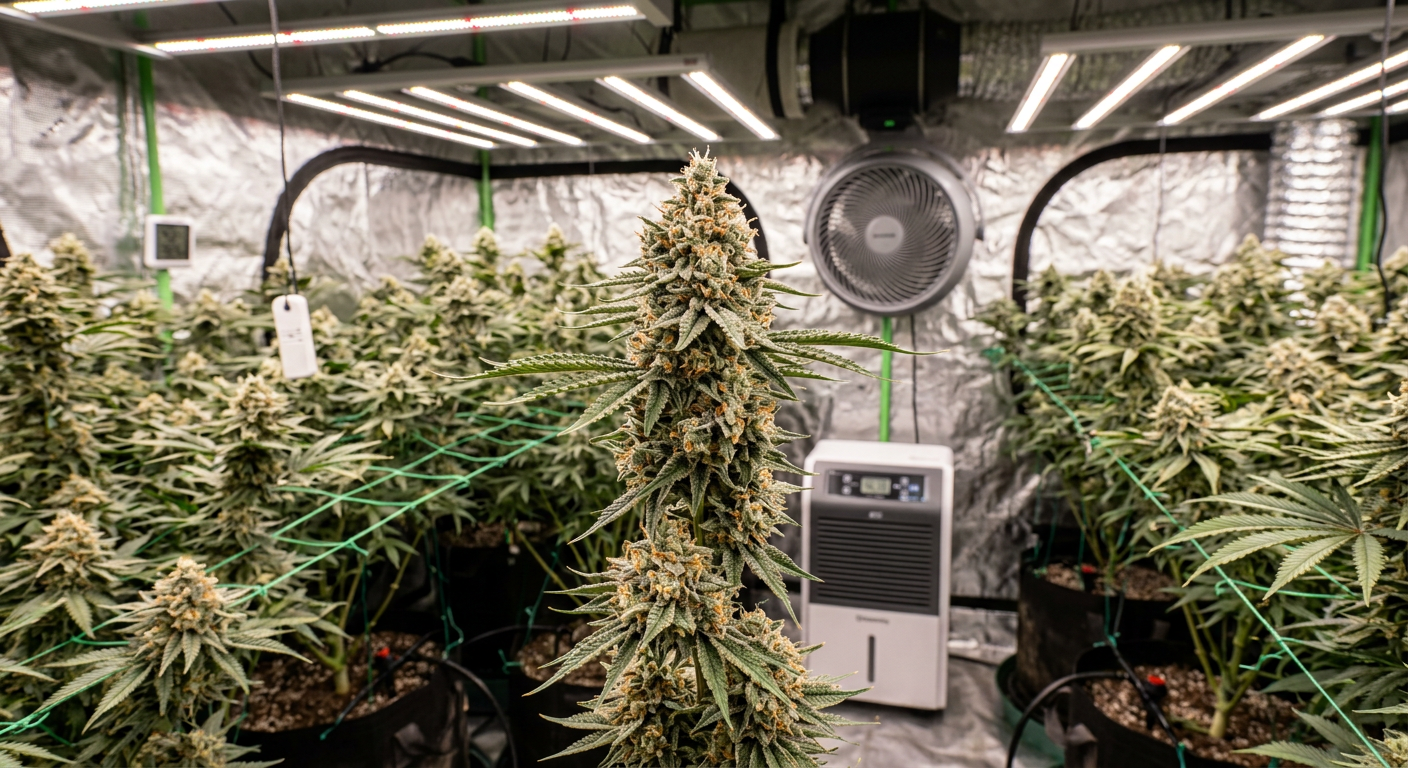
Temperature and Humidity: The Flowering Stage Environment
Flowering stage temperature and humidity for cannabis follow different rules than veg. The parameters that grow healthy vegetative plants can actually harm flowering plants — particularly the humidity targets, which must drop significantly as buds develop density.
Here are the target ranges for each flowering phase:
- Early Flower (Weeks 1–3): Temperature 68–77°F (20–25°C), RH 50–60%
- Mid Flower (Weeks 4–6): Temperature 65–75°F (18–24°C), RH 45–55%
- Late Flower (Weeks 7+): Temperature 62–72°F (17–22°C), RH 35–45%
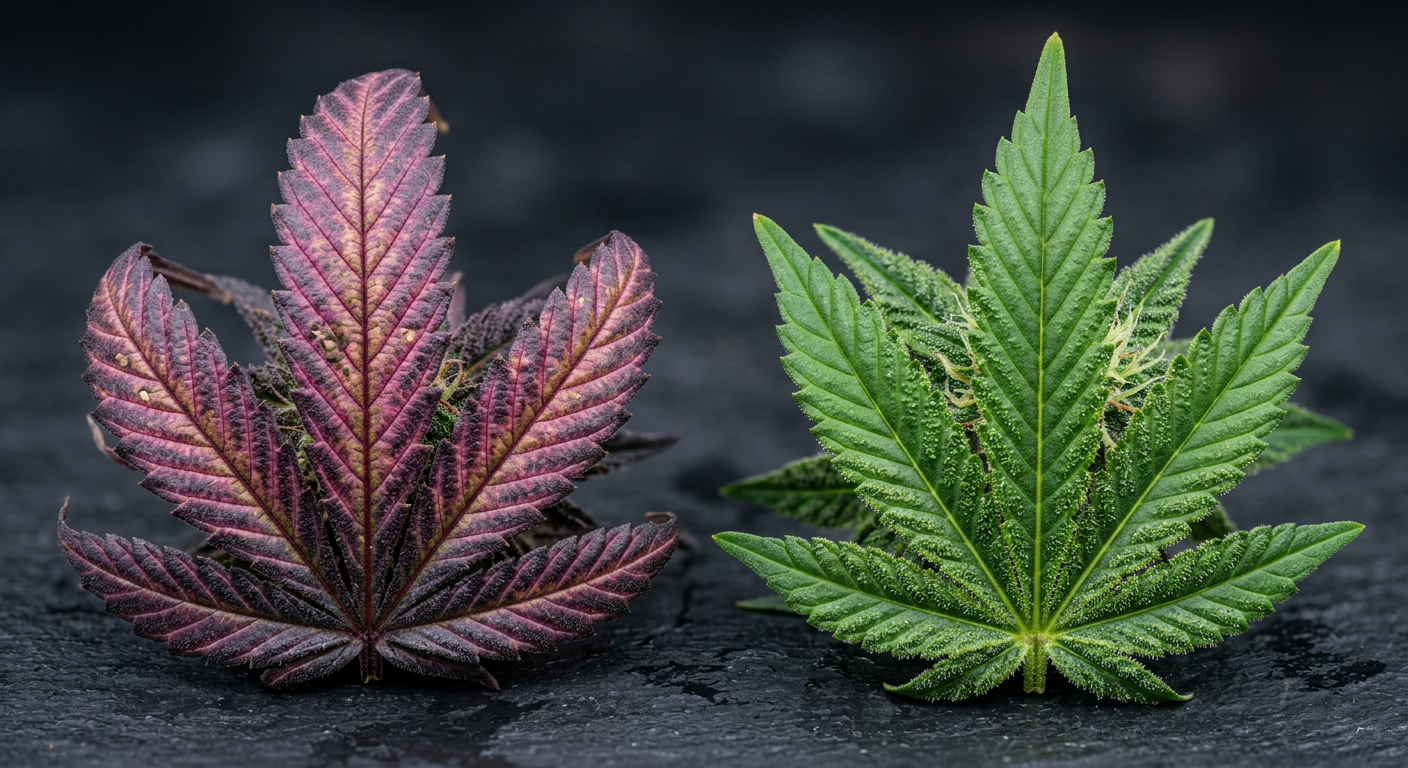
- Night temperatures: 8–10°F cooler than daytime — triggers anthocyanin (purple) expression in strains like Purple Power and Purple Kush
Botrytis (bud rot) alert: Humidity above 55% during late flower is the single biggest yield killer in dense-budding strains. Bud rot (Botrytis cinerea) begins invisibly inside the cola and spreads outward — by the time you see the gray mold on the surface, the inside is already destroyed. Drop RH below 45% from Week 6 onward.
VPD (Vapor Pressure Deficit) is a more precise way to manage your flowering environment than tracking temperature and humidity separately. Our VPD guide for cannabis gives you the exact targets for each growth stage — aim for 1.0–1.5 kPa VPD during peak flowering.
Pro tip: Running an oscillating fan directly across your canopy (not through it) increases air exchange around dense buds and significantly reduces botrytis risk without stressing plants. Combine with a dehumidifier on a humidity controller for precise RH management in late flower.
CO₂ enrichment from 1,000–1,500 PPM during the light period increases yield 20–30% in sealed grow spaces with adequate nutrients and light intensity (PPFD above 800 μmol/m²/s). Below that light intensity, supplemental CO₂ provides minimal benefit.
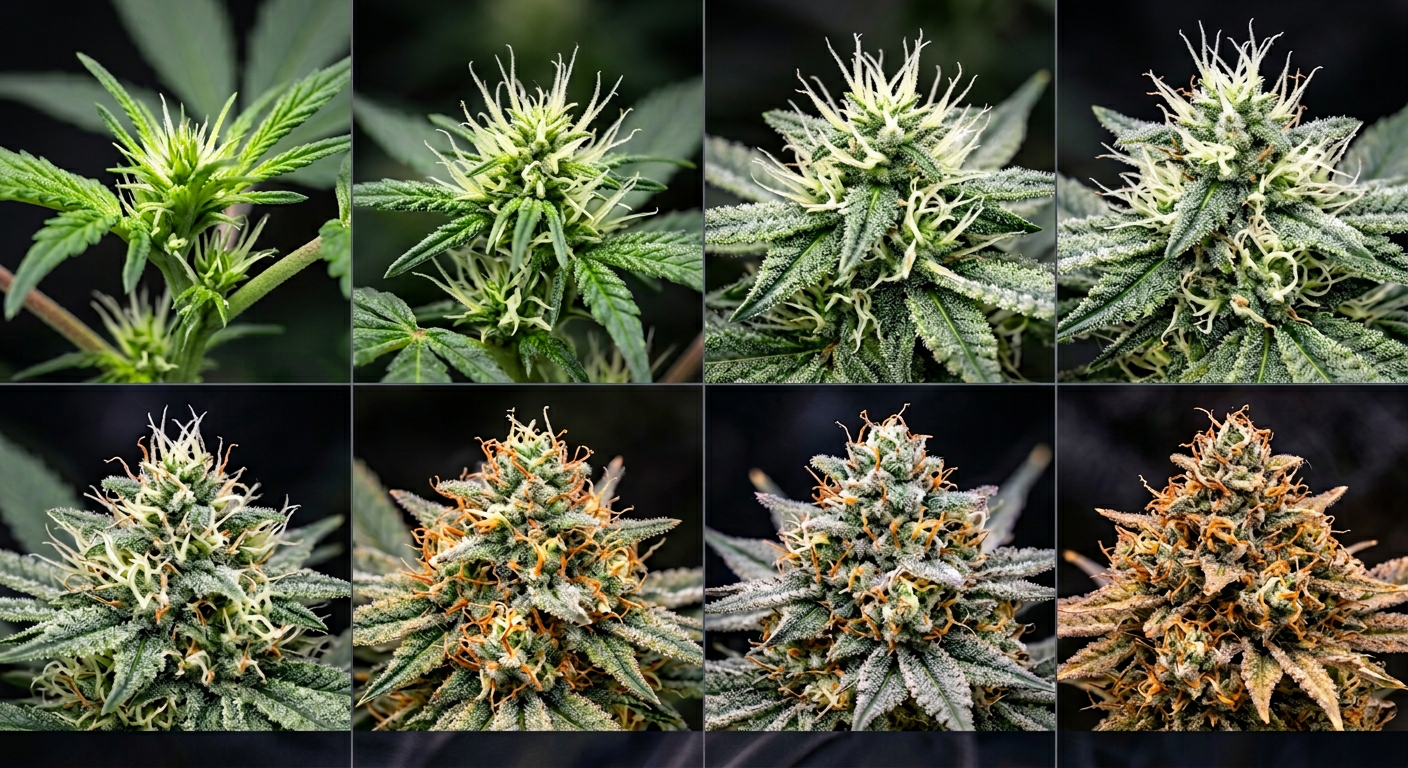
Cannabis Flowering Stage Bud Development: What Healthy Progression Looks Like
Understanding cannabis flowering stage bud development helps you diagnose problems early and confirm your plants are on track. Here's what healthy bud development looks like at each milestone:
Days 1–10: Pistil Formation
White, hair-like pistils (stigmas) emerge at every node — particularly at the main cola tip and branch tips. This is your first visual confirmation that flowering has been triggered. If you don't see pistils by Day 14 after flipping, check for light leaks or confirm your timer is working correctly.
Days 14–21: Calyx Stacking Begins
Individual calyxes (the tear-drop shaped structures each containing a single pistil) begin stacking on top of each other at bud sites. The more calyxes stack per unit area, the denser and heavier your final buds will be. Genetics largely determines stacking rate — high-yielding strains like Northern Lights x Big Bud and Wonder Woman stack aggressively.
Days 21–42: Bud Swell & Trichome Development
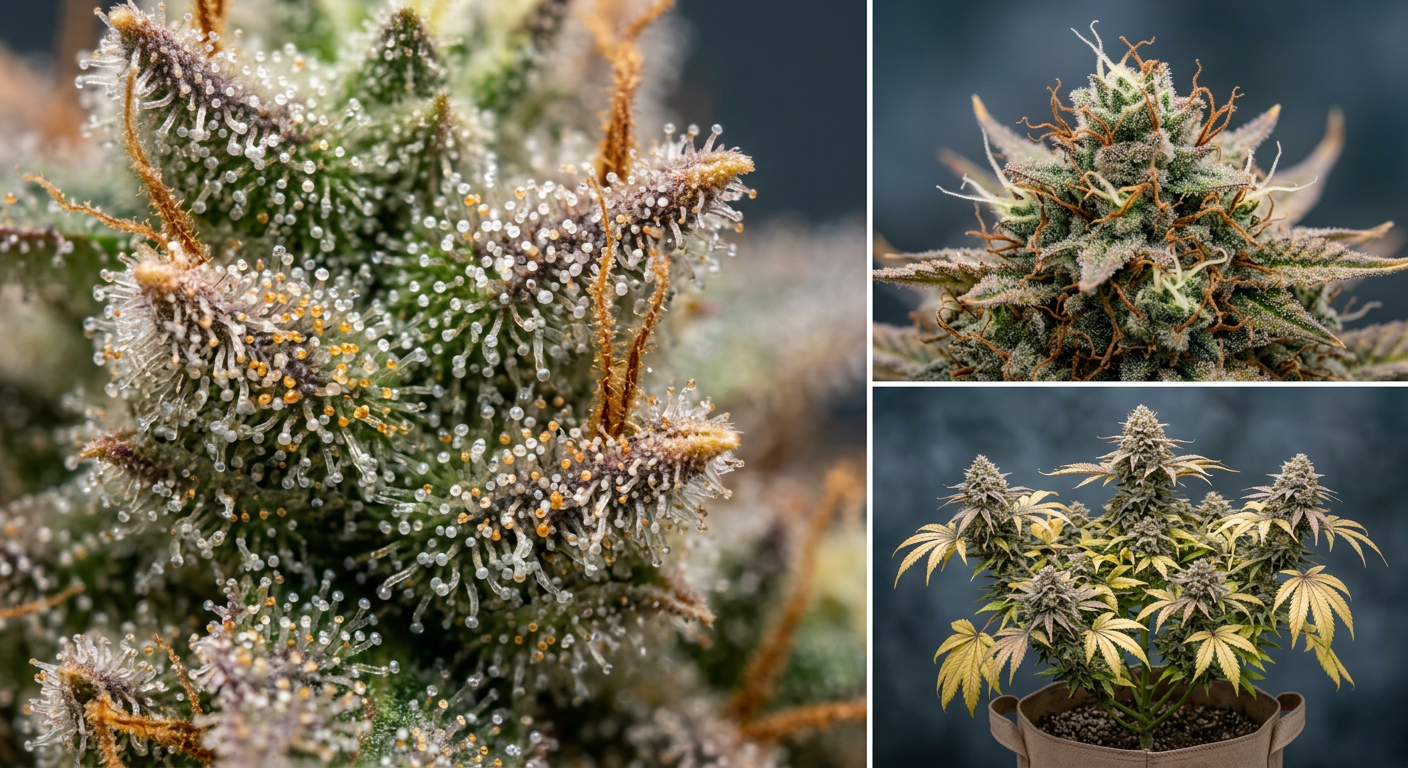
This is the "building phase." Buds gain mass rapidly and trichomes (resin glands) appear first as tiny clear dots under magnification, then become visible to the naked eye as a frosty coating. The characteristic aroma of your strain intensifies dramatically as terpene production ramps up. This is the phase that determines your final potency ceiling.
Days 42–56: Ripening & Pistil Color Change
White pistils gradually turn orange, red, or brown — the percentage of colored pistils is a rough harvest readiness indicator (aim for 70–80% colored). More importantly, trichome color under a 60x–100x loupe tells you actual maturity: clear = immature, milky/cloudy = peak THC, amber = THC degrading to CBN. Use both indicators together for the most accurate harvest window.
Terpene development during bud ripening is closely tied to your environment. Cool nighttime temperatures (60–65°F) in late flower and slightly lower humidity (35–45%) stress the plant in a productive way — triggering higher terpene and resin production as a natural response. Strains rich in myrcene, caryophyllene, and limonene respond especially well to this technique. For more on terpenes, see our guides on humulene and pinene in cannabis.
Cannabis Flowering Stage Deficiencies: Identification & Fixes
Cannabis flowering stage deficiencies are more common and more damaging than vegetative deficiencies because the plant has no time to recover before harvest. Catching a deficiency in Week 4 and correcting it immediately can still save your crop; catching the same deficiency in Week 7 may not be fixable in time.
Here are the most common flowering deficiencies, their symptoms, and specific corrections:
| Deficiency | Symptoms | Cause | Fix |
|---|---|---|---|
| Phosphorus (P) | Dark purple/reddish fan leaves, slow bud development, dark veins | pH too high (>6.8 soil), cold temps, overwatering | Adjust pH to 6.2–6.5, add bloom booster, raise temp above 60°F |
| Potassium (K) | Brown leaf edges, yellowing between veins on older leaves | pH imbalance, excess sodium or calcium | Correct pH, flush if EC is high, use K-rich feeding |
| Calcium (Ca) | Brown spots on mid-canopy leaves, bud tissue darkening, weak stems | Low pH, soft water, coco without CalMag | Add CalMag at 5–10 mL/gal, adjust pH to 6.2+ |
| Magnesium (Mg) | Yellowing between veins on older/lower leaves (interveinal chlorosis) | pH below 6.0, excess potassium | Foliar spray Epsom salt (1 tsp/L), add CalMag, raise pH |
| Iron (Fe) | Yellowing on NEW growth between veins | pH above 7.0, excess phosphorus, cold roots | Drop pH to 6.0–6.2, avoid overfeeding P early in flower |
| Nitrogen (N) | Whole-plant yellowing starting from bottom up | Intentional late-flower taper OR deficiency if Week <5 | If before Week 6: small N top-up; if Week 6+: normal and healthy |
Important distinction: Late-flower nitrogen deficiency (lower fan leaves yellowing and dropping in Weeks 6–8) is completely normal — it's the plant cannibalizing stored nitrogen from leaves to feed buds. Don't correct it unless it's progressing rapidly up the plant or occurring before Week 5.
Always rule out pH issues before diagnosing a nutrient deficiency. In 80% of cases, what looks like a deficiency is actually a lockout caused by incorrect pH preventing nutrient absorption — not a lack of nutrients in the root zone.
Pest Pressure During Flowering: What Increases & How to Respond
Pest pressure typically increases during the cannabis flowering stage for two reasons: dense bud structure creates microenvironments with reduced airflow, and the higher humidity of early flower (combined with sweet terpene emissions) attracts a wider range of insects and pathogens than veg.
Here are the pests that spike during flowering and how to handle each:
- Spider mites: Thrive above 77°F with low humidity. Look for fine webbing between buds. Treat immediately with spinosad or insecticidal soap — stop all foliar sprays after Week 5 to avoid chemical residue on buds.
- Fungus gnats: Adult gnats are mostly harmless; larvae damage roots. Use yellow sticky traps to monitor, diatomaceous earth on topsoil, and allow soil to dry between waterings.
- Aphids: Cluster under leaves and at bud bases. Treat with neem oil or spinosad before Week 4; switch to manual removal or CO₂ application (high CO₂ kills soft-bodied insects) after Week 4.
- Thrips: Silvery stippling on leaves. Treat with spinosad or predatory insects (Amblyseius cucumeris) — these are safe throughout flowering with no chemical residue.
- Botrytis (gray mold): Not an insect but the most destructive flowering-stage pathogen. Remove affected material immediately, reduce humidity below 45%, increase airflow. No effective chemical treatment once established in buds.
- Powdery mildew: White powdery coating on leaves. Treat with potassium bicarbonate spray (safe through Week 6) or remove affected leaves. Maintain RH below 50% and ensure adequate airflow.
Pro tip: Introduce predatory insects (Phytoseiulus persimilis for spider mites, Steinernema feltiae for fungus gnat larvae) at the start of flowering as a preventive measure. They're completely safe for your plants and buds — and far more effective than reactive chemical treatment once an infestation establishes.
The golden rule for flowering pest management: no foliar sprays of any kind after Week 5. Anything you spray on dense buds at Week 6 or later — even organic products — can leave residue that affects taste, aroma, and safety of the final product.
Cannabis Flowering Stage Problems: Troubleshooting Guide
Cannabis flowering stage problems often compound — one issue (high humidity) leads to another (botrytis) which leads to another (panic harvesting too early). This troubleshooting section addresses the most common problems growers face, with specific diagnostic steps and solutions.
Problem 1: Buds Are Airy and Loose
- Causes: Insufficient light intensity (below 400 PPFD), too-high temperatures during bud swell, excess nitrogen, or harvesting too early
- Fix: Increase light intensity (PPFD 600–900 during mid-flower), lower temps to 72°F max, cut nitrogen by Week 3, and use a loupe to confirm trichome maturity before harvesting
Problem 2: Plant Re-Vegetates During Flowering
- Causes: Light leaks, timer failure, or accidental light exposure during dark period
- Fix: Inspect entire grow space with all external lights off, replace or repair timer, check all electrical equipment for indicator LEDs
Problem 3: Hermaphroditism (Pollen Sacs Appearing)
- Causes: Genetic predisposition, light stress (leaks or interruptions), heat stress, or nutrient stress
- Fix: Remove pollen sacs immediately with tweezers before they open; if widespread, consider removing the plant to protect others; use stress-resistant feminized genetics next run
Problem 4: Bud Sites Not Forming After 2 Weeks
- Causes: Light period too long (>14 hours triggers re-veg in some strains), plant not mature enough (less than 6 weeks from seed), or light leak preventing proper dark period
- Fix: Verify timer is set correctly, check for light leaks, ensure plants are at least 6–8 weeks from seed before flipping
Problem 5: Leaves Curling Upward (Clawing) in Flower
- Causes: Nitrogen toxicity (most common in early flower), heat stress, or overwatering
- Fix: Flush with plain pH-adjusted water, reduce nutrient concentration by 30%, check canopy temperature is below 82°F
Most flowering stage problems share a root cause: environment. Temperature, humidity, pH, and light consistency solve 80% of flowering issues before they become serious. Get these four variables dialed in before investing in supplements or additives.
Harvest Timing: Reading Trichomes, Pistils & Plant Signals
Knowing exactly when to harvest is arguably the most important skill in the entire cannabis flowering stage. Harvest too early and you sacrifice 20–30% of potential potency and yield. Harvest too late and THC degrades to CBN, producing a sleepy, heavy effect with reduced clarity.
Use all three of these indicators together for the most accurate harvest window:
Indicator 1: Trichome Color (Most Accurate)
- Clear trichomes = immature, THC-A still forming — wait
- Milky/cloudy white = peak THC — harvest now for maximum potency (cerebral, energetic effect)
- Amber (20–30%) = some THC converting to CBN — harvest now for balanced body/head effect
- 50%+ amber = significant CBN content — sedative, "couch-lock" profile
Indicator 2: Pistil Color
- Under 50% colored pistils = too early
- 70–80% orange/red/brown = harvest window approaching
- 90%+ colored + pistils retracting into calyx = peak ripeness
Indicator 3: Plant Behavior
- Fan leaves yellowing and dropping = plant is pulling resources to buds, normal in late flower
- Bud calyxes swelling ("foxtailing" on some strains = late-flower swell, not heat stress)
- Strong, intense aroma = peak terpene expression
- Water uptake decreasing = plant approaching end of life cycle
For strains like OG Kush (8–9 weeks flower) or White Widow (8–9 weeks), trichomes mature relatively uniformly. Longer-flowering strains like Quantum Kush can have staggered maturity across the canopy — check trichomes on multiple colas before committing to harvest.
After harvest, your cure determines final quality as much as your grow. A proper 2–4 week cure in sealed glass jars at 60–62% RH and 65–70°F converts THC-A to THC, develops terpene complexity, and removes the chlorophyll harshness of fresh-dried flower.
Choosing the Right Strain for Your Flowering Timeline
Not all strains are created equal when it comes to the cannabis flowering stage. Your available space, grow season (if outdoor), and desired effect profile should drive your strain selection before you ever put a seed in the ground.
Here's a quick reference for flowering times across different strain categories:
| Strain Type | Flower Time | Stretch | Example Strains |
|---|---|---|---|
| Indica-dominant | 7–9 weeks | 25–50% | Purple Kush, NL x Big Bud |
| Balanced hybrid | 8–10 weeks | 50–75% | OG Kush, White Widow, Papaya |
| Sativa-dominant | 10–13 weeks | 75–150% | Sour Diesel, Super Lemon Haze |
| Autoflower | 7–10 weeks (seed to harvest) | Minimal | Skywalker OG Auto, Holy Grail Kush Auto |
| Fast Indica | 6–7 weeks | 20–35% | Blue Moonshine |
For new growers or those with limited vertical space, indica-dominant or balanced hybrid feminized seeds are the most forgiving choices. The Northern Lights x Amnesia Haze sits at a sweet spot — 9–10 week flower time with moderate stretch and exceptional resin production at 24% THC.
Autoflowering strains are excellent for growers who want to skip the 12/12 light management entirely. The Amnesia Haze Autoflower and Great White Shark Autoflower move from seed to harvest in 9–10 weeks regardless of light schedule — ideal for outdoor growers who want multiple harvests per season or indoor growers running 20/4 light cycles for efficiency.
Before you get to flowering, make sure your plants are properly prepared. Review our complete indoor growing guide and our vegetative stage guide for the foundation that makes your flowering stage as productive as possible. Growers using living soil setups should also check our living soil guide — the flowering nutrient strategy differs significantly in living soil vs. salt-based feeding.
The cannabis flowering stage is not a passive waiting period — it's 8–11 weeks of active management. Growers who monitor trichomes weekly, adjust humidity by stage, and execute a clean nutrient taper consistently harvest 30–50% more usable flower than growers who "set it and forget it" after the flip.
Flowering Stage Master Checklist
Use this checklist to stay on track throughout every phase of the cannabis flowering stage. Print it out or save it — it covers every critical action from the day you flip to harvest day.
✅ Pre-Flip (Day 0)
- Inspect grow space for all light leaks
- Test and verify timer accuracy
- Measure canopy-to-light distance (minimum 18" for LED, 24" for HPS)
- Confirm plants are healthy with no active deficiencies or pests
- Stock up on bloom nutrients, CalMag, and a PK booster
- Have a 60x–100x loupe or digital microscope ready
✅ Early Flower (Weeks 1–3)
- Monitor and adjust canopy height daily during stretch
- Begin transitioning from veg to bloom nutrients by Day 10
- Keep RH at 50–60%, temperature 68–77°F
- Train canopy (LST only — no aggressive training after Day 14)
- Confirm all bud sites have visible white pistils by Day 14
✅ Mid Flower (Weeks 4–6)
- Feed maximum bloom dose with PK booster (Weeks 4–5)
- Drop RH to 45–55%, lower temps to 65–75°F
- Check trichomes weekly under loupe
- Scout for pests and pathogens — inspect bud interiors on dense colas
- Ensure no foliar applications after Week 5
- Remove large fan leaves blocking light penetration if needed
✅ Late Flower (Weeks 7–Harvest)
- Begin flush 7–14 days before expected harvest (soil) / 3–7 days (hydro)
- Drop RH to 35–45%, temperature 62–72°F
- Monitor trichome color every 2 days
- Watch for late-stage botrytis — inspect any cola that doesn't look right
- Harvest when trichomes are 70–90% milky with desired amber percentage
- Trim immediately post-harvest and begin drying at 60–65°F, 55–60% RH
How long is the cannabis flowering stage?
The cannabis flowering stage lasts 7–11 weeks for most strains. Indica-dominant varieties typically finish in 7–9 weeks, balanced hybrids in 8–10 weeks, and sativa-dominant strains in 10–13 weeks. Autoflowering strains go from seed to harvest in 9–11 weeks total regardless of light schedule.
What nutrients does cannabis need during flowering?
During the cannabis flowering stage, plants need high phosphorus and potassium with reduced nitrogen. A standard approach: transition from high-N veg nutrients to a bloom formula (low N, high P/K) by Week 3, peak feed with a PK booster in Weeks 4–6, then taper all nutrients and flush with plain water 7–14 days before harvest. CalMag supplementation is critical throughout.
What temperature and humidity is best for the flowering stage?
Target 68–77°F (20–25°C) with 50–60% RH in early flower (Weeks 1–3), dropping to 65–75°F and 45–55% RH in mid-flower, then 62–72°F and 35–45% RH in late flower. Low humidity in late flower is critical — above 55% RH with dense buds dramatically increases botrytis (bud rot) risk.
When do I switch to 12/12 for flowering?
Switch to a 12/12 light schedule when your plant has reached its desired vegetative size — typically after 4–8 weeks of vegetative growth. Remember that plants will stretch 25–100% after the flip, so factor that into your decision. Most indoor growers flip when plants are 50–60% of the maximum height their grow space allows.
How do I know when cannabis is ready to harvest?
Use a 60x–100x loupe or digital microscope to examine trichome color on the buds (not sugar leaves). Clear trichomes mean wait; mostly milky/cloudy trichomes mean peak THC and harvest now for maximum potency; 20–30% amber trichomes give a more balanced body effect. Also look for 70–80% of pistils having changed from white to orange/red and check that the overall plant is showing signs of senescence (lower fan leaf yellowing).
Frequently Asked Questions
How long is the cannabis flowering stage?
The cannabis flowering stage lasts 7–11 weeks for most strains. Indica-dominant varieties finish in 7–9 weeks, balanced hybrids in 8–10 weeks, and sativa-dominant strains in 10–13 weeks. Autoflowering strains complete seed to harvest in 9–11 weeks total regardless of light schedule.
What nutrients does cannabis need during flowering?
Cannabis needs high phosphorus and potassium with reduced nitrogen during flowering. Transition to a bloom formula by Week 3, peak feed with a PK booster in Weeks 4–6, then taper all nutrients and flush with plain water 7–14 days before harvest. CalMag supplementation is essential throughout flowering.
What temperature and humidity is best for the cannabis flowering stage?
Target 68–77°F with 50–60% RH in early flower, dropping to 65–75°F and 45–55% RH mid-flower, then 62–72°F and 35–45% RH in late flower. Keeping humidity below 45% in late flower is critical to prevent botrytis (bud rot) in dense canopies.
When should I switch to 12/12 for flowering?
Switch to 12/12 when plants have reached 50–60% of your grow space's maximum height, since they will stretch 25–100% after the flip. Most indoor growers flip after 4–8 weeks of vegetative growth. The uninterrupted 12-hour dark period is what triggers the hormonal shift to flowering.
How do I know when cannabis is ready to harvest?
Examine trichome color with a 60x–100x loupe: clear means wait, mostly milky/cloudy means peak THC, and 20–30% amber gives a more balanced effect. Also look for 70–80% of pistils having turned orange/red. Use both trichome and pistil indicators together for the most accurate harvest window.


