

Complete Indoor Grow Tent Setup: Visual Step-by-Step Guide
Getting your indoor grow tent setup right from day one saves you money, prevents crop failures, and sets the stage for heavy harvests. Whether you're a first-time grower or upgrading from a closet grow, this visual guide walks you through every component, every connection, and every setting you need to dial in before your first seed hits soil.
We've broken this guide into 12 clear sections, each with exact numbers, comparison tables, and step-by-step visuals. Follow along from equipment checklist all the way through first plant placement and you'll have a fully operational grow room in a single weekend.
1. Grow Tent Equipment Checklist
A complete grow tent setup guide starts with having every piece of gear on hand before assembly begins. Missing even one item — like a pH meter or a timer — can stall your grow for days. Use this master checklist to shop smart and avoid last-minute runs to the hardware store.
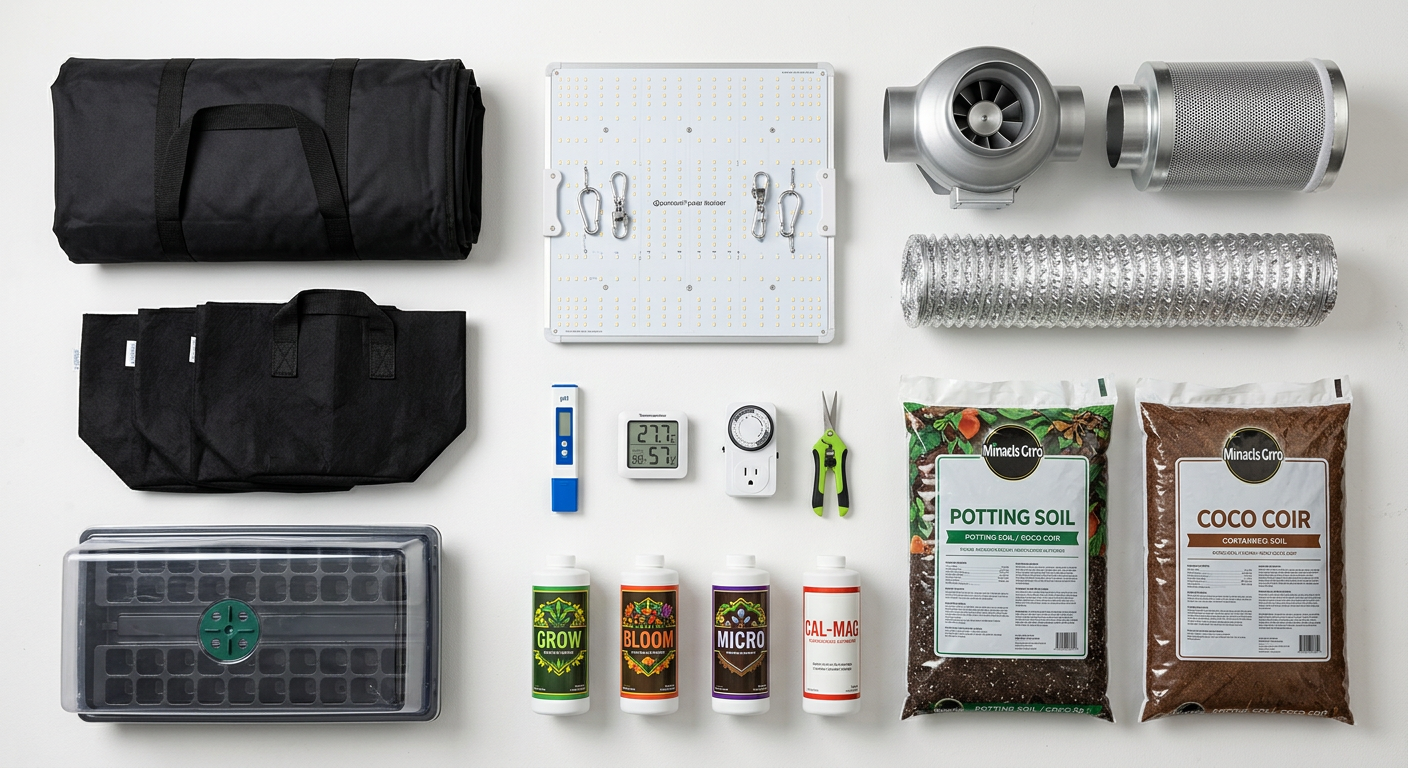
Essential Equipment List
- Grow tent — reflective interior, metal poles, access ports (2x2, 3x3, 4x4, or 5x5 ft)
- Grow light — LED or HPS matched to tent footprint
- Inline exhaust fan — sized in CFM to match tent volume
- Carbon filter — same diameter as inline fan (4", 6", or 8")
- Ducting — insulated aluminum flex duct, 4"–8" diameter
- Oscillating fan — clip-on or standing for canopy airflow
- Fabric pots — 3, 5, 7, or 10 gallon depending on plant count
- Growing medium — premium cannabis soil or coco coir
- Nutrients — 3-part base (Grow, Bloom, Micro) or all-in-one
- pH meter and calibration solution
- EC/TDS meter — measures nutrient concentration
- Digital thermometer/hygrometer — temp and humidity combo
- Timer — mechanical or digital, for lights and fans
- Light hangers — adjustable ratchet straps (2 per light)
- Trellis net or stakes — for plant training
- Saucers or catch trays — under each pot
- Watering can or pump sprayer
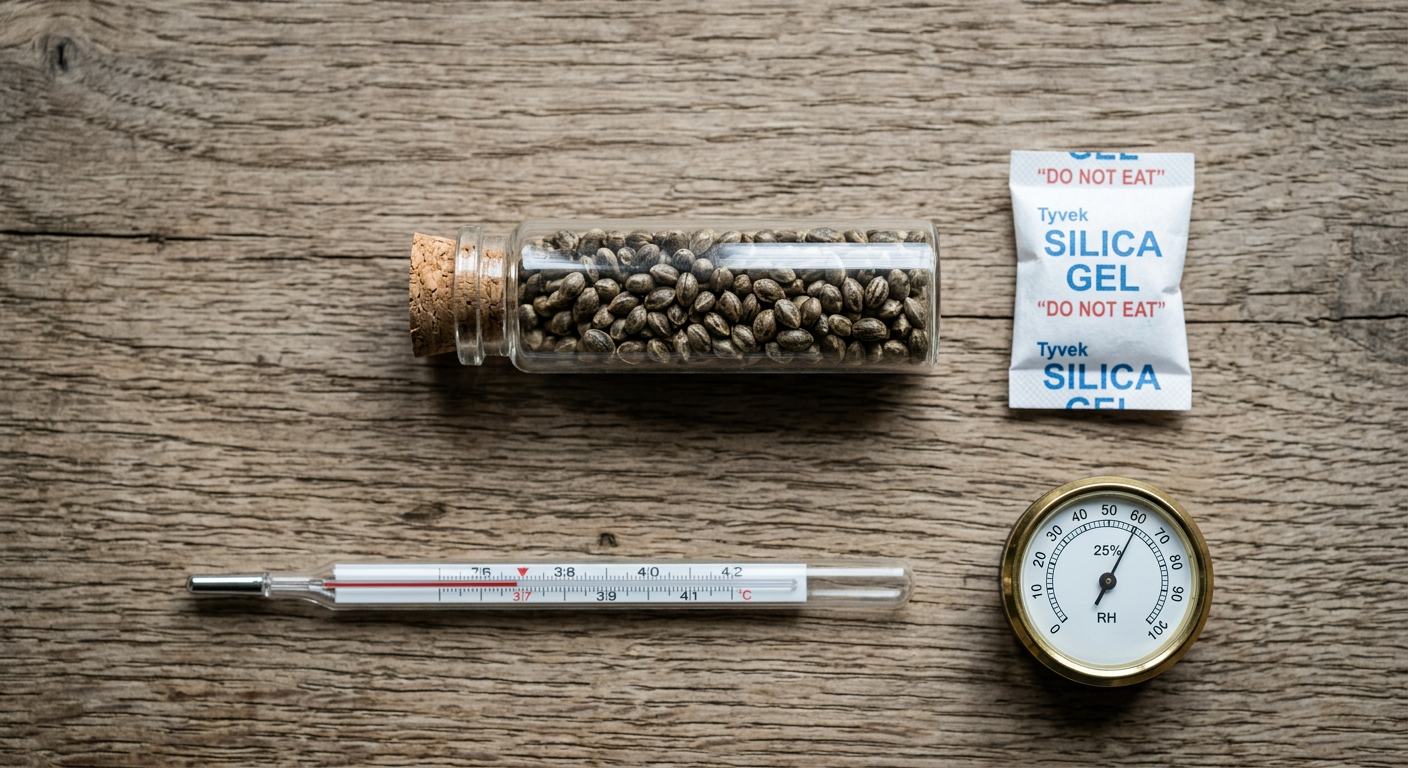
- Propagation tray and dome — for germinating seeds
Buy your inline fan and carbon filter as a matched kit from the same manufacturer. Mismatched diameters force you to use reducing adapters that cut airflow by up to 20%.
2. Choosing the Right Tent Size

Tent size is the single most important decision in any beginner grow tent build because it determines your light cost, ventilation requirements, plant count, and ultimately your yield ceiling. Picking a tent that's too small crowds plants and traps heat; picking one that's too large wastes electricity and makes environmental control harder.
The table below compares the four most popular tent sizes so you can match footprint to your space, budget, and goals.
| Tent Size | Sq Footage | Plant Count | Ideal Light (LED) | Fan Size | Avg. Yield (per harvest) | Best For |
|---|---|---|---|---|---|---|
| 2×2 ft | 4 sq ft | 1–2 plants | 200–250W | 4" inline | 1–2 oz | Beginners, micro grows |
| 3×3 ft | 9 sq ft | 2–4 plants | 400–450W | 4"–6" inline | 3–5 oz | Small home grows |
| 4×4 ft | 16 sq ft | 4–6 plants | 600–800W | 6" inline | 6–12 oz | Most popular all-rounder |
| 5×5 ft | 25 sq ft | 6–9 plants | 1000–1200W | 6"–8" inline | 12–20 oz | Experienced growers, high yield |
The 4×4 ft tent is the sweet spot for most home growers. It gives you enough canopy space for 4–6 plants, fits a single 600–800W LED perfectly, and keeps electricity costs manageable at around $40–$60 per month.
Also check your ceiling height before buying. Most tents come in 6 ft, 6.5 ft, or 7 ft tall versions. Cannabis plants in containers can reach 5 ft or more, and you need vertical clearance above the canopy for your light, ducting, and hangers. Always choose the tallest version your ceiling allows.
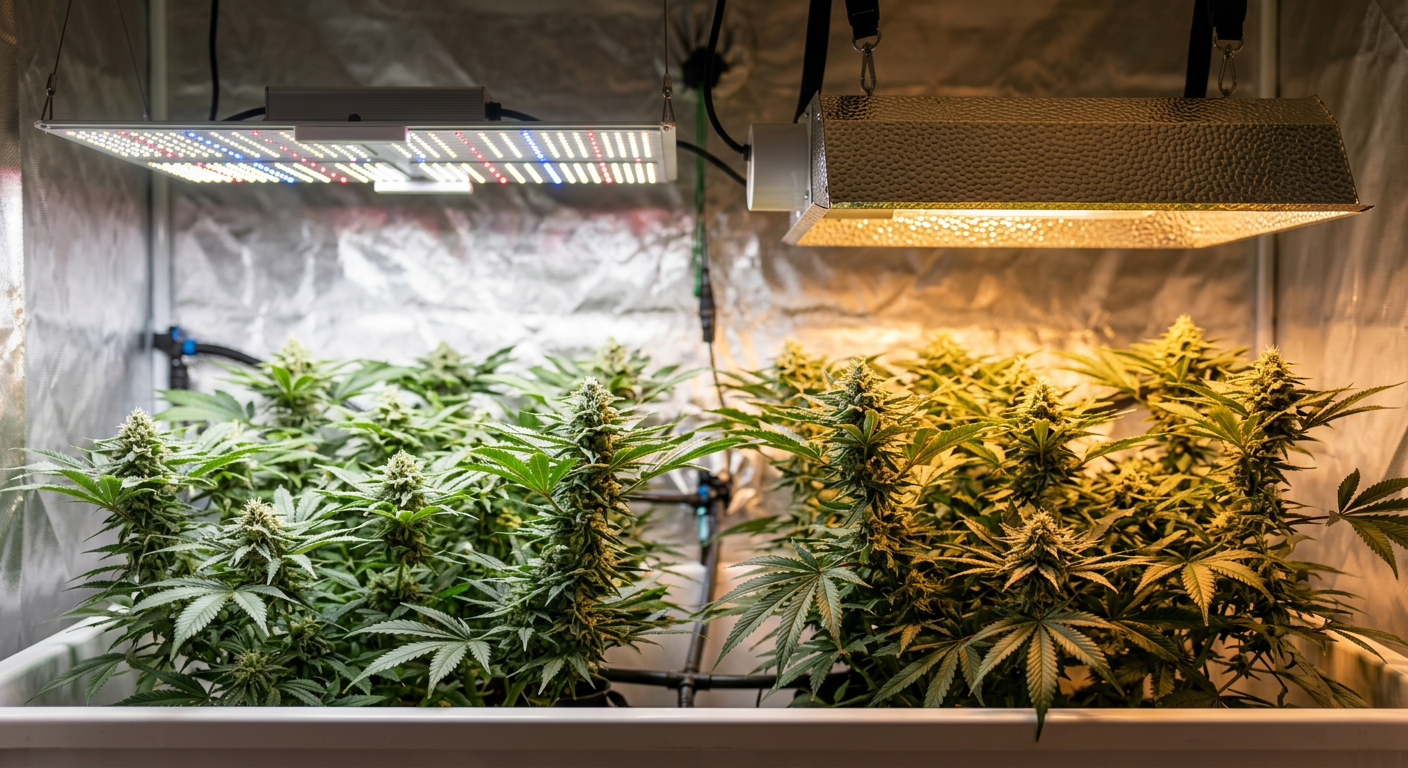
3. Grow Light Selection: LED vs HPS

Choosing the right grow light is the highest-impact decision in your cannabis tent setup because light drives photosynthesis, terpene production, and bud density. The two dominant technologies are LED (light-emitting diode) and HPS (high-pressure sodium), and each has a distinct cost and performance profile.
Modern quantum board LEDs have largely replaced HPS for home growers because they run cooler, consume less electricity, and produce comparable or better yields per watt. However, HPS fixtures still cost less upfront and perform reliably in colder grow spaces.
| Feature | Quantum Board LED | HPS | Blurple LED (budget) |
|---|---|---|---|
| Upfront Cost (4×4) | $250–$600 | $120–$250 | $60–$150 |
| Running Cost (monthly) | $20–$35 | $45–$70 | $15–$25 |
| Heat Output | Low–Medium | Very High | Low |
| Full Spectrum | Yes | Partial (orange/red) | Partial (blue/red) |
| Lifespan | 50,000+ hrs | 10,000–24,000 hrs | 20,000–30,000 hrs |
| Yield Potential | Excellent | Excellent | Fair |
| Beginner Friendly | Yes | Moderate | Yes |
Wattage Guidelines by Tent Size
- 2×2 ft: 200–250W true draw LED
- 3×3 ft: 400–450W true draw LED
- 4×4 ft: 600–800W true draw LED
- 5×5 ft: 1,000–1,200W true draw LED
Always look at the true watt draw — the actual electricity consumed — not the "equivalent" wattage some manufacturers advertise. A light labeled "1000W equivalent" may only draw 100W, which is far too little for flowering cannabis. Aim for at least 35–50 true watts per square foot of canopy.
Pair your LED light with a dimmer feature. Starting seedlings at 50% intensity prevents light stress, and you can ramp up to 100% during late flower without buying a second fixture.
For strain-specific light schedules and how different light periods affect bud development, see our complete Cannabis Light Schedule guide.
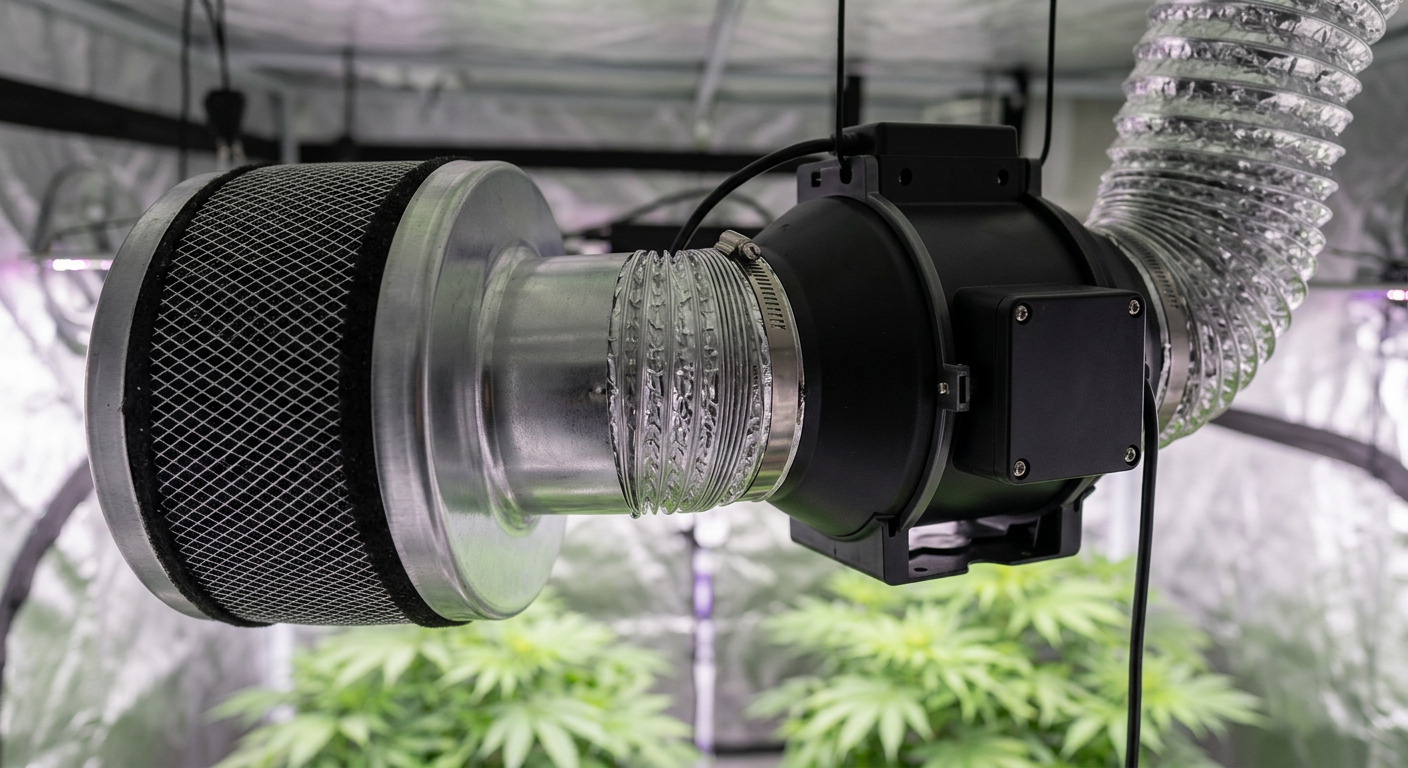
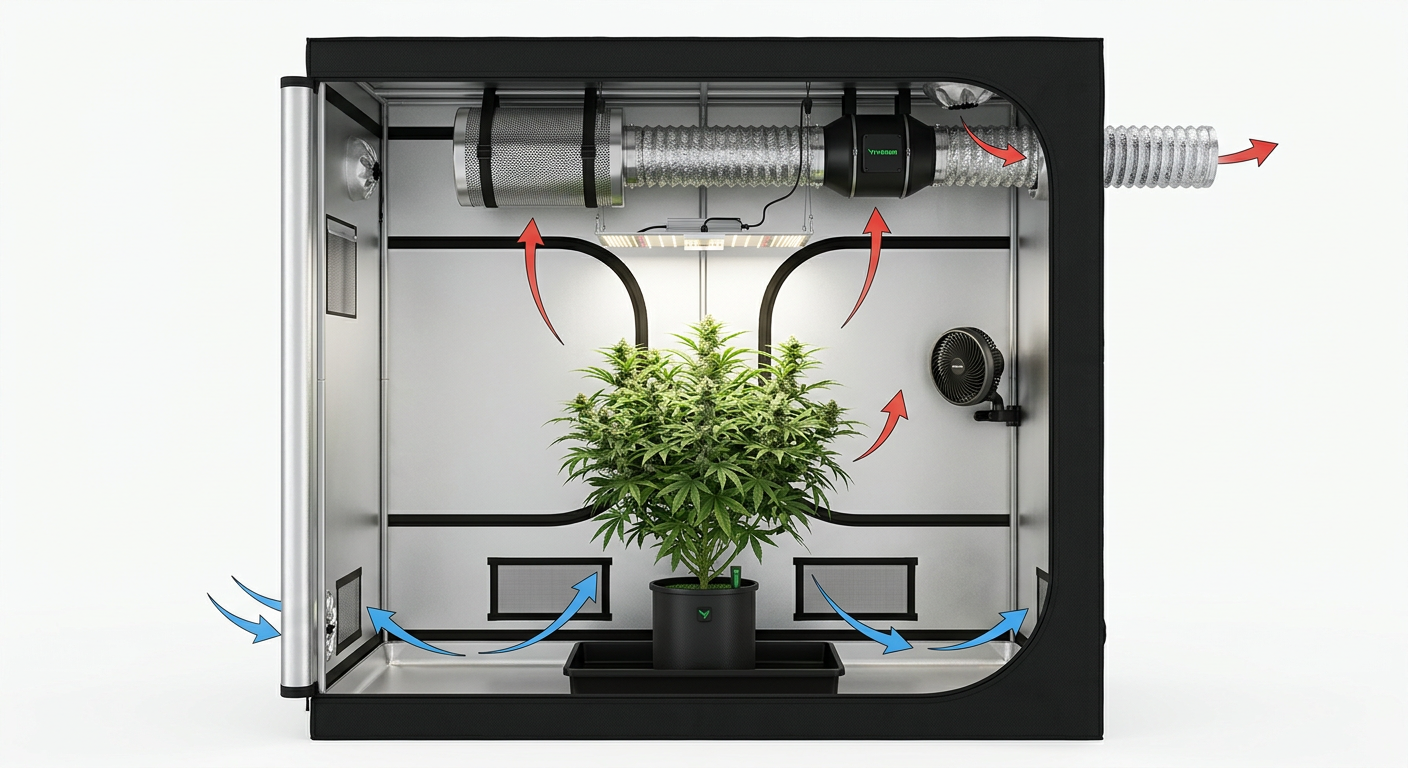
4. Ventilation Setup: Inline Fan, Carbon Filter, and Ducting
Proper ventilation is the backbone of any indoor grow setup because it controls temperature, removes humidity, replaces CO2, and eliminates cannabis odor before it reaches the outside world. A well-designed ventilation loop keeps your canopy temperature between 70–85°F and relative humidity between 40–70% depending on growth stage.
The standard setup runs from carbon filter → inline fan → ducting → out of tent. Air is pulled through the carbon filter first, which captures odor molecules, then pushed out by the inline fan through ducting that exits through a tent port to the outside or into an adjacent space.
How to Calculate the Fan CFM You Need
CFM (cubic feet per minute) measures how much air your fan moves. To size your fan correctly, calculate your tent's cubic footage and choose a fan that can exchange all the air at least once per minute.
- 2×2×6 ft tent: 24 cubic ft → 4" fan at 190–200 CFM
- 3×3×6 ft tent: 54 cubic ft → 4" fan at 190–200 CFM
- 4×4×6.5 ft tent: 104 cubic ft → 6" fan at 350–400 CFM
- 5×5×7 ft tent: 175 cubic ft → 6" or 8" fan at 400–600 CFM
Add 25% extra CFM capacity if you're running an HPS light (which generates significant heat) or if your ducting run is longer than 6 feet with multiple bends. For a deep dive into keeping temperatures dialed in throughout every growth stage, read our Cannabis Temperature Control guide.
Achieving Negative Pressure
Your tent walls should bow slightly inward — this is called negative pressure and it means your exhaust fan is pulling out more air than enters through the passive intake vents. Negative pressure is critical for odor control because it ensures all air exits through the carbon filter rather than leaking through seams.
If your tent walls bow outward, you have positive pressure, meaning unfiltered air is escaping through every zipper and seam. Dial up your exhaust fan speed or partially close your intake vents until walls pull inward.
5. Setting Up the Tent Frame and Hanging Equipment

Assembling the tent frame takes 20–40 minutes for most models and follows a logical sequence: floor frame first, vertical poles second, top frame last. Getting the frame square before sliding on the tent fabric prevents zipper stress and keeps your light hangers level over the canopy.
Lay Out All Poles and Connectors
Organize corner connectors, cross bars, and vertical poles by size before you start. Most tents color-code or size-code the poles so you don't accidentally use a short horizontal bar in a vertical slot.
Assemble the Bottom Floor Frame
Connect the four base horizontal poles into a rectangle using corner connectors. Press joints fully until you hear a click — loose connections cause the frame to rack out of square under load.
Insert Vertical Corner Poles
Slide vertical poles into the corner connectors, working opposite corners simultaneously to keep the frame balanced. On larger 4×4 and 5×5 tents, have a second person hold the poles upright while you add the top frame.
Add the Top Horizontal Frame
Connect the four top bars and any interior cross-support bars. These cross supports are your anchor points for hanging the light, carbon filter, and fan — make sure they're fully seated and rated for the load you're placing on them.
Slide the Tent Fabric Over the Frame
Pull the tent body over the completed frame, starting from the top and working down. Open all zippers before fitting the fabric to prevent tearing. Zip the floor tray in last to seal the bottom.
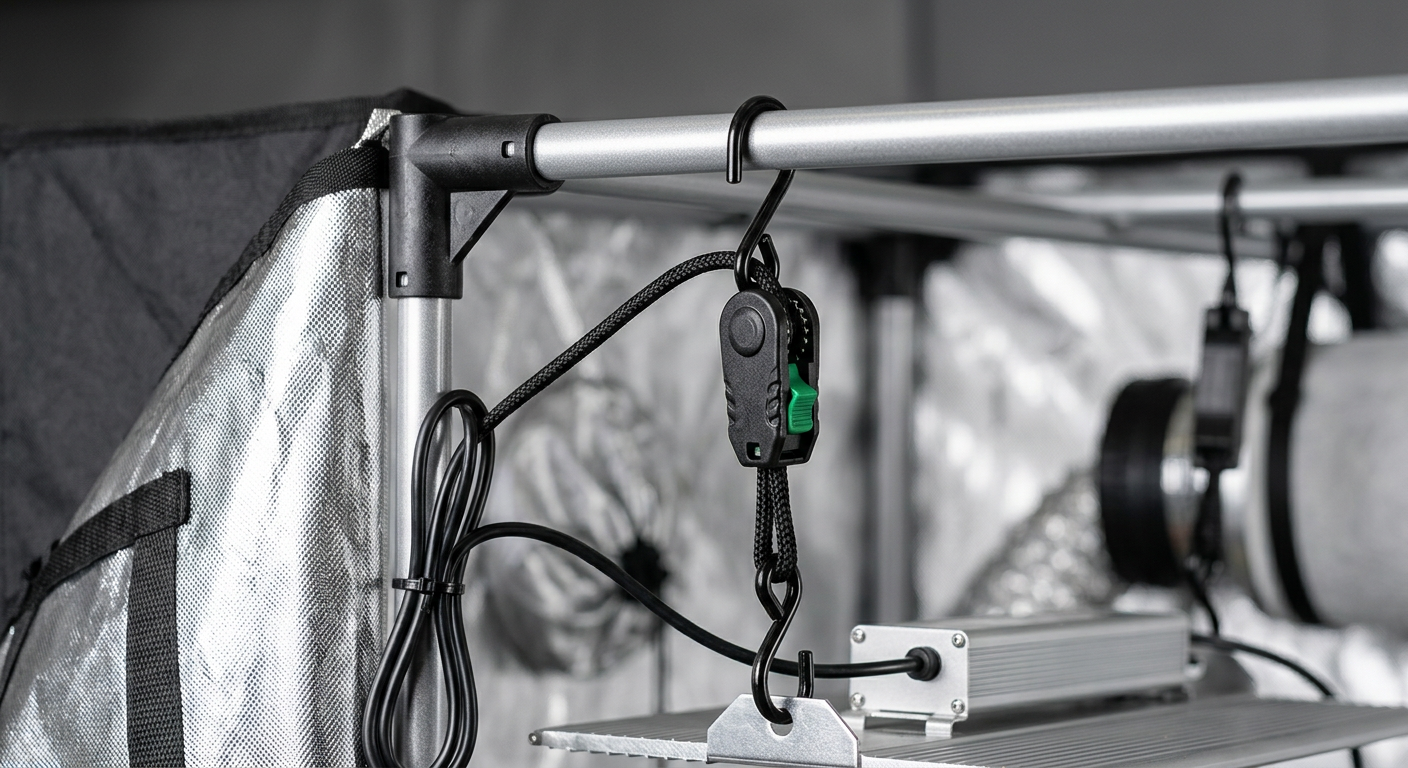
Install Ratchet Hangers on the Top Bars
Loop ratchet strap hooks over the top cross bars where your light and carbon filter will hang. Most growers use two hangers per light and two per carbon filter. Confirm each hanger is rated for at least 1.5× the weight of what you're hanging.
Hang everything from the tent's top cross bars, not from the tent fabric itself. Tent fabric and poles are not designed to bear vertical load and will pull apart at the seams under the weight of a heavy LED or carbon filter.
6. Light Installation and Height Adjustment

Light height directly controls how much photosynthetically active radiation (PAR) your plants receive, and getting it wrong in either direction causes problems. Hanging your light too close causes light burn and bleaching at the canopy tips; hanging it too far reduces intensity and encourages stretchy, loose bud structure.
Every LED model has a manufacturer-recommended hanging height, but the chart below gives you reliable starting points based on growth stage. Always use a PAR meter or a free smartphone lux meter app to verify intensity at canopy level when you make adjustments.
Recommended LED Height by Growth Stage
- Seedling (weeks 1–2): 24–36 inches above canopy, 50% power
- Vegetative (weeks 3–8): 18–24 inches above canopy, 75% power
- Early Flower (weeks 1–3 flower): 16–22 inches above canopy, 100% power
- Late Flower (weeks 4–8+ flower): 14–18 inches above canopy, 100% power
Attach Ratchet Straps to the Light
Hook ratchet straps through the light's hanging holes or the included hanging kit. Confirm the light is level by measuring from the floor to each corner of the fixture — a tilted light creates uneven PAR distribution across your canopy.
Set Initial Height and Run a Test
Raise the light to your seedling height (30 inches), plug it in for 30 seconds, and look for any hotspots or obvious flicker. Then measure the light's spread at canopy level — it should cover your full tent footprint without significant dark corners.
Understanding how light period changes trigger flowering is just as important as light intensity. Our Cannabis Light Schedule guide explains exactly when to flip from 18/6 to 12/12 and what happens to your plants during the transition.
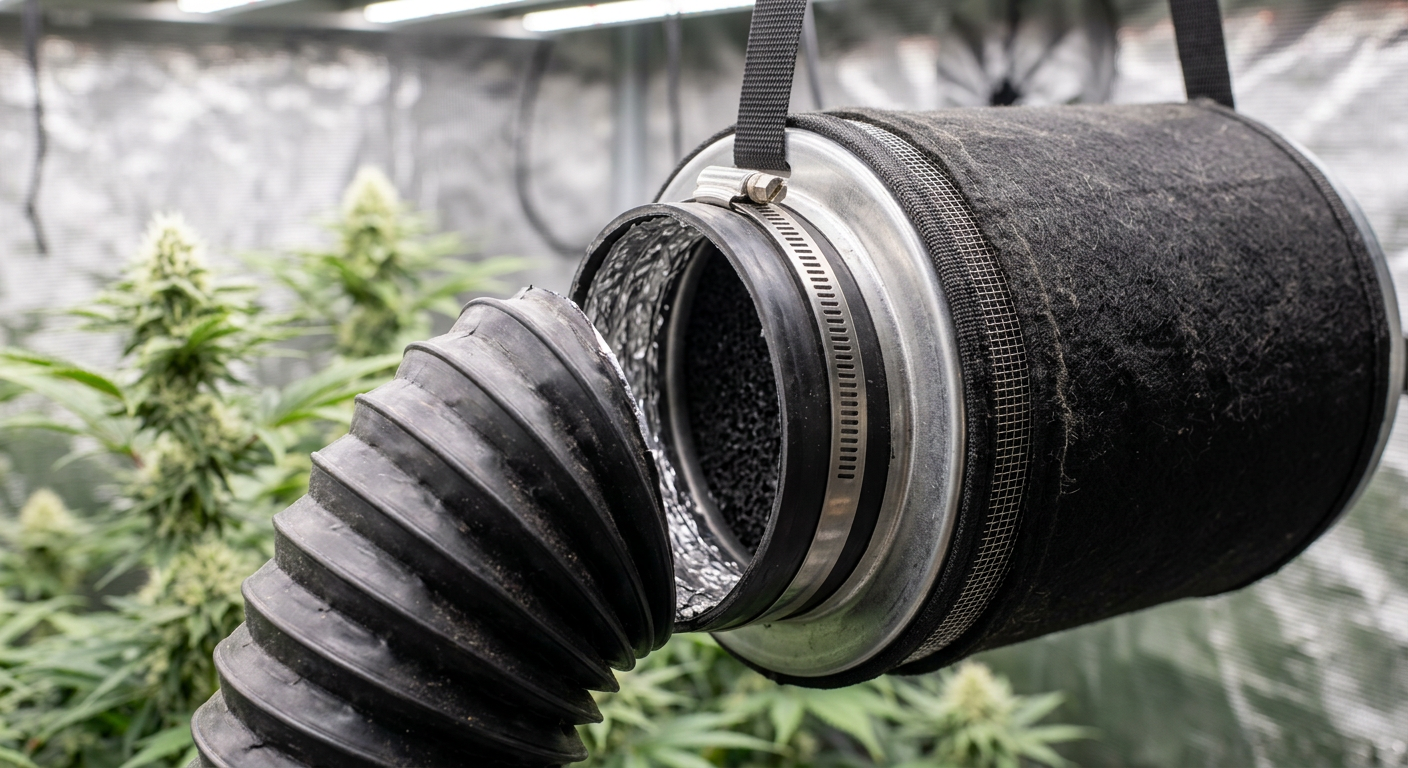
7. Ventilation and Carbon Filter Assembly

Once your frame is standing and your light is hung, it's time to connect your ventilation system. The assembly order matters: connecting components out of sequence makes it nearly impossible to tighten clamps and creates air leaks that let odors bypass the filter entirely.

Mount the Carbon Filter at the Tent's Top
Hang the carbon filter vertically from the top cross bar using ratchet straps, pre-filter sock facing downward. Position it near a top corner port so the outgoing duct has a short, straight run — every foot of extra duct and every 90° bend costs you approximately 10% airflow efficiency.
Connect the Inline Fan to the Carbon Filter
Slide the fan's inlet flange over the carbon filter's output collar and secure it with a metal clamp, tightening until snug but not deformed. The fan should draw air through the filter, not push air into it — check the airflow arrow stamped on the fan housing before connecting.
Run Ducting from Fan to Tent Port
Connect a length of flex ducting to the fan's outlet flange, securing it with a second clamp. Route the duct through the nearest top port and connect to a duct fitting or simply let it exhaust into the room (or run it outside). Keep bends gentle — no 90° kinks.
Connect the Fan Speed Controller
Plug the inline fan into a variable speed controller, which lets you fine-tune CFM without replacing the fan. Start at 70% speed for veg and increase to 90–100% in late flower when heat and humidity spike from dense buds transpiring heavily.
Position the Oscillating Clip Fan
Clip your oscillating fan to a vertical pole at mid-canopy height and angle it to create gentle leaf movement across all plants. Canopy airflow reduces hot spots, strengthens stems, and is one of the most effective tools for cannabis mold prevention during the dense flowering stage.
The carbon filter is your odor control system. Replace the activated carbon inside every 12–18 months or when you first notice cannabis smell escaping the tent, even with the exhaust running at full speed. Most filters include replacement carbon kits.
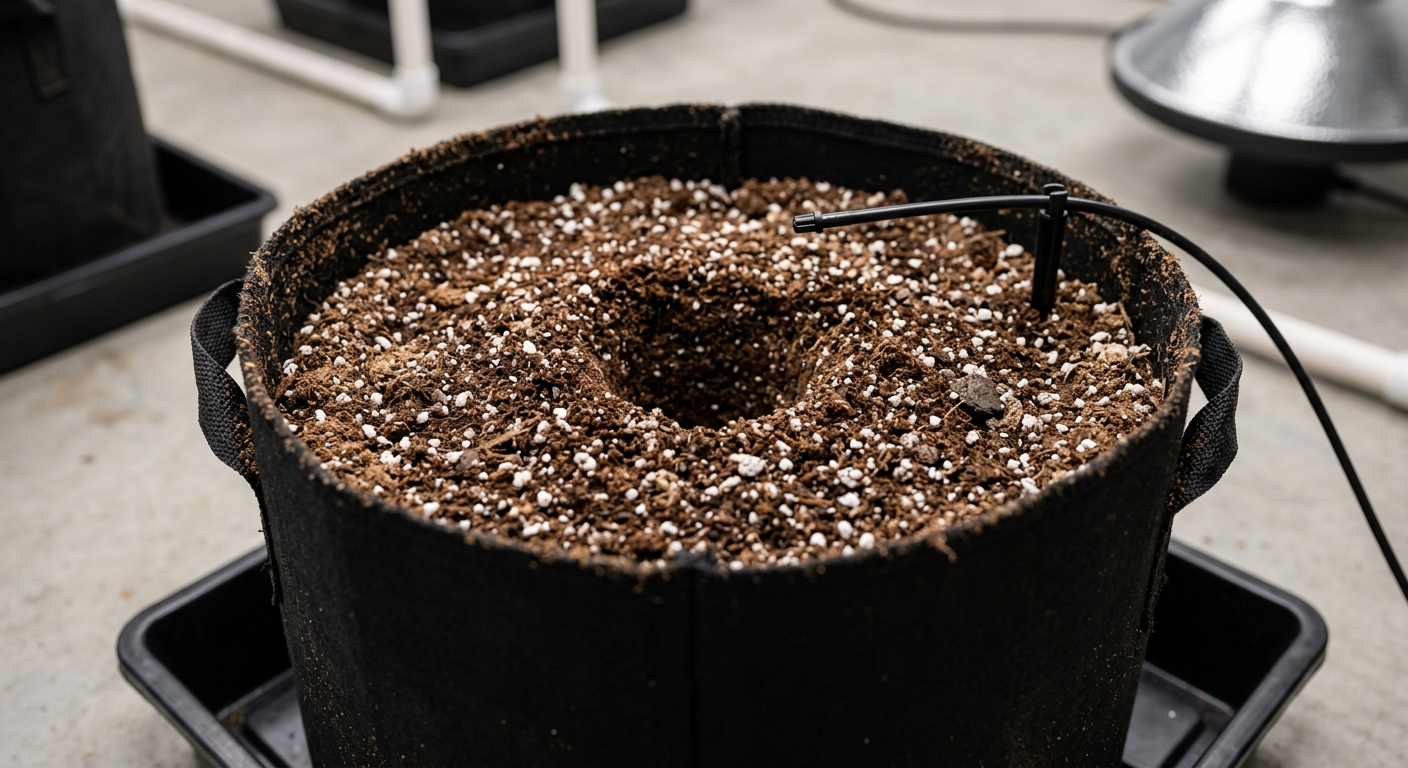
8. Growing Medium and Container Setup
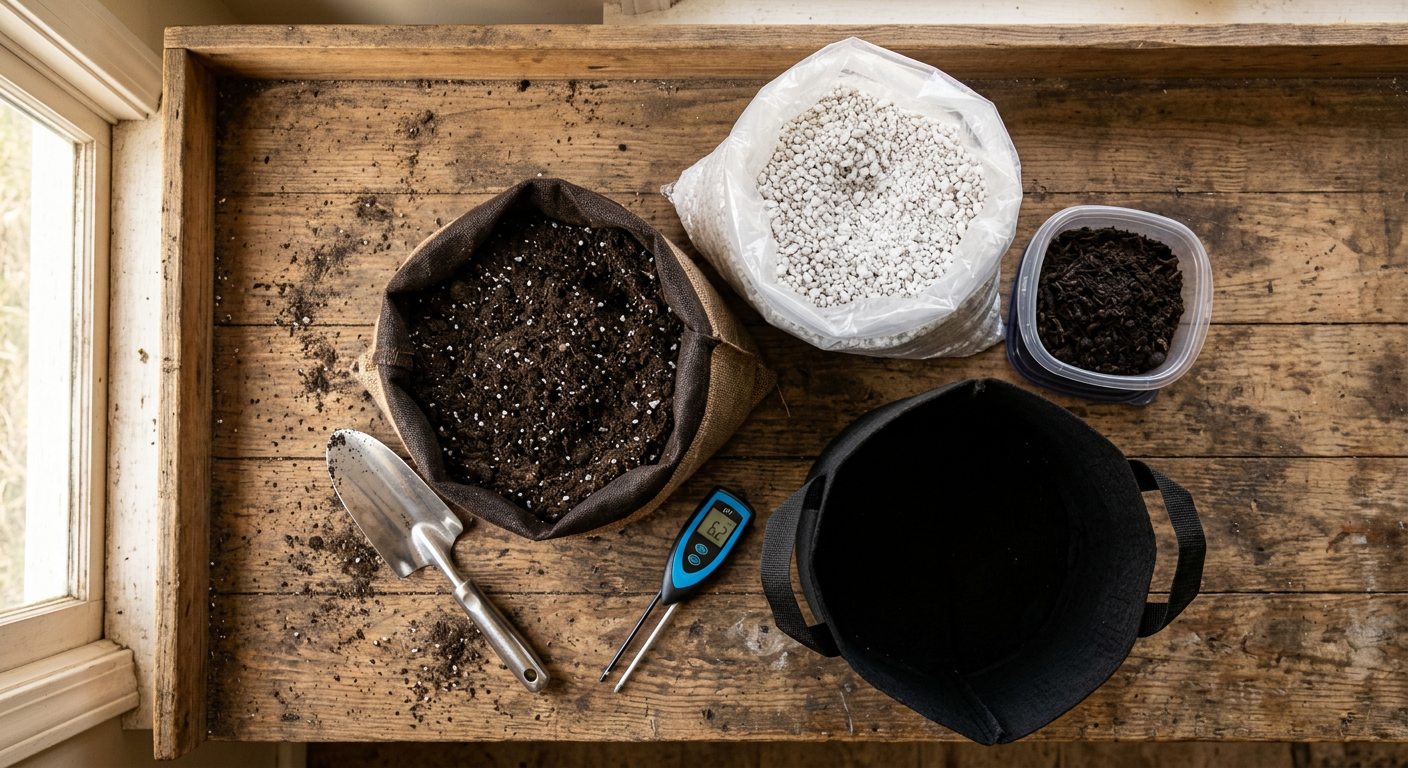
Roots are everything in cannabis cultivation — the medium and container you choose determines oxygen availability, moisture retention, drainage, and nutrient uptake. Most beginner growers do best with a premium cannabis-specific potting soil in fabric pots, which combine forgiving water retention with excellent drainage and natural air pruning at the root tips.

Container Size by Plant Count and Growth Style
- 3-gallon fabric pot: autoflowers, short veg cycle (4–6 weeks veg)
- 5-gallon fabric pot: standard photoperiod plants, 6–8 week veg
- 7-gallon fabric pot: large photoperiod plants, 8–10 week veg or longer
- 10-gallon fabric pot: mainlined or heavily trained plants, maximum yield builds
Recommended Soil Mix for Beginners
A quality cannabis soil mix should be light and airy with visible perlite, drain freely within 30 seconds of watering, and smell earthy and clean — never sour or ammonia-like. Build your own mix using these ratios for excellent results:
- 60% premium potting mix (Fox Farm Ocean Forest, Roots Organics, or similar)
- 30% perlite for drainage and aeration
- 10% worm castings for organic micronutrient baseline
Pre-buffered cannabis soils like Fox Farm Ocean Forest contain enough nutrients to feed seedlings and young veg plants for 4–6 weeks without any added nutrients. This makes them ideal for beginners who want to minimize early grow complexity.
Always elevate fabric pots on small plastic risers or pot feet — never let fabric sit directly in standing water in a saucer. Fabric pots wick moisture upward and will keep roots waterlogged, inviting root rot within days.
Watering Technique and Runoff
Water slowly and evenly around the entire pot surface until you see 10–20% runoff from the drainage holes. This runoff volume confirms full saturation and flushes excess salt buildup. Always pH your water to 6.0–7.0 for soil (6.5 is ideal) and 5.5–6.5 for coco coir before every watering.
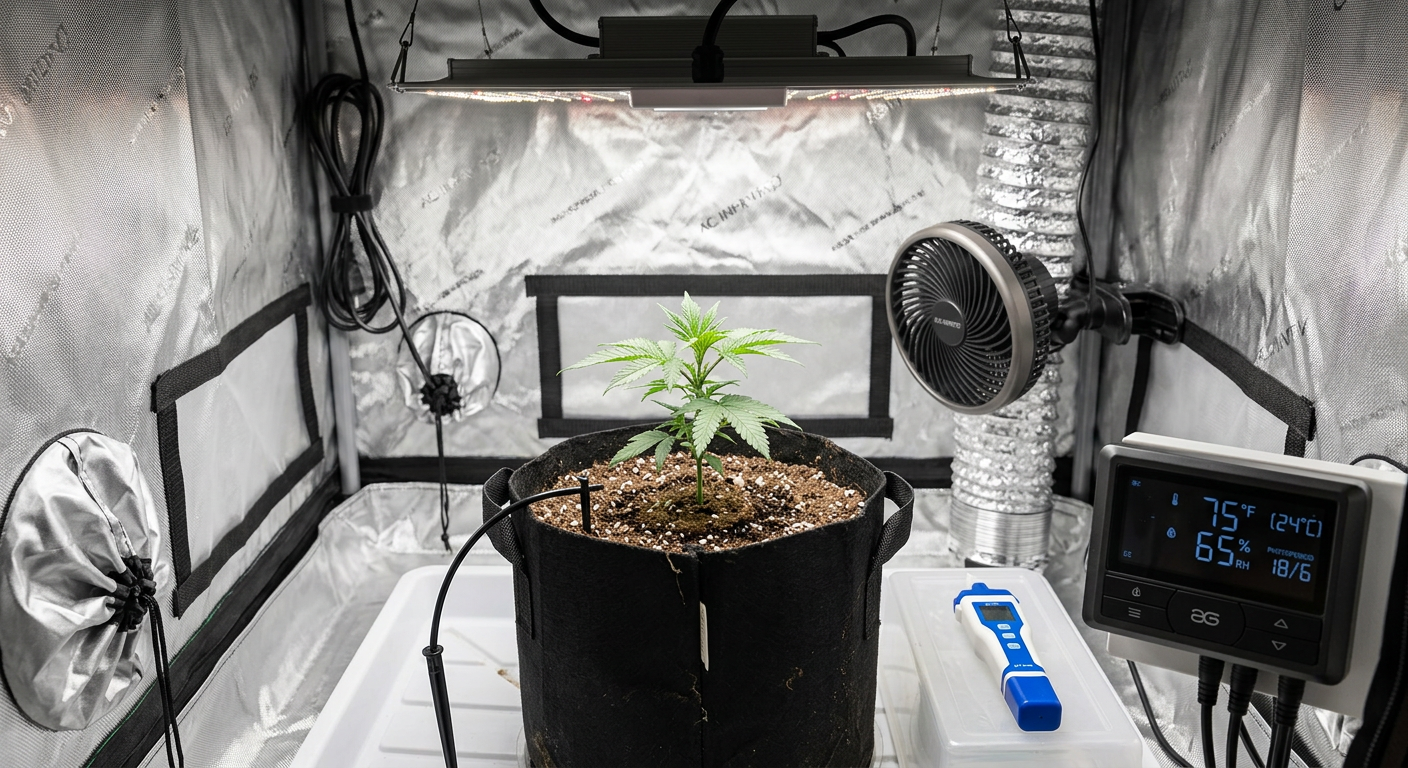
9. Environmental Monitoring: Temp, Humidity, and VPD
Environmental monitoring is where novice growers separate themselves from beginners who lose crops to heat stress, mold, or nutrient lockout. You need to track three variables continuously: temperature, relative humidity (RH), and their combined expression as vapor pressure deficit (VPD), which is the measure your plants actually respond to.
Target Ranges by Growth Stage
| Stage | Temperature (°F) | Relative Humidity (%) | VPD (kPa) |
|---|---|---|---|
| Seedling | 70–77°F | 65–70% | 0.4–0.8 |
| Vegetative | 72–82°F | 50–70% | 0.8–1.2 |
| Early Flower | 68–79°F | 40–50% | 1.0–1.5 |
| Late Flower | 65–76°F | 35–45% | 1.2–1.6 |
Place your digital thermometer/hygrometer at canopy level — the exact environment your plants experience — not at the floor or ceiling. Temperature at the floor can be 5–10°F cooler than at the canopy, giving you a false reading that leads to underperforming plants or undiagnosed heat stress.
Keeping late-flower humidity below 45% is critical for preventing Botrytis (bud rot) and powdery mildew in dense cola formations. Our detailed Cannabis Mold Prevention guide covers airflow strategies, defoliation timing, and environmental controls that protect your harvest in the final weeks.
VPD is the professional grower's secret weapon. It combines temperature and humidity into a single number that predicts how hard your plants are transpiring. Hitting VPD targets of 0.8–1.2 kPa in veg and 1.0–1.5 kPa in early flower consistently outperforms growers who only track temperature alone.
Monitoring Tools You Need
- Digital combo thermometer/hygrometer — Inkbird or Govee models with data logging, $15–$30
- Min/max logging hygrometer — records overnight lows you'd otherwise miss
- Smart WiFi sensor (optional) — sends phone alerts when temp/humidity drift out of range
- VPD chart — printed and taped inside the tent for quick reference
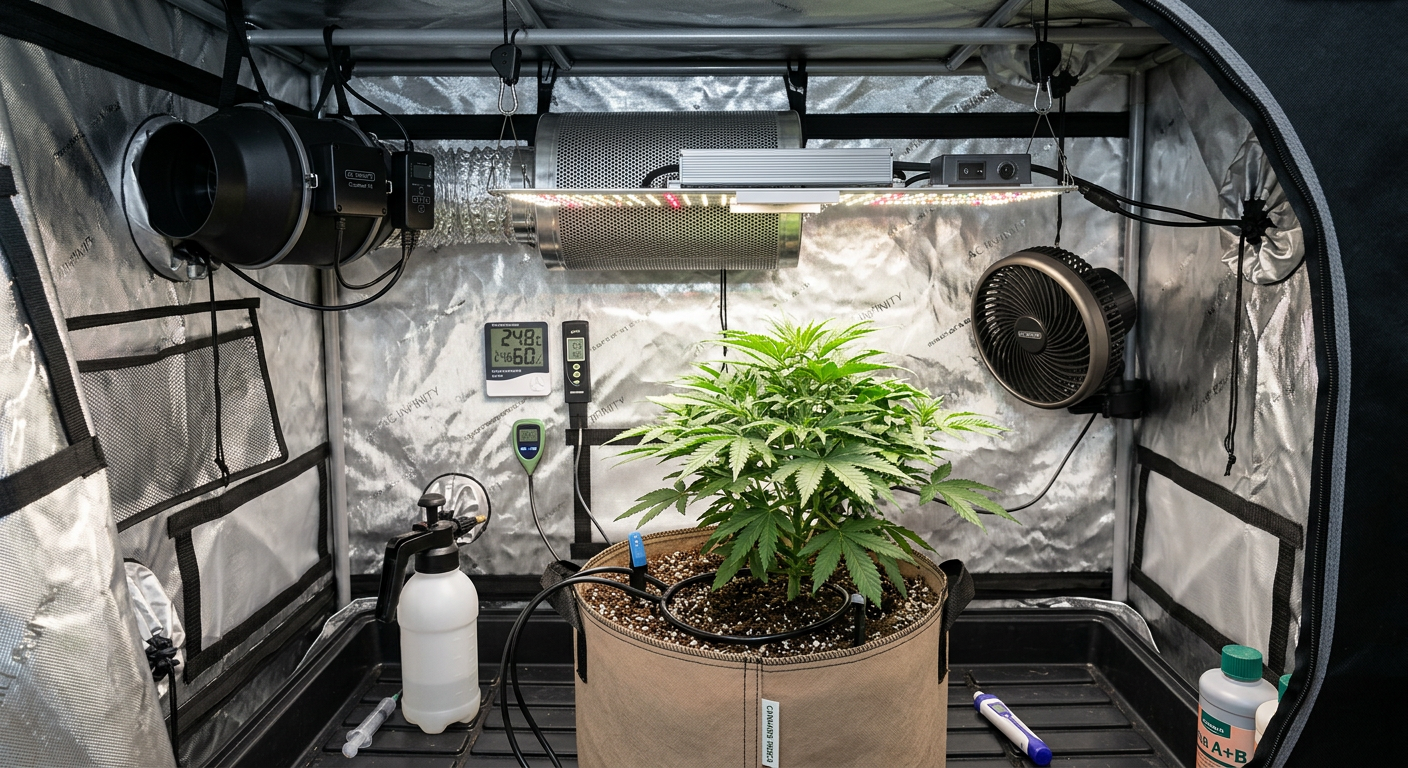
10. First Plant Placement and Initial Settings
With your tent assembled, lights hung, ventilation running, and pots filled, you're ready to place your first plants and dial in your initial settings. This moment is exciting, but taking 20 minutes to verify every parameter before plants go in saves weeks of troubleshooting later.
Run Your System Empty for 24 Hours
Before any plants enter the tent, run lights, fans, and ventilation at your planned settings for a full 24-hour light/dark cycle. Check temps at the top and bottom, verify negative pressure, confirm the carbon filter is working, and look for any wiring issues or light leaks.
Set Your Timer for 18/6 (Veg) or 20/4 (Auto)
Plug your grow light into a digital timer set to 18 hours on, 6 hours off for photoperiod strains in vegetative growth, or 20/4 for autoflowering varieties. Autoflowers like White Widow Autoflower don't require a light flip to flower and perform well on 20/4 from seed to harvest.
Germinate or Transplant Your Seedlings
Germinate seeds in a paper towel or directly in a solo cup of moist seedling mix, then transplant to your final container once the seedling has developed 3–4 nodes. For beginners, strains like Northern Lights Feminized are forgiving, compact, and highly resistant to environmental stress during the critical early weeks.
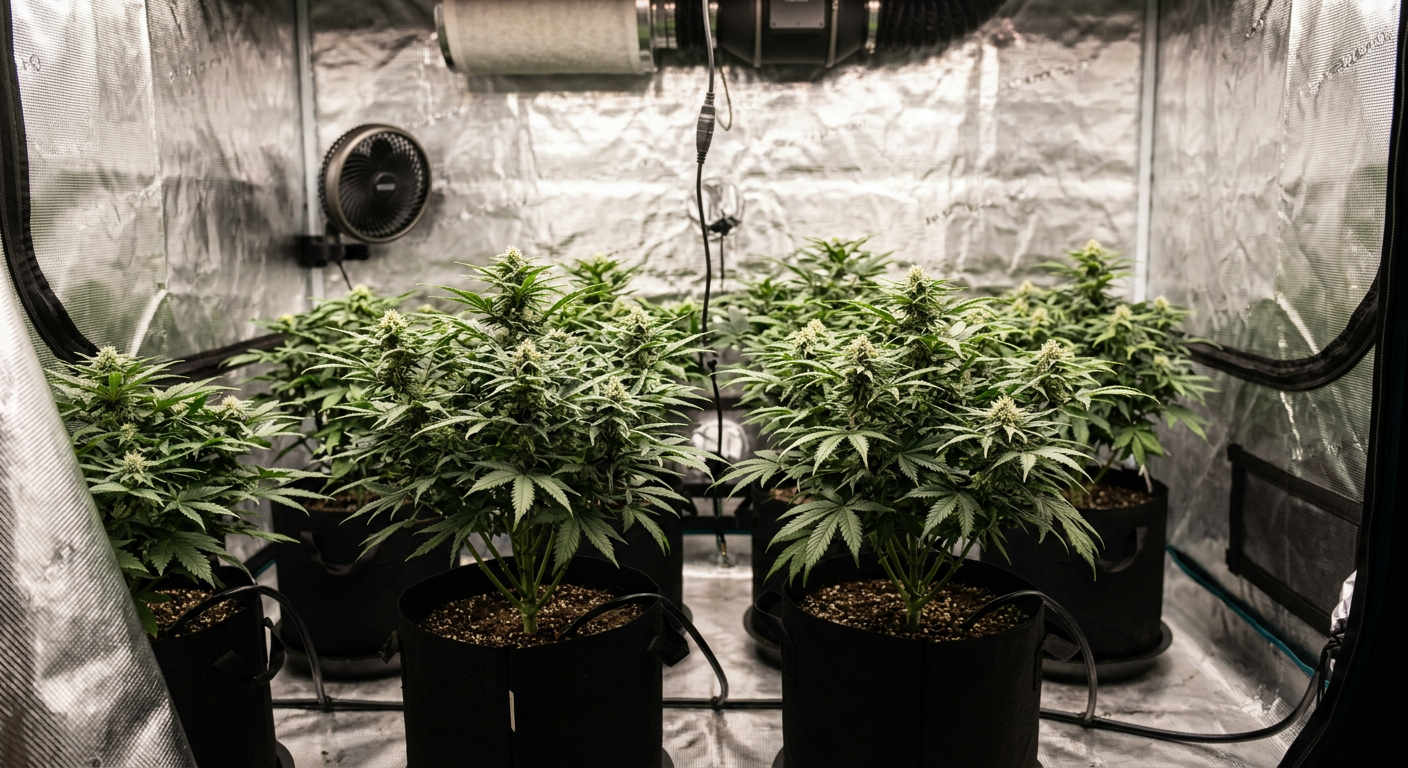
Place Pots Under the Canopy Center
Position pots symmetrically under the light so each plant receives equal PAR intensity. In a 4×4 tent with four plants, place pots in a 2×2 grid with 6–8 inches of spacing between pot edges. Check our Cannabis Seedling Care guide for the exact watering schedule and light intensity settings during the first two weeks.
Water In with pH-Corrected Water
Give each seedling a gentle first watering with pH 6.5 water — just enough to dampen the root zone without soaking the entire pot. Overwatering is the number one killer of young cannabis plants because waterlogged roots suffocate and invite Pythium (root rot) within 48 hours.
Once your plants are established and growing vigorously, you'll want to understand what's happening below the surface during cannabis vegetative stage growth so you can time training, topping, and the eventual transition to flower correctly.
For your first grow, choose a beginner-friendly photoperiod strain like Blue Dream Feminized or Gorilla Glue Feminized. Both are high-yielding, resilient, and well-documented, making it easy to find solutions when problems arise.
11. Common Grow Tent Setup Mistakes to Avoid
Even experienced growers make setup errors that cost them weeks of growth or entire harvests. The mistakes below show up repeatedly in online grow forums and are almost entirely preventable with a little planning and the right information before you flip that first power switch.
Top Setup Mistakes and How to Fix Them
- Skipping the pH meter: pH imbalance causes nutrient lockout that looks identical to deficiencies. Always pH every drop of water and nutrient solution that touches your medium.
- Using tap water without testing: Many municipal water supplies have chlorine, chloramine, or high mineral content (>300 ppm) that stresses plants. Test your tap water before your first grow.
- Undersizing the inline fan: A fan that can barely exchange the tent volume once per minute will fail to control heat and humidity in late flower. Always buy 25–30% more CFM than your minimum calculation.
- Hanging the light too high and too dim: Stretchy, airy buds are almost always caused by insufficient light intensity, not strain genetics. Get a PAR meter or lux meter and verify your readings.
- Ignoring light leaks during dark periods: A single LED indicator light or gap in tent fabric during the 12-hour dark period can trigger hermaphroditism in photoperiod strains. Inspect your tent in a dark room with lights off.
- Overfeeding from week one: Pre-amended soil already has nutrients. Adding liquid feed on top creates nutrient burn (brown, curled leaf tips) that slows growth for 1–2 weeks while the plant recovers.
- Not training plants early enough: Topping and LST (low-stress training) should begin in veg, not flower. Plants that go into flower untrained will have one dominant cola that shades lower buds.
- Forgetting to check ducting connections: Loose duct clamps let odors escape. Inspect every connection after the first 48 hours of operation when vibration from the fan can loosen fittings.
Never run your grow light without a functioning exhaust fan. A sealed tent with a 600W LED can reach 100°F within 30 minutes, permanently stunting or killing plants and creating a fire hazard from overheated wiring and heat-stressed equipment.
Understanding the Cannabis Flowering Stage timeline helps you avoid the most costly late-grow mistakes — like flushing too early or harvesting before trichomes are fully ripe — that waste weeks of careful cultivation work.
12. Budget Breakdown: Starter vs Mid-Range vs Premium Builds
One of the most searched questions in any grow tent setup guide is: "How much does it actually cost?" The answer varies significantly based on quality level, tent size, and whether you shop new or used. The three build tiers below are based on a 4×4 ft tent setup — the most popular size for home growers — so you can compare apples to apples.
| Component | Starter Build ($) | Mid-Range Build ($) | Premium Build ($) |
|---|---|---|---|
| Grow Tent (4×4) | $60–$80 | $100–$150 | $200–$300 |
| Grow Light | $80–$120 (blurple LED) | $250–$350 (QB LED) | $500–$700 (top-tier QB) |
| Inline Fan + Carbon Filter | $60–$80 | $100–$140 | $180–$250 |
| Oscillating Fan | $15–$20 | $25–$40 | $50–$80 |
| Fabric Pots (4-pack) | $10–$15 | $20–$30 | $30–$50 |
| Soil + Perlite | $30–$40 | $50–$70 | $80–$120 |
| Nutrients | $25–$40 | $60–$90 | $120–$180 |
| pH + EC Meter | $20–$30 | $50–$80 | $100–$150 |
| Timer + Misc. Accessories | $20–$30 | $30–$50 | $60–$100 |
| Total Estimated Cost | $320–$455 | $685–$1,000 | $1,320–$1,930 |
| Expected Yield (per harvest) | 2–4 oz | 5–10 oz | 10–20 oz |
Where to Spend More and Where to Save
Spend more on: the grow light (directly impacts yield and quality), the inline fan/filter combo (directly impacts odor control and heat management), and your pH/EC meters (inaccurate readings cause more lost crops than any other factor).
Save on: the tent itself (budget tents from reputable brands perform nearly identically to premium options for most home growers), fabric pots (generic pots work just as well as branded), and nutrients (one quality 3-part base line is all you need).
Buy your seeds from a reputable source and choose feminized strains to eliminate the risk of male plants wasting half your tent space. Gorilla Glue Feminized and Blue Dream Feminized are consistently high performers in 4×4 tent setups with mid-range equipment.
Monthly Operating Costs to Budget For
- Electricity (mid-range LED 4×4): $25–$45/month
- Nutrients per cycle: $20–$60 depending on product line
- pH calibration solution: $5–$10 every 2–3 months
- Carbon filter replacement carbon: $25–$50 every 12–18 months
- Soil and perlite (per grow): $30–$60
Many strains like Northern Lights Feminized are specifically prized for their terpene richness — particularly myrcene and caryophyllene — which develop most fully under dialed-in environmental conditions, making the investment in quality monitoring equipment pay off in both yield and potency.
Frequently Asked Questions
How long does it take to set up a grow tent for the first time?
Most first-time growers complete a full indoor grow tent setup in 4–8 hours. Building the tent frame and hanging equipment takes 1–2 hours. Connecting ventilation, running ducting, and installing the light takes another 1–2 hours. The remaining time goes to calibrating pH meters, verifying environmental readings, and running a 24-hour test cycle before plants enter the tent.
What size grow tent is best for a beginner?
The 3×3 ft or 4×4 ft tent is the best starting point for most beginners. A 3×3 keeps costs lower and is easier to manage environmentally, fitting 2–4 plants comfortably. A 4×4 provides more room to make mistakes and still harvest well, and a single quality quantum board LED covers the footprint efficiently. Avoid 2×2 tents for your first grow — the limited space makes temperature and humidity swings more dramatic and harder to correct.
Do I need a carbon filter for an indoor grow tent?
Yes — if odor management matters to you at all, a carbon filter is essential. Cannabis plants produce strong terpene aromas throughout the flowering stage, and without a carbon filter connected to your exhaust system, that odor will permeate your entire home and potentially travel to neighboring spaces. A properly sized carbon filter rated for your fan's CFM eliminates 95–99% of cannabis odors from exhausted air.
Can I use autoflowering seeds in a grow tent setup?
Autoflowering seeds are an excellent choice for grow tents, especially for beginners. Auto strains like White Widow Autoflower complete their entire life cycle from seed to harvest in 70–90 days without requiring a light schedule change. They stay compact (perfect for 2×2 and 3×3 tents), can run on 18–20 hours of light per day from start to finish, and are highly resilient to minor environmental fluctuations.
What temperature and humidity should I maintain in my grow tent?
During vegetative growth, target 72–82°F and 50–70% relative humidity. During flowering, lower humidity progressively to 40–50% in early flower and 35–45% in late flower to prevent mold on dense buds. Keep nighttime temperatures no more than 10°F below daytime temperatures to avoid condensation. For a complete breakdown of temperature targets at every growth stage, see our Cannabis Temperature Control guide.